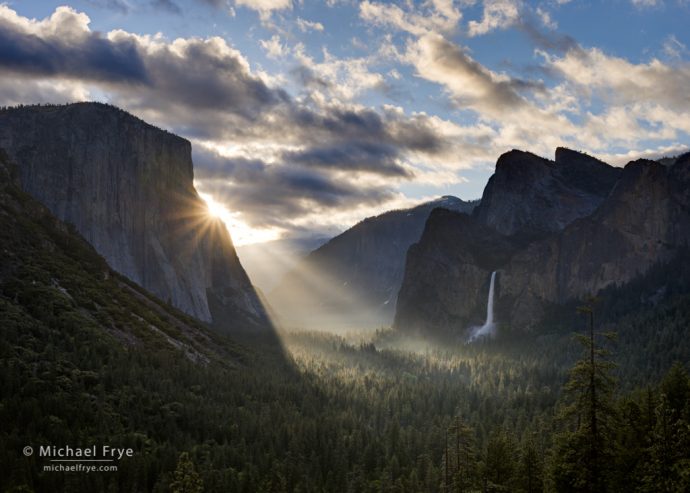
Sunbeams from Tunnel View, spring, Yosemite. Having a solid, well-practiced field routine helps me to calmly capture fleeting moments of light like this. 40mm, three auto-bracketed bracketed exposures at f/11, ISO 100.
Do you have a consistent field routine? Do you go through the same steps, in the same order, every time you take a photograph?
If you said no, you’re in good company. Most photographers I work with don’t have a solid, consistent field routine.
But I think having this routine is vital. Without one, you’re likely to forget important steps, like setting the right f-stop, or checking sharpness (and then kick yourself later when you realize your mistake). And when a rainbow suddenly appears over Yosemite Valley, or sunbeams break through the fog in a redwood forest, having a solid, consistent routine that you’ve practiced over and over will help you avoid panicking. You can just go through your normal routine and concentrate on putting one foot in front of the other, knowing that you won’t forget an important step.
And by making the technical aspects of photography a well-practiced routine, you can concentrate fully on more important things, like composition.
Now is a great time to practice your field routine. You don’t have to be in a national park; in fact it’s probably better if you’re not, so you can focus on practicing your technique, rather than striving to get a great shot. You can practice your field routine anywhere, including your yard or neighborhood.
Here’s my basic field routine, designed for photographing still subjects on a tripod. (Toward the end of this post I’ll show you how I modify this routine when the shutter speed matters, like when hand-holding, or photographing moving subjects.)
This routine has served me well in every situation for decades, so I know it works. But feel free to modify it to suit your style and choice of subject.
Step 1: Compose
First things first. You can’t make any decisions about exposure or focus without knowing what’s in the frame. Yet I constantly see people putting the cart before the horse. They start thinking about what f-stop they should use before they’ve even figured out their composition. Composition is probably the most important step in this routine, so give it the attention it deserves. Worry about camera settings later.
Step 2: Attach and Adjust Filters
Would a polarizer help? Do you need a graduated neutral-density filter? (I don’t use them, but many people do.) Now is the time to put them on and adjust them.
Step 3: Focus
This subject – focusing – deserves it’s own article, and I’ll delve into this in detail in a future post. (You can find that post here.) But for now I’ll give you a few basic guidelines.
Let’s assume that you want to get everything in focus (which probably applies to 99% of landscape photographs).
If everything in the photograph is far away, focusing can be easy. All the objects in the picture are essentially at infinity as far as the lens is concerned, so the focus distance for everything is the same. You can focus on any part of the frame, either manually or with autofocus, and be sure that you’re focusing at the right distance.
How far away am I talking about? That depends on the lens. You probably know that it’s easier to get everything in focus with wide-angle lenses than telephoto lenses. If you’re using a wide-angle lens (say 28mm or wider), it’s safe to say that if everything in the photograph is at least 50 feet away, then you don’t have to worry about depth of field, and you can focus anywhere in the frame. With a 50mm lens that “safe” distance is about 100 feet. With a 100mm lens it’s more like 250 feet. (These distances apply regardless of the sensor size, or crop factor. Only the actual focal length matters.)
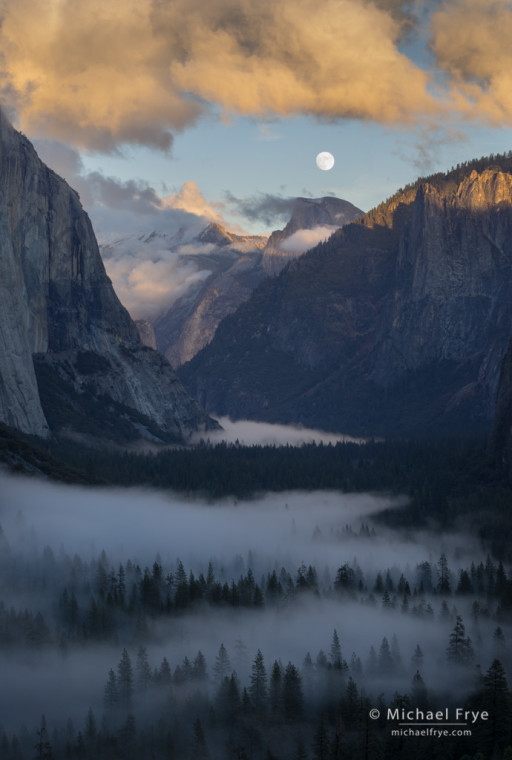
Moon rising above Yosemite Valley, Yosemite. Although the physical distance between the foreground and background in this photograph was large (about six or seven miles), the depth of field was not. The closest objects to the camera, the trees at the bottom of the frame, were about half a mile from the camera – essentially at infinity as far as the lens was concerned, even though I was using a telephoto lens. So focusing was easy; I could autofocus anywhere, knowing that every section of the photograph was at infinity, so the focus distance for everything was the same. 97mm, 1/10th sec. at f/11, ISO 100.
If there’s something in the frame that’s closer than that, you have to be more careful about where you focus. Again, this can get complex, so I’ll keep it as simple as possible for now.
Let’s say you’ve composed a photograph with a 24mm lens, where the closest object to the camera is 3 feet away, and the farthest object is at infinity. That’s a lot of depth, even for a wide-angle lens, so precise focusing is critical. Where (at what distance) should you focus? The short answer is: somewhere in between, and closer to the foreground than the background. (There’s more depth of field behind the spot you focus on than in front, so focusing closer to the foreground will allow you to stretch the depth of field to encompass both the closest and farthest objects.)
Can we get more precise than that? Absolutely. You could use a hyperfocal-distance chart or app, but I think these are cumbersome and slow.
You could use an aphorism like, “focus a third of the way into the frame,” or “focus a third of the way from the bottom of the frame.” These both have grains of truth, and work some of the time, but don’t work at all for many situations.
Instead, here’s an easy shortcut that I use all the time: the hyperfocal distance is approximately double the distance from the foreground. So if the closest object to the lens is three feet away, then focus at six feet. If the nearest object is ten feet away, then focus at twenty feet. Simple, right?
(Note that the hyperfocal distance is the optimum focusing distance for getting everything in focus from the foreground to infinity. Things get a little more complicated in situations where the background isn’t at infinity, like, for example, if you’re trying to get everything from 10 feet to 30 feet in focus. I go into more detail in this post.)
So in the example above, if I’m trying to get everything from three feet to infinity in focus with a 24mm lens, where should I focus? At double the distance from the nearest object: six feet. (You can use the distance scale on the lens for this, or just pick a spot six feet away and focus on it, either manually or with autofocus.)
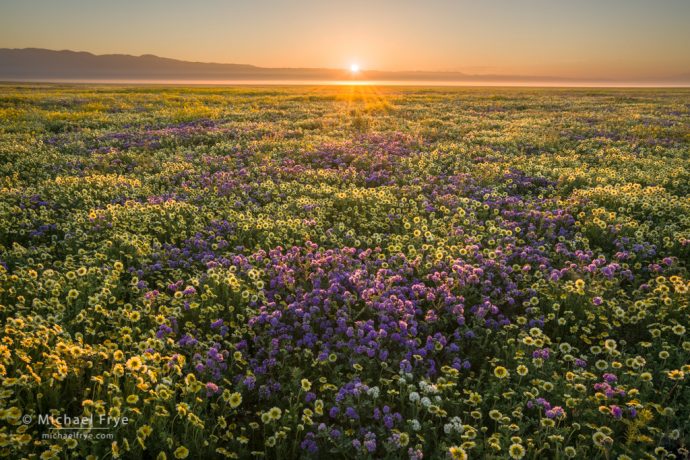
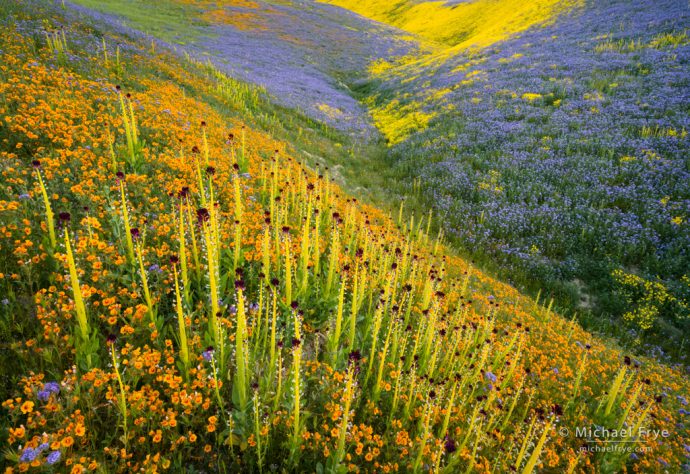
Endless flowers, Carrizo Plain NM, California. The focal length here was 22mm, and the nearest objects, the flowers at the very bottom of the frame, were about three feet from the lens. So I focused at double that distance: six feet (around the top of the clump of purple flowers in the center foreground). With wide-angle lenses, the hyperfocal distance is much closer to the foreground than the background! 22mm, three auto-bracketed exposures at f/16, ISO 100, blended with Lightroom’s HDR Merge.
There are limits of course. At f/16 (the smallest aperture I’m willing to use before diffraction becomes objectionable), I can get from three feet to infinity in focus with a 24mm lens focused at six feet. Anything closer than three feet requires a smaller aperture or focus stacking. With a super-wide lens, like 16mm, I can get everything from one-and-a-half feet to infinity in focus at f/16 (focused at double that distance: three feet). With a 50mm lens I can get about 13 feet to infinity in focus at f/16 (focused at 26 feet). And with a 100mm lens the range is about 50 feet to infinity (focused at 100 feet).
Again, I’ll write more about focusing later! But for now, to find the hyperfocal distance, determine how far away the closest object is from the lens, then focus at twice that distance.
Step 4: Set the Aperture
This step is actually pretty easy. For 95% of my photographs I use either f/11 or f/16.
If everything in the scene is far enough away to be at infinity, then depth of field isn’t an issue. You could use any aperture, so you may as well pick the f-stop where your lens is sharpest. For most lenses that’s in the middle range, somewhere between f/5.6 and f/11. I usually use f/11 to make sure I have enough depth of field. I might use f/8 or f/5.6 if everything is really far away, and I think my lens will be sharper at one of those wider apertures.
If the scene has some depth to it – enough depth to require focusing precisely, as described in the previous step – then I’ll use f/16. That’s the smallest aperture I’m willing to use before diffraction becomes objectionable. (For more about that topic, see this post.)
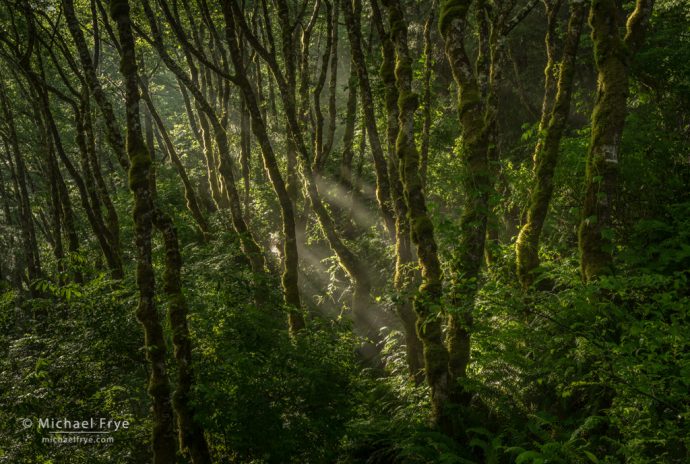
Alders and sunbeams, Redwood NP, California. When a scene has some depth, like this one, I typically use f/16 – the smallest aperture I’m willing to use before getting objectionable diffraction. Here the focal length was 50mm, and the closest thing to the camera was the leaves along the right edge of the frame, which were about 15 feet away. So I focused at double that distance (about 30 feet), and used f/16 to get sufficient depth of field. 50mm, 1/2 sec. at f/16, ISO 100.
If I can’t get everything in focus at f/16 I’ll focus-stack. If focus-stacking isn’t possible because of subject movement, I might, on rare occasions, use f/22. Or I’ll find a different composition that doesn’t require as much depth of field.
Obviously you need to use either aperture-priority or manual mode to perform this step!
Step 5: Set the Exposure
Exposure, again, is a complex subject that should have its own article. I’ve written about histograms here, and adjusting exposure here.
In going through your routine, you’ve already set an aperture based on the depth of field you think you need. So don’t touch that aperture! And if your camera is on a tripod, and the subject isn’t moving, use your camera’s native ISO (usually 100). So that leaves one more option for setting the exposure: the shutter speed. You can adjust the shutter speed in aperture-priority mode by changing your exposure compensation, or in manual mode by adjusting the shutter speed directly.
If you’re hand-holding, or the subject is moving, you may need to push up the ISO to get a fast enough shutter speed to avoid blurring the photo. You should still set the aperture first based on the depth of field you need, as described in Step 4. Then, in aperture-priority mode, set your exposure-compensation to get the right exposure, and next, adjust your ISO until you get the shutter speed you want. In manual mode, set the shutter speed you want, then adjust the ISO to get the desired exposure.
Wildflowers in the Temblor Range, with desert candles, blazing stars, tansy phacelia, and hillside daisies, Carrizo Plain NM, California. I needed a small aperture (f/16) to get everything in focus, but a slight breeze was moving the flowers, so I had to push the ISO up to 800 to get a fast enough shutter speed (1/6th of a second) to freeze the motion. The closest objects to the camera were the small flowers in the lower-left corner, or maybe the tall stalks in the center near the bottom, both of which were about three feet away, so I focused at twice that distance – six feet. 20mm, 1/6th sec. at f/16, ISO 800.
Of course there could be times when getting a fast enough shutter speed and small enough aperture requires using a super-high ISO. In most cases I’d rather have a sharp photograph that’s noisy than a less-noisy photograph that’s not sharp. I can deal with the noise later. But if the ISO gets really high (let’s say 3200 or more), then I might need to compromise. I could sacrifice some depth of field by using a wider aperture, or perhaps be willing to let some wind-blown flowers or leaves blur by using a slower shutter speed. Or maybe I’ll try a different composition that doesn’t require as much depth of field, or includes only non-moving objects.
Step 6: Take the Picture!
Make sure you use a cable release, remote, or self-timer if your camera is on a tripod. And use mirror lockup with SLRs to avoid vibrations that can cause blurry photos. (Mirror lockup is especially important with telephoto lenses.)
Step 7: Check Sharpness
Magnify the image on the back of the camera to make sure it’s sharp. Be sure to check the very closest objects in the foreground (usually near the bottom of the frame), and the very farthest objects in the background (usually near the top of the frame).
If something doesn’t look sharp, try to determine the cause. If nothing is sharp, then camera movement is probably the culprit. If the foreground looks sharper than the background, you’ve focused too close; try focusing a little further back. If the background looks sharper than the foreground, you’ve focused too far; try focusing a little closer. If the middle looks sharp, but both foreground and background look soft, then you need to use a smaller aperture to get more depth of field, or focus-stack.
When evaluating sharpness, always view the image at the same magnification, so that you’re comparing apples to apples. For most cameras, I’d suggest zooming in as far as possible, then backing off a step or two. Usually the maximum zoom level exceeds the resolution of the camera’s preview, so everything looks fuzzy. But backing off a step or two (how much depends on the camera) usually is just about right – enough magnification to evaluate sharpness, but not so much that everything looks blurred.
(For more about evaluating the causes of blurry photos, see this post.)
Step 8: Check the Exposure
Don’t just rely on looking at the image on the back of the camera; check the histogram and blinkies to evaluate your exposure. In most cases you don’t want to see any blinkies, and the brightest pixels should be near, but not touching, the right edge of the histogram. (Again, you can read more about histograms here.)
If the exposure is too light or dark, then adjust your exposure compensation (in aperture-priority mode) or shutter speed (in manual mode), re-take the picture, and check again. If there’s too much contrast to get detail in both highlights and shadows with one frame, then bracket exposures.
With colorful subjects, don’t forget to check the red channel of the histogram! (More about that here.)
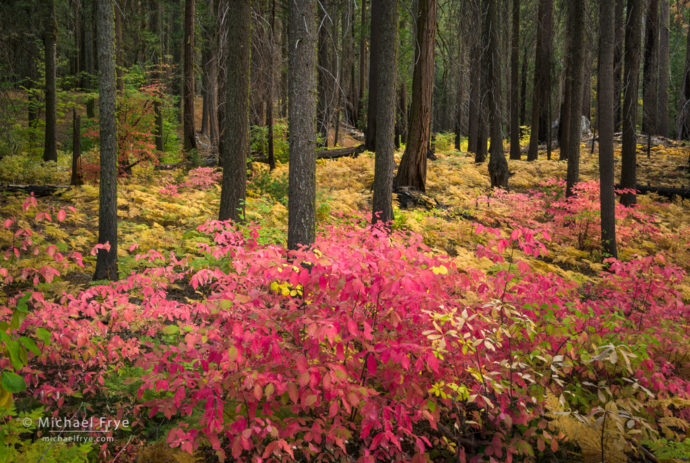
Autumn forest with dogwoods and ferns, Yosemite. After you take the photo, check your histogram and blinkies. And when photographing colorful subjects like this, be sure to check your red channel histogram too!
That’s it! That’s the whole routine. I’d suggest practicing particular steps that seem challenging to you before trying to practice the entire routine. If, for example, you think you need to practice the focusing step more, or haven’t yet figured out how to view the blinkies on your camera, do those things first. Then go out with your camera and tripod, find a subject (anything will do), and go through the whole routine. Then find another subject and do it again.
The more you practice, the better you’ll get. When you reach the point where you hardly have to think about it anymore, where the routine has become, well, routine, then you’ll be ready for anything. You can concentrate on seeing, and creativity, instead of wondering what f-stop you should use.
And when you encounter fleeting, beautiful light, you’ll know what to do: compose, put on filters, focus, set the aperture, set the exposure, and shoot! (And don’t forget to check the sharpness and exposure!)
— Michael Frye
P.S. Happy Easter and Passover! I hope you’re enjoying the holidays, despite the troubled times we’re living in.
Related Posts: How to Get Everything in Focus; Digital Photography Basics: Reading Histograms; Digital Photography Basics: Adjusting Exposure; Why F/16?; Five Causes of Blurry Photos; Six Essential Camera Settings for Landscape Photographers


Thanks Michael. One problem I always have when looking at the image on the back of my camera is trying to determine sharpness given how small the image is. When I start enlarging sections I’m fearful I’ve crossed over into pixel peeper land. Everything looks sharp if I don’t enlarge it, yet quite often, everything becomes fuzzy at some point of enlargement. Is there a sweet spot somewhere in this process?
John, what kind of camera do you have?
Hi Michael,
I used a Nikon D7100 for about 5 years. Last year I switched to a Fuji X-T2. Both APSC sensors.
Thank you.
Unfortunately I’m not that familiar with the X-T2, so I can’t recommend a specific magnification level for evaluating the sharpness of your images. As I said, usually zooming in as far as you can go is too far, to a point where you’ve exceeded the resolution of the image preview, and everything looks fuzzy. On most cameras I recommend zooming in as far as you can go, then backing off a step or two. But I don’t know if that’s true for the Fuji. It works with most Nikons and Canons.
Thanks for this nice article, very useful and simple information shared in an atractive way!! Thanks!!!
Thanks Andres!
Thanks for this very useful article. I just wish you had written this years ago…it would have saved me a lot of grief.
Thanks again.
Oh well, better late than never!
Thanks so much for these helpful tips Michael! Although I’ve been taking landscape photos for many years, I still get that feeling of panic when viewing a scene that I want to capture correctly. Having a solid routine like this one will help me feel more confident in the field when presented with the challenges of trying to remember all the technical stuff and help me focus more on things like composition. As Always,I appreciate you sharing your knowledge.
Panicking at certain moments, especially when photographing beautiful but fleeting moments of light, is really common. It happens to everyone. I do hope these tips help.
I agree with JohnC and would add a step about histogram. Looking at the back of the camera can be troublesome when I have to put on my glasses 🙁 I have learned to count on my blinkies and have to change my habits to check-out the back of my camera for focus and histogram. As long as I am quarantined to my yard I might as well practice-practice-practice. Thanks for the advice
Well I’ll ask you the same question that I asked John: what camera are you using?
Michael, I’m having trouble being able to reply directly to a previous comment. But i just wanted to say thank you for your response on the cameras and the back screen.
You’re welcome John.
I will copy your list & add this to my list
* Check for setting not visible on the LCD screen, like image stabilization on lens
I turn image stabilization on when I am taking pictures of kids, then forget about it when I mount the camera on a tripod. I have a bunch of long exposures which were not sharp due to this missed step.
Yeah, it might be a good idea to add something like checking image stabilization to your routine. Mirror lockup (for SLRs) is another item you could add. I tried to keep this as simple as possible, but feel free to add anything you find appropriate. Step 7, checking sharpness, should warn you about problems caused by leaving image stabilization on or not using mirror lockup, but of course it’s better to catch those things before taking the picture!
I’ll be sure to come back. 무료스포츠중계