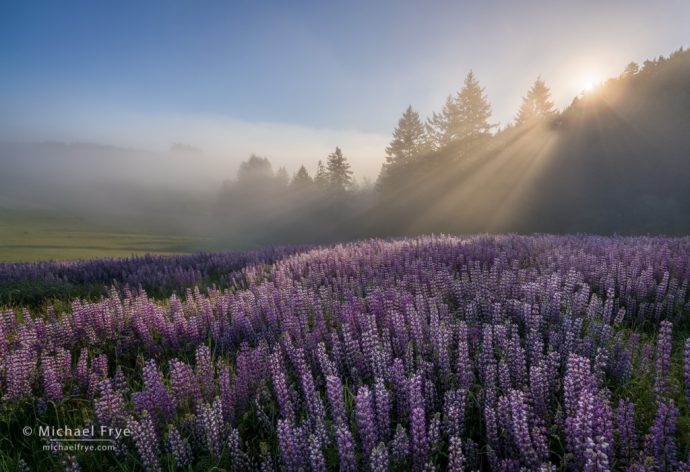
Sun rising over a field of lupines, Redwood NP, California. The focal length was 16mm, and the closest objects to the camera were the flowers at the very bottom of the frame, about two feet from the lens. I used my hyperfocal-distance shortcut to find the optimum focus distance, by doubling the distance from the closest object and focusing at four feet. Then I stopped to down to f/16 to get enough depth of field to make both the foreground and background sharp. 16mm, three bracketed exposures at f/16, ISO 100, blended with Lightroom’s HDR Merge.
In this recent post I talked about the importance of having a solid, well-practiced field routine, so that you don’t forget important steps, and you’ll be less likely to panic when the light gets interesting.
One of the steps in my routine, focusing, deserves a little more attention, so I’m going to cover that step in more detail here.
(In that previous post I covered some of the basics about focusing and finding the hyperfocal distance. The next section repeats some of that information, but with additional details. If you don’t want to go over that territory again, however, feel free to skip down to the section below called “When the Hyperfocal Distance Doesn’t Apply.”)
Some Basics
First, let’s assume that you want to get everything in focus (which probably applies to 99% of landscape photographs). If everything in the photograph is far away, focusing can be easy. All the objects in the picture are essentially at infinity as far as the lens is concerned, so the focus distance for everything is the same. You can focus on any part of the frame, either manually or with autofocus, and be sure that you’re focusing at the right distance.
How far away am I talking about? That depends on the lens. You probably know that it’s easier to get everything in focus with wide-angle lenses than telephoto lenses. If you’re using a wide-angle lens (say 28mm or wider), it’s safe to say that if everything in the photograph is at least 50 feet away, then you don’t have to worry about depth of field, and you can focus anywhere in the frame. With a 50mm lens that “safe” distance is about 100 feet. With a 100mm lens it’s more like 250 feet. (These distances apply regardless of the sensor size, or crop factor. Only the actual focal length matters.)
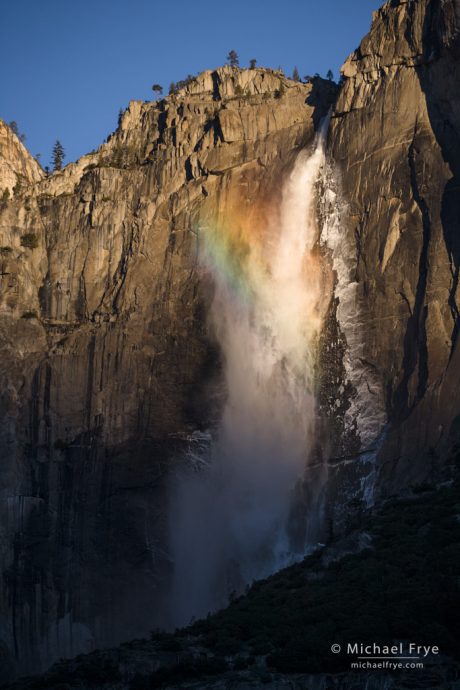
Upper Yosemite Fall and rainbow, Yosemite. Although I used a telephoto lens (145mm) for this photograph, the cliffs and waterfall were at least half a mile from the camera – essentially at infinity as far as the lens was concerned. So focusing was easy; I could autofocus anywhere, knowing that every section of the photograph was at infinity, so the focus distance for everything was the same. And since the depth of field was minimal I could use f/5.6, a fairly wide aperture, and still be sure of getting everything in focus. 145mm, 1/180th sec. at f/5.6, ISO 200.
If there’s something in the frame that’s closer than that, you have to be more careful about where you focus.
Let’s say you’ve composed a photograph with a 24mm lens, where the closest object to the camera is 3 feet away, and the farthest object is at infinity. That’s a lot of depth, even for a wide-angle lens, so precise focusing is critical. Where (at what distance) should you focus? The short answer is: somewhere in between, and closer to the foreground than the background. (There’s more depth of field behind the spot you focus on than in front, so focusing closer to the foreground will allow you to stretch the depth of field to encompass both the closest and farthest objects.)
Can we get more precise than that? Absolutely. You could use a hyperfocal-distance chart or app, but I find these cumbersome and slow.
You could use an aphorism like, “focus a third of the way into the frame,” or “focus a third of the way from the bottom of the frame.” These both have grains of truth, and work some of the time, but don’t work at all for many situations.
Finding the Hyperfocal Distance
So we need something better. Here’s a shortcut that I use all the time: the hyperfocal distance is approximately double the distance from the closest object to the lens. So if the closest object to the lens is three feet away, then the hyperfocal distance is six feet. If the closest object is ten feet away, then the hyperfocal distance is twenty feet. Simple, right?
(Note that the hyperfocal distance is the optimum focusing distance for getting everything in focus from the foreground to infinity. It doesn’t apply to situations where the background isn’t at infinity, like if you’re trying to get everything from 10 feet to 30 feet in focus. For those instances, see the section “When the Hyperfocal Distance Doesn’t Apply” below.)
So in the example above, if I’m trying to get everything from three feet to infinity in focus with a 24mm lens, where should I focus? I just double the distance from the closest object – three feet – and focus at six feet. (You can use the distance scale on the lens for this, or just pick a spot six feet away and focus on it, either manually or with autofocus.)
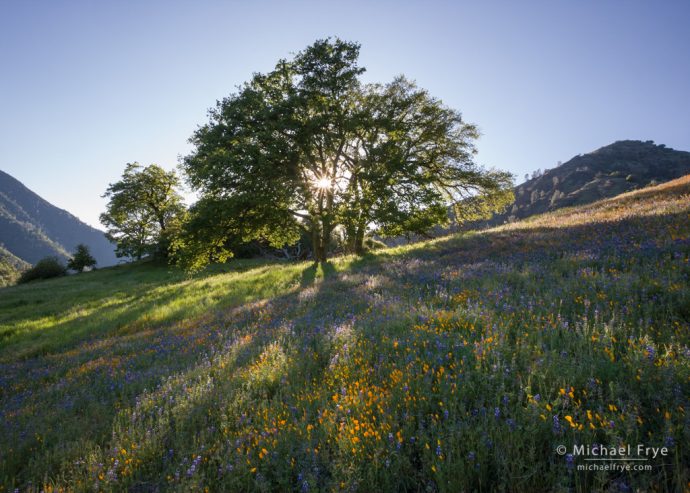
Poppies, lupines, and oaks, late afternoon, Sierra Nevada foothills, California. Again I used my hyperfocal-distance shortcut to find optimum focus distance. The closest objects, the flowers in the lower-right corner of the frame, were about three feet from the lens, so I doubled that distance and focused at six feet. 17mm, 1/30th sec. at f/16, ISO 400.
There are limits of course. Even with a wide lens, like 24mm, I can’t get everything from six inches to infinity in focus in one frame. Here are some practical limits for getting everything in focus with various focal lengths at f/16 (the smallest aperture I’m willing to use before diffraction becomes objectionable). (I’m using a depth of field app to calculate this, with a circle of confusion of .02mm, which matches my practical experience with today’s high-resolution sensors.)
16mm: 1.5 feet to infinity (at f/16, focused at 3 feet)
20mm: 2 feet to infinity (at f/16, focused at 4 feet)
24mm: 3 feet to infinity (at f/16, focused at 6 feet)
35mm: 6 feet to infinity (at f/16, focused at 12 feet)
50mm: 13 feet to infinity (at f/16, focused at 26 feet)
100mm: 50 feet to infinity (at f/16, focused at 100 feet)
200mm: 200 feet to infinity (at f/16, focused at 400 feet)
You don’t have to memorize this (though that wouldn’t hurt). I’m just trying to show you the limits of what’s possible. You’re just not going to be able to everything from 10 feet to infinity in focus with a 100mm lens (at least not with one frame).
When the Hyperfocal Distance Doesn’t Apply
The hyperfocal distance is the optimum focusing distance for getting everything in focus from the foreground to infinity. But what if the background isn’t at infinity? What if you’re trying to get a range from, say, 10 feet to 30 feet in focus?
Let’s get back to one of those aphorisms for a minute – the one that says “focus a third of the way into the frame.” I can’t see how this axiom applies when the background is at infinity. For instance, if the closest object to the camera is three feet away, and farthest object three miles away, then should you focus one mile away? No, of course not – that would be at infinity as far as the lens is concerned. You need to focus a lot closer than that.
But this axiom is actually pretty accurate when when dealing with finite distances (in other words, when the far distance isn’t infinity). For example, if you’re trying to get a range from 20 feet to 50 feet in focus, then focusing a third of the way between those two distances would bring you to 30 feet, which is just about right. You still have to estimate those distances, which I often find difficult, but it might at least get you into the ballpark.
What about that other aphorism, “Focus a third of the way from the bottom of the frame?” That idea also can work if you’re photographing flat ground that recedes into the distance evenly (like a meadow, field, playa, etc.) But if you have objects in front of other objects (like trees in front of other trees), it doesn’t work at all.
A Technique for Any Situation
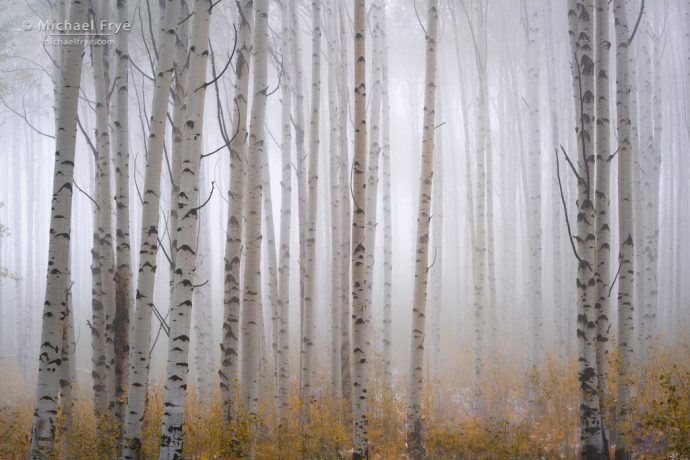
Aspens in fog, White River NF, Colorado. I used the “quick-and-dirty method,” described below, to find the optimum focus distance for this scene. 70mm, 1/6th sec. at f/16, ISO 200.
Instead, here’s a technique I’ve been using for decades that works in any situation, whether the range you’re trying to get in focus is three feet to infinity, or three inches to nine inches. And it works even when you have objects stacked in front of each other.
The basic concept is pretty simple. You focus on the closest thing to the camera, then focus on the farthest object, and then center the focusing ring halfway in between those distances. Not halfway out in the field, but halfway between the distance marks on the lens.
Let’s say I focus on the closest thing to the camera, and find out, according to the distance scale on my lens, that it’s seven feet away. Then I focus on the farthest object, and see that it’s 20 feet away. To find the optimum focusing point, I just manually turn the focus ring until it shows that I’m halfway between the 7-foot mark and the 20-foot mark on the distance scale of the lens, like this:
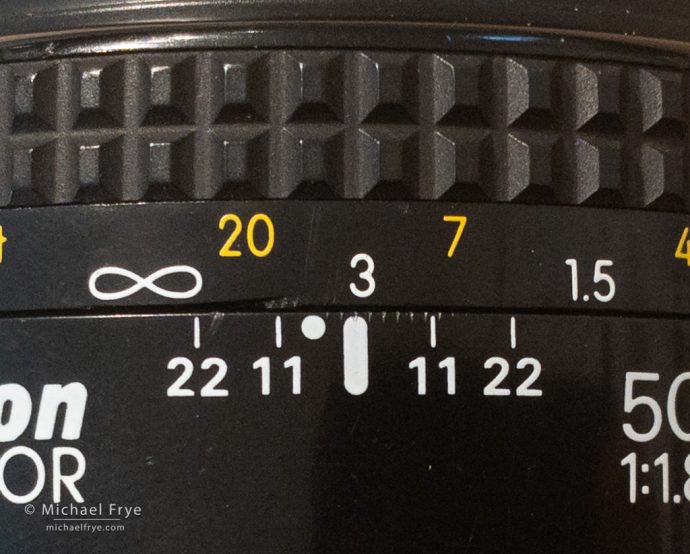
If the closest object to the camera is 7 feet away, and the farthest object is 20 feet away, then I focus halfway between those two marks on the lens. In this case I ended up focusing just past the 3-meter mark, at approximately 11 feet.
What if the closest or farthest distances don’t conveniently align with one of the foot or meter marks on the focusing ring? First, I focus on the closest thing to the camera, and mark that distance on the focusing ring with a fingernail. Then I focus on the farthest object, and mark that with another fingernail. Then I focus halfway between my fingernails, like this:
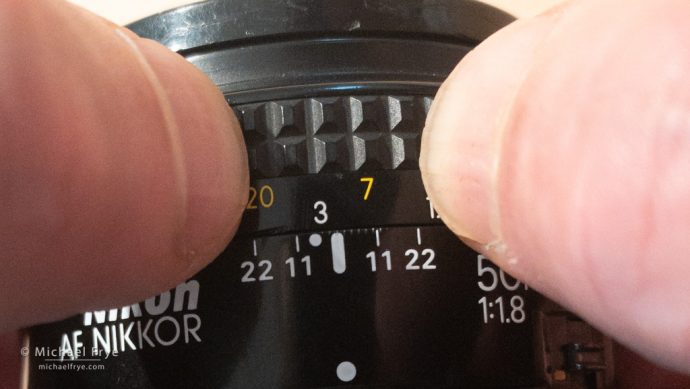
Instead of using foot or meter marks on the lens, you can just mark the closest and furthest points with your fingernails.
The Quick-and-Dirty Method
The technique I just described works really well if your lens actually has a distance scale. Unfortunately, many modern lenses don’t. So then what do you do? Try the “quick-and-dirty method.”
Again, use manual focus. Look through the viewfinder, and focus on the closest object to the camera. Next, focus on the farthest object from the camera. Then, still looking through the viewfinder, rock the focusing ring about halfway between those two distances. (Again, I’m talking about the distance you’re turning the focusing ring, not the distance between objects in the field.)
Check yourself by seeing if the foreground and background look equally out of focus. In other words, if the foreground looks sharper than the background, you’ve focused too close. If the background looks sharper than the foreground, you’ve focused too far. If both the foreground and background look equally fuzzy, then you’ve focused at the right distance. (I call this the Equally Fuzzy Principal.)
Here’s an example of the quick-and-dirty method. For this patch of flowers in our yard I first focused on the closest thing to the camera – the flowers in the lower-left corner of the frame:
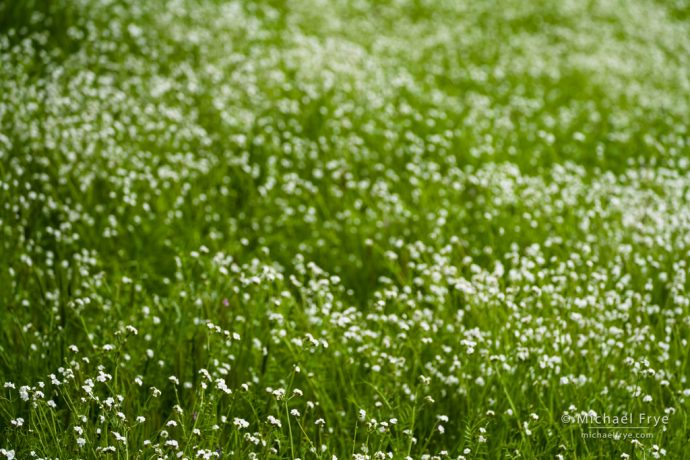
To use the quick-and-dirty method you first focus on the closest thing to the camera – in this case, the flowers in the lower-left corner.
Next, I focused on the farthest thing from the camera – the flowers in the upper-right corner:
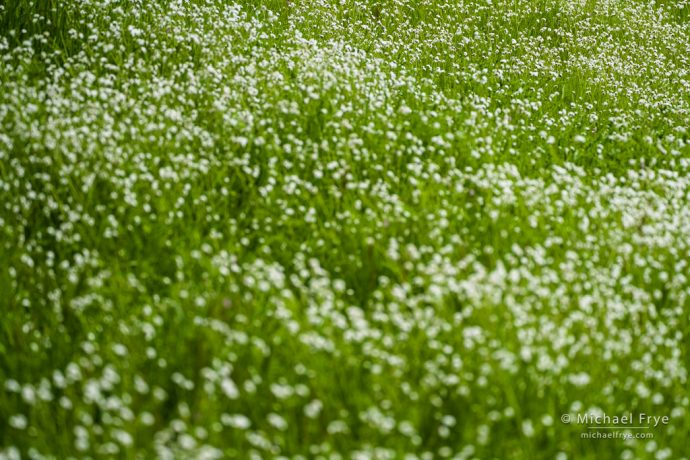
Next you focus on the farthest thing from the camera – here, the flowers in the upper-right corner.
Then I rocked the focusing ring about halfway between, and checked to see if the foreground and background were equally out of focus. Here, the flowers in the lower-left corner look about as fuzzy as the flowers in the upper-right corner, so it looks like I’m focused in the right spot:
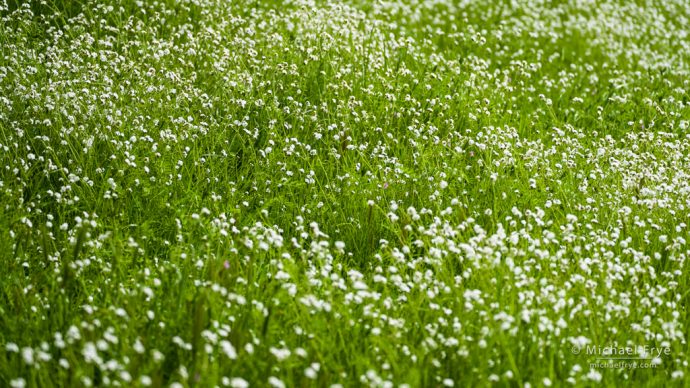
Then you rock the focusing ring about halfway in between, until the foreground and background look about equally fuzzy.
Here’s a short video that demonstrates this technique:
(If you can’t see the video, click here.)
I actually use this quick-and-dirty method more often than marking the distances on my lens, even if my lens has a distance scale. It’s faster.
However, for this quick-and-dirty method to work the aperture has to be wide open, otherwise it’s hard to see what’s in focus and what’s not. This isn’t a concern with SLRs, since the lens diaphragm stays open until you press the shutter. So even if you have the aperture set to f/16, the diaphragm will actually be wide open at f/2.8 or f/4 (or whatever your lens’s widest aperture is) until you press the shutter. This wide-open viewing aperture makes the depth of field shallow, allowing you to see what’s in focus more readily.
But with some mirrorless cameras the lens may actually be stopped down even before you press the shutter – depending on the camera and its settings. I can’t go into detail about every camera here, but I’ll mention that with a Sony mirrorless cameras and Sony lenses, the aperture is usually stopped down even before you press the shutter. So if you’ve set a smaller aperture like f/11 or f/16 it becomes hard to see precisely where you’ve focused, because there’s so much depth of field.
To change that you can either just manually adjust the f-stop to your widest aperture to focus (and then reset it to take the picture), or, in the menu, under Live View Display, turn the Setting Effect to Off, which makes the camera behave like an SLR by keeping the diaphragm open until you press the shutter. (Note that I recommend usually having the Setting Effect on, so that you get a live preview of your exposure. I put the Live View Display menu item in my Function menu for quick access, so I can turn the Setting Effect off and back on when needed.)
Naturally, any of these techniques take practice. You can practice focusing in your backyard – and now might be a good time to do that.
Setting the Aperture
Once you’ve found the optimum focusing distance, using any of the methods described above, then you need to pick an aperture, take the picture, and check sharpness.
Picking the aperture is actually pretty easy. For 95% of my photographs I use either f/11 or f/16.
If everything in the scene is far enough away to be at infinity, then depth of field isn’t an issue. You could use any aperture, so you may as well pick the f-stop where your lens is sharpest. For most lenses that’s in the middle range, somewhere between f/5.6 and f/11. I usually use f/11 to make sure I have enough depth of field. I might use f/8 or f/5.6 if everything is really far away, and I think my lens will be sharper at one of those wider apertures.
If the scene has some depth to it – enough depth to require focusing precisely, as described at length above – then I’ll use f/16. That’s the smallest aperture I’m willing to use before diffraction becomes objectionable. (For more about that topic, see this post.)

Sand dunes, Mesquite Flat Dunes, Death Valley. When a scene has some depth, like this one, I typically use f/16 – the smallest aperture I’m willing to use before getting objectionable diffraction. Here the focal length was 33mm, and the closest thing to the camera was the sand at the bottom of the frame, which was about 5 feet away. So I focused at double that distance (about 10 feet), and used f/16 to get sufficient depth of field. 33mm, 1/8 sec. at f/16, ISO 100.
Then take the picture, magnify the image on the back of the camera, and check to see if everything is in focus. If everything looks sharp, great – you’re done. If the foreground is sharp but the background is soft, then you’ve focused to close; adjust your focus and try again. If the background is sharp but the foreground is soft, then you’ve focused too far; adjust your focus and try again. If the middle is sharp, but both the foreground and background look soft, then you’re focused at the right distance, but you didn’t have sufficient depth of field. Try using a smaller aperture, or, if that doesn’t work, you’ll need to focus stack.
Obviously you need to set your exposure mode to either aperture-priority or manual to perform this step!
So that’s it. I know this is a lot to digest, but I wanted to be thorough, and give you a number of options so that you can pick what works best for you. Good luck – and don’t forget to practice!
— Michael Frye
Related Posts: Developing a Solid Field Routine; Focus-Stacking Season; Why F/16?
Michael Frye is a professional photographer specializing in landscapes and nature. He is the author or principal photographer of The Photographer’s Guide to Yosemite, Yosemite Meditations, Yosemite Meditations for Women, Yosemite Meditations for Adventurers, and Digital Landscape Photography: In the Footsteps of Ansel Adams and the Great Masters. He has also written three eBooks: Light & Land: Landscapes in the Digital Darkroom, Exposure for Outdoor Photography, and Landscapes in Lightroom: The Essential Step-by-Step Guide. Michael has written numerous magazine articles on the art and technique of photography, and his images have been published in over thirty countries around the world. Michael has lived either in or near Yosemite National Park since 1983, currently residing just outside the park in Mariposa, California.


Great information once again! Do you have any further advice/tips regarding getting everything in focus with the tilt function of a til-shift lens like the 17mm TSE
Thanks Kanwarjit! I’ve never used a tilt-shift lens, so I’m afraid I can’t offer any tips.
Excellent rundown of a complex situation!
Thanks Alan… complex indeed!
Great article, sometimes it’s good to go back to basics as you sometimes forget it!
This is great, thanks Michael. It was much easier when I used the Pentax 67II film camera. With digital it certainly has been frustrating at times with no markings. And as you’ve mentioned, the 1/3rd of the way in doesn’t always pan out. Good tips here to put into practice.
Thanks – I’m glad you found this helpful!
Great explanation, Michael. I’ve never seen this broken down in as simple a way as your Quick and Dirty breakdown. I’ve never been a fan of hyperfocal focusing as I’m pretty lousy at judging distances; will definitely give your method a go next time I’m out in the field!
Thanks Michael – I’m glad you found this helpful!
Great tutorial Micheal, appreciate you sharing this information. I will be out in the backyard today enjoying the break in the weather and putting these lessons to work!
Thanks Ciaran – and the backyard is a great place to practice.
Thank you for this valuable lesson, Michael. I stumbled here searching for a solution to my particular situation, which is shooting video of a stage production. I know it’s different from landscape photography, but perhaps you could advise me with the knowledge and experience you have.
For my wide shot, I have a 24-70mm lens pointed at the stage from maybe 15 feet in front. Depending on placement I will have it set somewhere between 24-35mm to capture the whole stage. To get the most light while giving myself some space to move, I’m trying f/8. I have shot f/5.6 in the past and there were shots that were perfectly focused and shots that were lacking (depending on how I manually focused).
The stage is not huge but has some depth. The back is perhaps 30 to 40 feet from the camera. Actors will be mostly downstage toward the camera, but often in the middle, and at times at the back. My question is, do the principles you’ve laid out here apply to my context?
Can I focus on where the nearest and farthest actors will be, and adjust to the midpoint? Is there a better way for this situation?
Sorry for all the words, but if you can give me some pointers I would appreciate it! Thanks again, and I’ll be back for more!
You’re welcome John.
> Can I focus on where the nearest and farthest actors will be, and adjust to the midpoint? Is there a better way for this situation?
That sounds like it would work. But it’s not the midpoint out on stage, rather halfway between the closest and farthest focus distances on your lens. Or, if you’re thinking of the distances on stage, it would be about a third of the distance between the closest and farthest spots the actors will be (focused closer to the foreground – a third of the way back from the closest spot). If in doubt it’s always better to focus too close than too far, as there’s more depth of field behind the spot you’re focused on than in front.
It might be better to autofocus on the actors as they move about. That would be more precise, and allow you to use wider apertures. But I take it there’s a reason you can’t do that… ? Maybe you’re firing the camera remotely? Or the light levels are too low for autofocus to work well?
Hi Michael, I’m making another comment because I can’t reply to yours.
I will definitely try to aim for a third of the way between the actors on stage; my lens is the Sigma 24-70mm 2.8 and it’s focus-by-wire so your method of measuring halfway on the lens would be tough, I’m assuming. In the past I have tried focusing on the closest point but now I see that’s incorrect. I’m also limited to a 5-inch monitor while shooting and it’s very difficult to guage sharpness, even zoomed in or with focus peaking. What may look sharp in the moment is often blurry on my large monitor at home, and by then it’s too late.
As for autofocus, on my camera, the Lumix S5, it’s not so reliable! I do need to man a second camera during the performance for tight shots, so the wide cam needs to be set once and trusted to do its job. I’ve tried setting it to continuous AF (human detection/tracking) but it has been inconsistent. I agree that selecting the actors for AF as they move about would be an ideal solution if I were behind the camera, but with the amount of actors/movement, the pulsing of the AF as it locks on would make the video unusable.
There are two more rehearsals until the performance this weekend so I will practice what you’ve told me and hopefully figure it out! Thank you so much for taking the time to help.
> my lens is the Sigma 24-70mm 2.8 and it’s focus-by-wire so your method of measuring halfway on the lens would be tough, I’m assuming.
Yes, focus-by-wire doesn’t work with that method. I’d try focusing a quarter to a third of the distance from the closest to the farthest spot you’re likely to see the actors.
What lens and settings would you recommend to get everything in focus in a shot of a basketball arena from the top side of the arena looking down to the court? I have a Nikon D4S body and pretty much every lens to get the job done. Would you use a 35MM or try to get it with a 24MM and set it at f16?
Use the lens that will give you the composition you want. Composition ALWAYS comes first. Only when you know the composition you want can you then figure out the other details, like f-stop. Once you know the composition you want, then figure out what’s the closest thing to the camera in that composition, and the farthest thing. From there you can figure out where to focus, and then what f-stop you need to get everything in focus (as I describe here).
Your simplistic methods for roughly calculating hyperfocal distance are the best I’ve seen! I’m very pleased and impressed.
Thanks Peter! Glad you found that helpful.