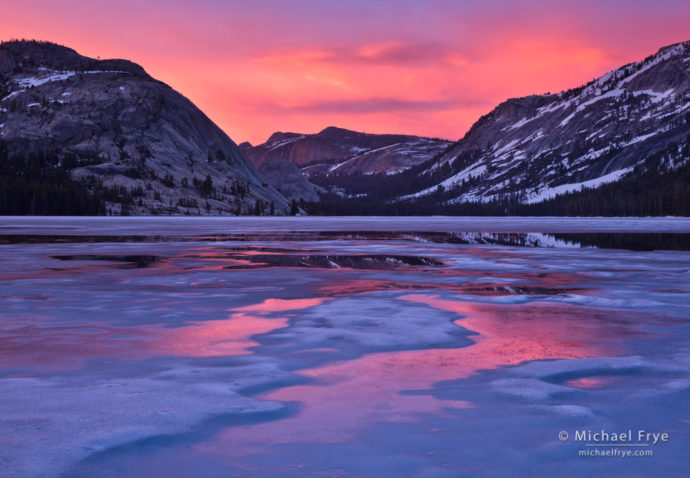
Sunset at Tenaya Lake, Yosemite. It’s important to check the red channel in the histogram when photographing warm, saturated colors like this.
Every camera has default settings that seem to have been designed for beginning photographers who are handholding the camera. When teaching workshops I frequently dive into the menus on student’s cameras to change those settings (with their permission of course) to ones more suitable for landscape photographers working on a tripod. And the students usually tell me they wished they’d known about those settings sooner.
So here are six camera settings that I urge you to consider changing. These changes will make operating the camera easier, and in some cases might be the difference between getting the shot and missing it.
Turn Auto Rotation Off
By default, most cameras automatically rotate vertical images so that they appear in their correct orientation when holding the camera in a horizontal position. This might make sense when you’re handholding (although I don’t like it then either), but makes absolutely no sense when using a tripod. On a tripod, with auto rotation on, the image appears sideways, so you have to twist your head around to see the image properly. What’s more, the image is tiny, because it’s not using all the screen space available:
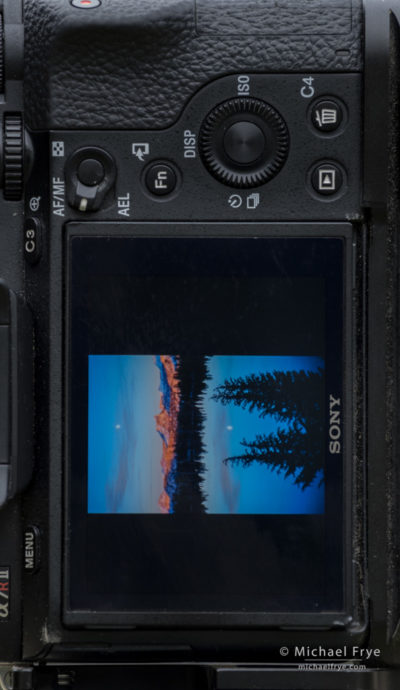
With auto-rotation on, vertical images are skewed sideways, and don’t fill the available space
After turning auto rotation off the image appears in its correct orientation, and fills the whole screen:
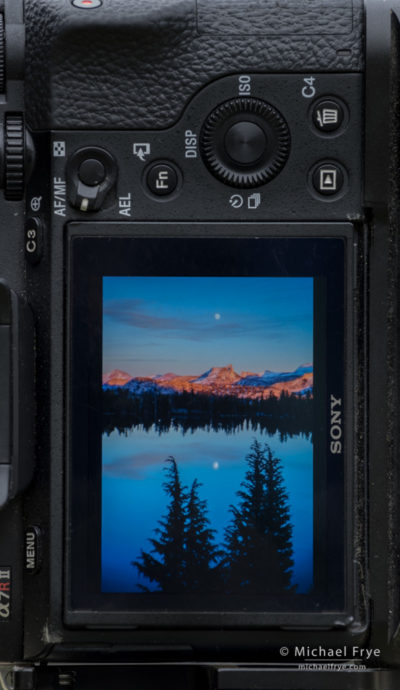
With auto-rotation off, vertical images are displayed in their correct orientation, and fill the whole LCD screen
Much better!
Every camera is different, so I can’t give you exact directions for changing this annoying auto-rotation behavior. With Canon models look for a menu item called Auto Rotate. Choose the option for rotating images only on the computer monitor but not the camera. With Nikons the menu item is labeled Rotate Tall; you want to turn it off. On Sonys look for Display Rotation and turn it to Off.
Set Auto Review to Hold
By default most cameras briefly display the image you’ve just taken on the back of the camera. This is called Auto Review on most cameras and the default setting is usually two seconds – hardly enough time to see the image, much less evaluate it. Once the image disappears after two seconds you can always press the playback button to see the image again, but that’s an extra, unnecessary step. Instead, I recommend delving into the menus to find the Auto Review option (on Nikons it’s called Image Review), and set it to Hold. That means the image you’ve just taken will remain on the back of the camera until you press another button (like the shutter button or menu button), allowing you to evaluate the image at your leisure.
Of course if you leave the image displayed on the back of your camera for a long time that will drain your battery, but you just have to remember to lightly press the shutter button to make the image disappear when you’re done looking at it.
(Note that Sony cameras don’t have the Hold option; unfortunately the longest you can set the Auto Review for is 10 seconds, which is what I set it to.)
Enable the Highlight Alert
On many cameras the highlight alert (which everyone calls the blinkies) is not enabled by default. Fix that now! The highlight alert makes any part of an image that’s overexposed flash on and off, and is one of the most important tools for evaluating exposures in the field. In most cases you don’t want to see any part of an image blinking at you; if you do the photograph is probably overexposed, and you want to make a darker exposure.
On Canon cameras find the menu item labeled Highlight Alert and turn it on. With Sony cameras the highlight alert is on by default – in fact there’s no way to turn it off. On Nikons go to the playback menu and find Playback Display Options. Check Highlights (and while you’re at it, check the RGB histogram), and be sure to select Done to make the changes stick.
Once the highlight alert is enabled, you typically have to cycle through different display modes to see the blinkies when reviewing an image. On some Canon models you’ll see the blinkies (if there are any) in any image-review mode. On other Canon models you only see the blinkies when the histogram is also visible; just keep hitting the Info button until you see the histogram and the blinkies (if there are any). With Nikons press the up or down arrows on the control dial until you find the screen labeled Highlights (unless you’ve set up your camera so that pressing the left and right arrows cycles through the display modes). On Sony cameras press the button labeled “Disp” (on the control wheel) until you see the screen with the histogram, where you’ll also see blinkies (if there are any).
Enable the RGB Histogram
By default most cameras only show you the luminance histogram, not the RGB histogram. But the ability to see histograms for the individual red, green, and blue color channels is essential when photographing scenes with rich, saturated colors, like sunsets or autumn leaves. You want to pay particular attention to the red channel in those situations, and make sure the red channel isn’t clipped. You don’t want to see the red channel pushed up against the right edge, or find a spike at the right edge, like this:
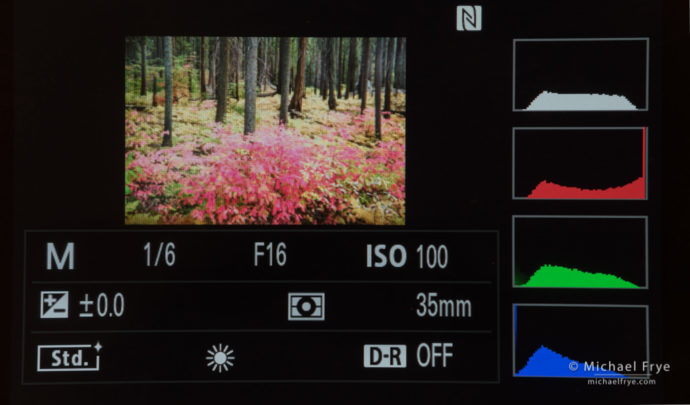
The RGB histogram on my Sony A7rII, showing clipping in the red channel
Notice that the luminance histogram (at the top in this illustration) looks fine, with nothing pushed against either edge. You wouldn’t see any blinkies here, because the blinkies are based on that luminance histogram. But the red channel has a big spike at the right edge, showing that it’s overexposed. Overexposed reds and yellows are usually very difficult to work with later, even in Raw files. No matter what you do they end up looking weird and splotchy or posterized. So if the red channel is clipped you need to make a darker exposure. Keep going darker until you don’t see any clipping in the red channel. Or you can bracket and blend the exposures together later – just make sure at least one of your bracketed exposures shows no clipping in the red channel.
But first you need to enable the RGB histogram. On Canon cameras there’s usually a menu item specifically for the histogram; find that, and turn on the RGB histogram. With Nikons you’ll find a checkbox for the RGB histogram under Playback Display Options (make sure you select Done to make it stick). On Sonys the RGB histogram is always on.
Once the RGB histogram is enabled you will again have to cycle through different playback display options to see it (as described in the previous section).
Turn Off Image Stabilization on a Tripod
Image stabilization (or Vibration Reduction for Nikon users) is designed for handholding. If the camera is on a tripod and the camera senses any vibration, image stabilization will try to compensate for that vibration, but won’t do it correctly, and will actually blur the photograph. Turn off image stabilization when using a tripod!
Some lenses will sense when the camera is on a tripod and automatically turn image stabilization off. That’s a great feature, but unless you’re sure your lens will do that, the safest bet is to turn off image stabilization manually.
Use Back-Button Focus
By default, with every camera I know of, you activate autofocus by pressing the shutter button halfway down. But I prefer to separate those two functions – focusing and pressing the shutter – by using back-button focus. And I’m not alone: virtually every professional photographer I know uses back-button focus.
Back-button focus takes the autofocus function away from the shutter button and assigns it to a button near the top-right corner on the back of the camera. You use your right forefinger to press the shutter (as usual), and your thumb to activate the autofocus.
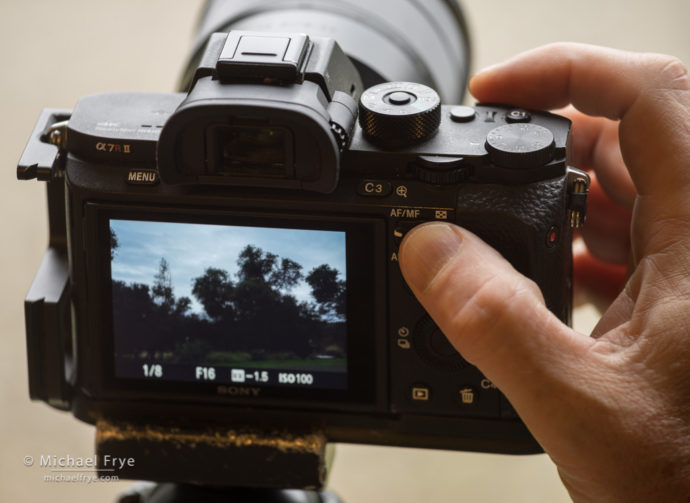
Opertaing back-button focus on my Sony A7rII. I have it set so the AF/MF button activates autofocus.
Divorcing autofocus from the shutter button has many advantages. First, you don’t have to flip a switch to change from autofocus to manual focus, because the camera is always in both modes. Just leave autofocus on all the time, and if you want autofocus, press the button on the back of the camera. If you want to focus manually, just turn the focusing ring; the camera won’t override your manual focus when you press the shutter because autofocus isn’t attached to the shutter button anymore.
For that matter, you can just leave the camera in continuous focus mode, rather than changing from single-shot focus to continuous focus. If you want single-shot focus, just press the focus button on the back until focus is locked, then let go. You can then keep pressing the shutter as many times as you want, but the focus will stay locked at the same distance until you press the back focus button again. If you want continuous focus, just press and hold the back focus button while you follow your subject.
Let’s say you want to focus on an off-center subject. Rather than moving the focus point, or attempting to press the shutter halfway down to lock it on your subject, just move the camera until the focus point is on your subject, then press the back focus button until focus locks, and let go. You can then recompose and fire away, knowing that the focus won’t change and will still be locked at the right distance for your subject.
I could go on and on, but you get the point. The only potential disadvantage of using back-button focus is that you might forget to press the back button and end up with an out-of-focus image. It takes a little practice at first to get into the habit of pressing that back button, but once you get the hang of it you won’t go back.
Unfortunately I can’t give specific instructions on how to set up back-button focus on your camera, because the procedure varies so much from one model to the next, even within the same brand. I’d suggest Googling “back button focus (your camera model).” You should get a bunch of hits, including YouTube videos. And back-button focus isn’t available on some models, but should be an option on most higher-end cameras.
Two More Obvious Ones
I said there were six of these settings, but I’m going to throw in two more obvious ones. First, I recommend using Raw mode for the highest image quality and most flexibility in adjusting the images later. Second, if you’re using Raw mode there’s little reason to adjust the white balance in the camera, since with the Raw images it’s easy to adjust the white balance later in software, so most of the time you can just set the white balance to Auto.
Okay, that’s really it! I hope you find these tips helpful.
— Michael Frye
Related Posts: Digital Photography Basics: Reading Histograms; Digital Photography Basics: Adjusting Exposure
Michael Frye is a professional photographer specializing in landscapes and nature. He is the author or principal photographer of The Photographer’s Guide to Yosemite, Yosemite Meditations, Yosemite Meditations for Women, Yosemite Meditations for Adventurers, and Digital Landscape Photography: In the Footsteps of Ansel Adams and the Great Masters. He has also written three eBooks: Light & Land: Landscapes in the Digital Darkroom, Exposure for Outdoor Photography, and Landscapes in Lightroom: The Essential Step-by-Step Guide. Michael has written numerous magazine articles on the art and technique of photography, and his images have been published in over thirty countries around the world. Michael has lived either in or near Yosemite National Park since 1983, currently residing just outside the park in Mariposa, California.


Excellent advice on all counts, Michael.
Michael, Your advice is of great help to me. When I purchased a new DSLR camera the manual doesn’t explain why or the reason. You explain everything that I can understand. Thanks Michael!
Randy P.
You’re welcome Randy – glad this was helpful to you.
Thank you, Michael. Best description I’ve read yet on back button focus. I’ve been using the back button for exposure lock on my D610, then recomposing and focusing with the shutter release. Now I’ll be rethinking that approach.
Glad that helped Brian – thanks!
Good article Michael. As one that leaves my camera turned on all day long, I leave review time set to 8 seconds rather than HOLD because I don’t trust myself to clear it every time. Perhaps that’s my age creeping up on me.
Great photo to start the discussion from. When did you capture that? Road still open?
Thanks Mike. I’m not sure why you would leave your camera turned on all day long, but whatever works! The photo of Tenaya Lake is from June, 2011. The Tioga and Glacier Point roads are closed. The road conditions number is 209-372-0200.
Excellent article…I learned so much about my Nikon…and in language I can understand.
Thanks S!
For these same tips apply to portrait photography?
Well I specifically said that these settings are for landscape photography on a tripod. But for handheld portrait photography I would still set Auto Review to Hold, enable both the highlight alert and the RGB histogram (you’d want to watch the red channel if someone was wearing a red or yellow shirt), and use back-button focus. Turning off auto-rotation is a matter of preference when handholding, but I would recommend it when using a tripod. You’d want to turn on image stabilization if handholding, turn it off when using a tripod.
Thanks for your guidance.
You’re welcome Jay!
Hi Michael, but shooting in RAW, the histogram is not right … it shaws data of the jpeg …am I doing wrong?
Yes, the histogram shows the data from the JPEG, but that doesn’t mean the histogram is giving you erroneous information. The histogram is still going to be very similar to the histogram for the Raw file, and is still a highly valuable tool for evaluating exposure, including the exposure for the red channel. I’d recommend using the Standard picture style (picture control with Nikons, Creative Style with Sonys) and using the Abode RGB color space. The picture style and the color space only affect JPEGs, but the Standard style is usually very close to the Raw file at Adobe’s default settings in Lightroom or Adobe Camera Raw, so will give you a pretty accurate histogram. The slightly-larger color space of Adobe RGB will also help make the histogram a little more accurate for the Raw file in Adobe’s (very large) default color space of ProPhoto RGB. I thought about including those settings in this post too, but, well, I didn’t want to clutter it up too much.
Well written, Michael. I’m glad you included the suggestion to shoot RAW, but it should be noted that the RGB histogram on your camera is going to display the values for the JPG embedded in the raw file. There’s usually a little headroom even if one channel is clipped, but this varies by camera so people would be best served by doing their own experiments. It’s digital after all; you can just delete the results when you’re done!
Mike.
Thanks Mike. You’re right, of course, about the back-of-the-camera histogram being based on a JPEG image rather than the actual data of the Raw file, but, as I said to Antonio, that doesn’t mean the histogram is giving you erroneous information. The histogram for the JPEG will be very close to the histogram for the Raw file, especially if you use the Standard Picture Style and Adobe RGB color space. I personally would not feel comfortable having any clipping in the red channel in any situation, even knowing that the histogram for the JPEG might be slightly different than the true information in the Raw capture. The differences are slight, and too small to count on for me.
The differences are also usually compensated by the lack of detail in most back-of-the-camera histograms. In other words, if the histogram on the LCD screen would actually show you when tiny areas of the red channel are overexposed, you might find a difference between what you’re seeing in that histogram on the camera vs. what you find when looking at the Raw file in software. But since most camera’s histograms aren’t very detailed and accurate, they don’t show small clipped areas in the red channel, so when you think you’ve made a dark enough exposure to get rid of red channel clipping you actually haven’t, but the little extra leeway you get in the Raw file compensates for that and ensures that you still have a usable file. In other words, those two factors cancel each other out. It would be nice if you could see blinkies for an individual channel, wouldn’t it? Oh wait, you can – with Nikons. Nice feature that I wish every camera had.
Of course testing is a good idea. But there’s a lot that goes into that. You’d have to test with, say, a sunset, and bracket exposures by half-stop or even third-stop increments, then compare the back-of-the-camera histograms (don’t erase your card after downloading!) with the Raw images in Lightroom or Adobe Camera Raw. But you would want to use the 2010 Process Version in either Lightroom or Adobe Camera Raw, rather than the 2012 Process Version, because the automatic highlight recovery in the 2012 process would skew the results.
The bottom line for me is that I’m very cautious with the red channel, because I’ve experienced too many situations where a blown red channel has caused me grief. I’d rather err on the side of underexposure (or bracket exposures) if I have any doubts whatsoever about red channel clipping.
Michael,
One of your best technical blogs with soundly reasoned explanations. I concur with each of your points, but a question occurred to me about choosing to use the 2010 Process Version in ACR or Lightroom for comparing the results of red channel testing. Is this just for the test, or do you not use the 2012 Process Version for your landscape work? I didn’t realize how much the red channel could be affected by the automatic highlight recovery feature. With all the sunrise/sunset opportunities here in Southwest Florida, that becomes a very important consideration for me!
Thank you so much for covering the RGB histogram and, especially, the attention we need to pay to that red channel!
Prayers for all affected by the Detwiler Fire and our beloved Yosemite!
Thanks Ross. I was only suggesting the 2010 Process Version for testing to compare Raw histograms with back-of-the Camera histograms. I use the 2012 Process for processing my real photographs. The automatic highlight recovery is generally a good thing, but can cause confusion when comparing what you see on the back of the camera with what you see in Lightroom or Adobe Camera Raw.
Michael,
Happy for the clarification Michael. I suspected that was only for comparative purposes, but thank you for pointing out that little-known point about the automatic highlight recovery feature in the 2012 Process Version. I look forward to more great tips and techniques. Thanks!
The 6 tips were valuable. You taught me some but glad to have the others. The focus might trap me a couple times. I love receiving your blog. Things to learn. Beauty to view. Thank you.
Thanks Janet – I’m glad you found these helpful!
Hi Michael,
Thanks for sharing that info with us. There are so many controls on my Canon 5d ii that I’d never come close to learning them. Can’t think of how many times I’ve contorted my neck trying to see vertical images, or watched them expire in an instant! And checking back over recent exposures, I could see instances where the red bar was backed up to the right…Hope you have a Happy Thanksgiving!
I’m happy this helped Michael!
Very good tips, Michael! I have the same settings except auto review which I always turn off completely. I often make several frames of the same composition and then review them all.
Thanks Artem. Obviously everyone does things a little differently, so whatever works for you.
Great ideas. I see the logic of separating focus and shutter, now will have to get used to it. Can’t wait till t weekend to t out there and try some of these!
Thanks Marty – glad you found this helpful!
Thanks for the tips. Question: what are the problems with simply leaving the camera set to continuous mode?
You’re welcome Michael. I don’t see any problem with leaving the camera in continuous-focus mode with back-button focus – in fact I recommend continuous-focus mode when using back-button focus, as I talked about in this post. If you’re asking about continuous shutter, I don’t see any problem with that either. I always leave my camera in continuous-shutter mode, then just press once and let go if I want one shot, or hold down the button if I want to take a burst. I takes a little practice to be able to avoid capturing multiple frames when you only want one, but once you get the hang of it you don’t have to switch back and forth between single and continuous.
For most people, (who don’t need to shoot RAW or need to care about low light) get your iphone out and shoot, it’s all quite easy.
You don’t even need Lightroom after, just use built in app.
Done.
Well there’s no doubt that you can take great photos on a smartphone. Photography is always more about light and composition than gear. Having said that, there are some big limitations to smartphone cameras. Perhaps the biggest one is being restricted to only one focal length. Then there’s the noise, the low resolution, slow autofocus, lack of a viewfinder (for following action), and on and on.
“Let’s say you want to focus on an off-center subject. Rather than moving the focus point, or attempting to press the shutter halfway down to lock it on your subject, just move the camera until the focus point is on your subject, then press the back focus button until focus locks, and let go. You can then recompose and fire away, knowing that the focus won’t change and will still be locked at the right distance for your subject.”
I am afraid that can lead to back-focusing when the depth of field is shallow.
Thanks for your comment John. By “back-focusing,” I assume you’re not talking about using the button on the back of the camera, so do you mean focusing behind the subject? If so, there’s no reason that would happen more often using back-button focus than by using the shutter button to focus – unless the subject moves, in which case you just hit the back-focus button again.
I meant back-focusing, i.e., achieving focus on a plane behind the desired plane of focus and it occurs equally with focus action on the shutter or back focus button, if one points the camera sideways to focus.
If one focuses a point off-centered by pointing/rotating the camera towards that point, one is measuring a distance larger than the distance (perpendicular) to the focal plane where that point of interest lies, therefore attaining focus on a plane behind the correct plane once the camera is repositioned for shooting. This may not be an issue with large DOF, but it is when DOF is narrow.
Thanks for clarifying John. I don’t think anyone points the camera perpendicular to their intended composition to focus. You might point the camera a few degrees to the left or right of your intended composition to on your subject, then recompose. In that case the difference in camera-to-subject distance might be a few millimeters, at most. If you were extremely close to the subject, with a long lens and wide-open aperture, that might matter. But 99% of the time it wouldn’t make a difference.
Good tips but I still like to adjust White Balance in camera to make reviewing in the field and picking selects easier. The closer they are to the final image, the easier it is to cull them. Also, when someone asks to see your photos in the LCD, you don’t have to explain the way the photos look while your audience rolls their eyes. 😉
That’s totally fine – whatever works for you. But when pressed for time setting the white balance is a step you should skip.
Agreed. I don’t need it to be exact for my purposes, just in the ballpark. I merely set it to the closest preset. When I’m doing portraits, I’ll get out my ColorChecker.
The Enable the RGB Histogram suggestion was great! I had seen the other suggestions before and implemented those already, but had not seen the RGB histogram called out before. I have been using the light balance histogram for some time. Now I can appreciate why some of my photos looked more washed out than I expected. Thank you Michael.
I’m glad you found that helpful Cass!
If I may offer a suggestion for a 7th…
Turn off that dadgum auto-focus confirmation beep! 🙂
I like that one Bob. 🙂