by Michael Frye | Apr 20, 2020 | Advanced Techniques, Digital Photography Basics, Photography Tips
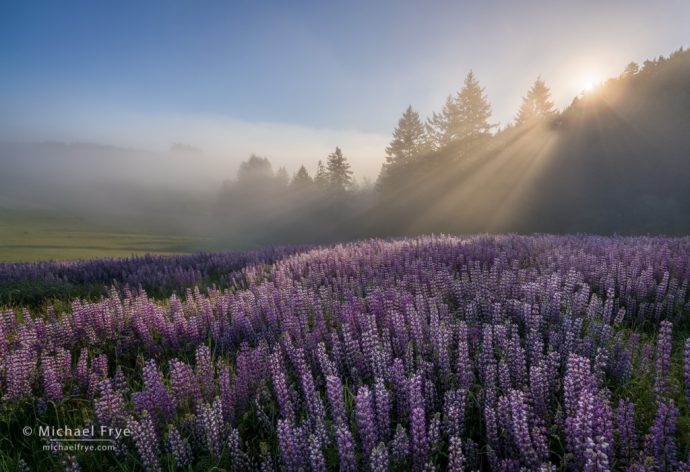
Sun rising over a field of lupines, Redwood NP, California. The focal length was 16mm, and the closest objects to the camera were the flowers at the very bottom of the frame, about two feet from the lens. I used my hyperfocal-distance shortcut to find the optimum focus distance, by doubling the distance from the closest object and focusing at four feet. Then I stopped to down to f/16 to get enough depth of field to make both the foreground and background sharp. 16mm, three bracketed exposures at f/16, ISO 100, blended with Lightroom’s HDR Merge.
In this recent post I talked about the importance of having a solid, well-practiced field routine, so that you don’t forget important steps, and you’ll be less likely to panic when the light gets interesting.
One of the steps in my routine, focusing, deserves a little more attention, so I’m going to cover that step in more detail here.
(more…)
by Michael Frye | Apr 12, 2020 | Advanced Techniques, Digital Photography Basics, Photography Tips
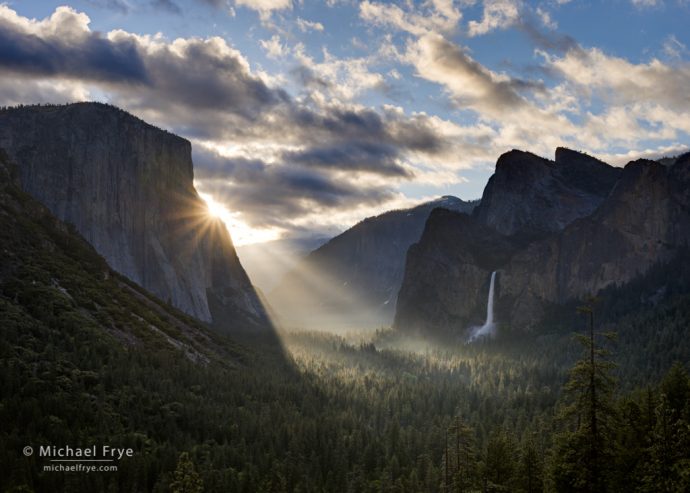
Sunbeams from Tunnel View, spring, Yosemite. Having a solid, well-practiced field routine helps me to calmly capture fleeting moments of light like this. 40mm, three auto-bracketed bracketed exposures at f/11, ISO 100.
Do you have a consistent field routine? Do you go through the same steps, in the same order, every time you take a photograph?
If you said no, you’re in good company. Most photographers I work with don’t have a solid, consistent field routine.
But I think having this routine is vital. Without one, you’re likely to forget important steps, like setting the right f-stop, or checking sharpness (and then kick yourself later when you realize your mistake). And when a rainbow suddenly appears over Yosemite Valley, or sunbeams break through the fog in a redwood forest, having a solid, consistent routine that you’ve practiced over and over will help you avoid panicking. You can just go through your normal routine and concentrate on putting one foot in front of the other, knowing that you won’t forget an important step.
(more…)
by Michael Frye | Oct 20, 2013 | Digital Photography Basics

Sunrise on a peak in the eastern Sierra, Inyo NF, CA, USA
I made this photograph yesterday morning during my first Eastern Sierra Fall Color workshop. It’s just so beautiful over here! We had a great time, and I’m looking forward to the second one.
With sidelight like this, a polarizing filter can actually lighten a reflection if it’s adjusted correctly. By lightening the refection and darkening the sky the polarizer helped to balance the contrast of this scene, and from there it was relatively easy to process this image in Lightroom using Highlights, Shadows, and the Graduated Filter tool.
— Michael Frye
Related Posts: A Landscape Transformed; Autumn Snow
Did you like this article? Click here to subscribe to this blog and get every new post delivered right to your inbox!
Michael Frye is a professional photographer specializing in landscapes and nature. He is the author or principal photographer of The Photographer’s Guide to Yosemite, Yosemite Meditations, Yosemite Meditations for Women, and Digital Landscape Photography: In the Footsteps of Ansel Adams and the Great Masters. He has also written three eBooks: Light & Land: Landscapes in the Digital Darkroom, Exposure for Outdoor Photography, and Landscapes in Lightroom 5: The Essential Step-by-Step Guide. Michael written numerous magazine articles on the art and technique of photography, and his images have been published in over thirty countries around the world. Michael has lived either in or near Yosemite National Park since 1983, currently residing just outside the park in Mariposa, California.
by Michael Frye | Apr 7, 2011 | Digital Photography Basics, Photography Tips

Most camera's light meters would read the dark areas in the background and overexpose these dogwood blossoms. To correct for this, you need to either override the meter with exposure compensation, or adjust the exposure manually.
In the first part of this series I explained one of the most fundamental aspects of digital photography: reading histograms. In this edition I’ll delve into the next step: how to adjust the exposure when the histogram doesn’t look right the first time.
(more…)
by Michael Frye | Feb 3, 2011 | Digital Photography Basics, Photography Tips

Understanding how to read a histogram is the best way to judge exposure in high-contrast scenes like this.
With film, exposure always involves some guesswork—you can never be sure you made the correct exposure until you develop the film. But with digital cameras you can tell immediately whether the right amount of light reached the sensor by looking at a histogram. This ability to instantly evaluate exposure is a game changer—the single biggest advantage of digital photography over film.
But many photographers are still guessing about exposure because they’re unable to decipher the histogram’s cryptic messages. Instead they judge exposure by how bright the image looks on their camera’s LCD screen. But while those little screens are extremely useful for many things, evaluating exposure isn’t one of them. There are too many variables: screen quality (usually bad), the LCD brightness setting in the camera, and the amount of ambient light.
(more…)


