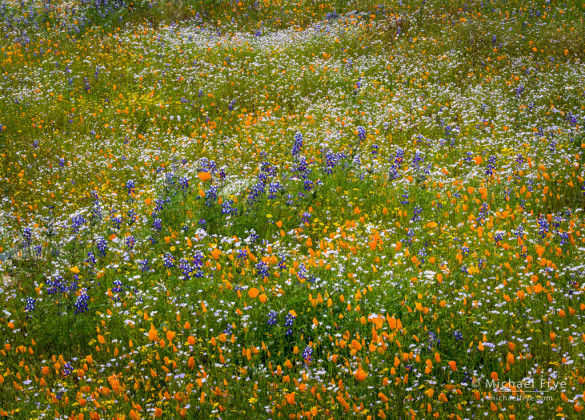
Poppies, lupines, goldfields, and tri-colored gilia, Merced River Canyon, Wednesday afternoon. A focus-stacked blend of four different frames.
It’s spring, which means it’s wildflower season, and focus-stacking season.
There’s been a secondary poppy bloom in the eastern end of the Merced River Canyon near El Portal. No big swaths of poppies, but smaller patches, and some of those patches are mixed with other flowers, which always makes things more interesting. Claudia and I spent the afternoon up there on Wednesday, and had a great time. I’ve included a couple of my favorite images from that day here.
As I was processing the images later, it occurred to me that all of them required focus stacking. Literally every single one. And this is very common for me when photographing wildflowers. I don’t need focus stacking often in other seasons, but in spring I use this technique all the time. It’s just difficult to get everything in focus with one frame when photographing wildflowers. I’m frequently picking out a particularly dense patch of flowers, and using a telephoto lens to emphasize patterns and visually compress the space, making the flowers look closer together. Even with careful focusing and f/22 it’s impossible to get everything in focus with a long lens raking across a field of flowers like that. But even with wide-angle lenses it’s sometimes difficult to get everything in focus with one frame, because I’m getting really close to the foreground flowers, so there’s a tremendous amount of depth.
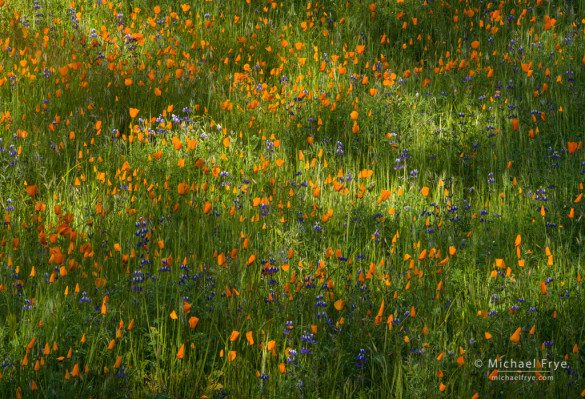
Poppies and lupines in dapples light, Merced River Canyon. Again I used focus stacking for this image.
Using high-resolution cameras the last couple of years has only made it more difficult to get everything in focus. A slight fall-off in depth of field that wasn’t very noticeable with a 16- or 20-megapixel camera becomes glaringly obvious with a 36- or 42-megapixel camera. And I’m more reluctant to use very small apertures like f/22 because the softness caused by diffraction at these small apertures also becomes more apparent with high-resolution sensors.
One solution to this problem is tilt-shift lenses. With a tilt-shift lens you can change the plane of focus to match the receding plane of a field of flowers, making it easier to get everything in focus. But I’ve never gone that route, mainly because tilt-shift lenses are quite expensive. They also have their limitations: there are no zoom tilt-shifts, so you can only use certain focal lengths, and they don’t help with situations where the near and far objects aren’t on the same plane, like tree branches in front of other tree branches. But having said that, they’re perfect for wildflowers, because the flowers are usually on the same plane, so maybe one day I’ll bite the bullet and get one.
But in the meantime I can use focus stacking. That means making a series of exposures focused at different distances, and then blending those exposures together in software.
I typically use f/16 for focus-stacking sequences, because on all my lenses that’s the smallest aperture I can use before getting objectionable diffraction. I could try f/8 or f/11, but then would have to capture more frames to cover the whole range and make sure every flower is in focus in at least one image. More frames would be okay if there was absolutely no wind, but that’s rare. I’m usually trying to capture the whole sequence during a lull, when the breezes are minimal, so the fewer frames I need the better. Using f/16 gives me more depth of field, so the focus overlaps more between frames, requiring fewer images and less time.
You need to use manual exposures for focus stacking, as any variation in brightness between exposures will make it harder to blend the frames together later. I also focus manually, through the viewfinder. I start by focusing on the closest flowers, usually at the bottom of the frame (or one of the bottom corners). I’ll wait for a lull in the wind, click the shutter (using a remote or cable release of course), focus a little further back, click again, focus further back again, click again, and so on, until the focus reaches the flowers furthest from the camera. I’m not very scientific about this; I don’t measure how much further back I have to focus for each frame, or anything like that. I’m just using my experience, and being conservative, making sure there’s plenty of overlap between frames. The physical, real-world distances are not important; I’m guided by how far I turn the focusing ring between each frame, not by the focus distance in feet or meters. I captured this short video the other day to show you what this looks like through the viewfinder:
(If you can’t see the video click here.)
I shot this video at f/4, my lens’s widest aperture, to simulate how this would look through the viewfinder of an SLR. When you look through the viewfinder of an SLR you’re seeing the scene with the aperture wide open. Even if you have the aperture set to f/16, the lens diaphragm stays open at f/4, or f/2.8, or whatever the widest aperture is on that lens, until you actually press the shutter. That keeps the viewfinder bright, and in this case the shallower depth of field you see at a wide aperture helps to clearly show where the lens is focused, which makes the whole procedure easier. (However, with a Sony lens on a Sony mirrorless camera, the lens stays stopped down by default, which makes it harder to see exactly where the lens is focused. I believe you can set one of the Custom Keys to override this, but I’m not sure, since I don’t own any Sony lenses – I used a Canon 70-200mm f/4 zoom with an adapter for these images and the video).
Once you’ve captured the sequence, there are many software tools that can blend the frames together. My favorite is Helicon Focus. This software gives me consistently good results, and has a great new feature: the ability to output the blended exposures as a fully-editable DNG Raw file. Once the DNG file is back in Lightroom it behaves like any any other Raw file, with all the power and flexibility that implies, including the ability to adjust the white balance, recover highlights, adjust the capture sharpening and noise reduction settings, choose a camera profile, and so on. Setting up Helicon Focus to output a DNG Raw file is a little convoluted, but Helicon has a video that walks you through the process. (For the rendering step in Helicon Focus, I typically use Method B, with Radius at 8 and Smoothing at 4 – the default settings).
Photoshop can also blend a focus-stacking sequence. In Lightroom, select the images you want to blend, then choose Photo > Edit In > Open as Layers in Photoshop. Photoshop will open the images and stack them as layers into a single document. Then, in the Layers panel, select all the layers (click on the top one, then Shift-click on the bottom layer). Next, go to Edit > Auto-Align Layers. Choose Auto for the Projection Method, then click OK. Once Photoshop has finished aligning the layers, choose Edit > Auto-Blend Layers. For the Blend Method use Stack Images, check Seamless Tone and Colors, and click OK. Photoshop will then automatically add layer masks, revealing the sharpest parts of each frame, to create the blended image. From there, you can continue to modify the image in Photoshop using Adjustment Layers, or save it as a PSD or TIFF and make further adjustments in the Develop Module in Lightroom.
If you already own Photoshop this second method allows you to blend focus-stacking sequences without buying or learning another program, which is great. Or it would be great, if it worked as well. In my experience, Helicon Focus does a better job of selecting the sharpest parts of each frame to blend into the final image. Here’s a closeup comparison of part of the image at the top of this post. The left side shows the image blended in Photoshop, the right side shows the output from Helicon Focus (click on the image to see it bigger):
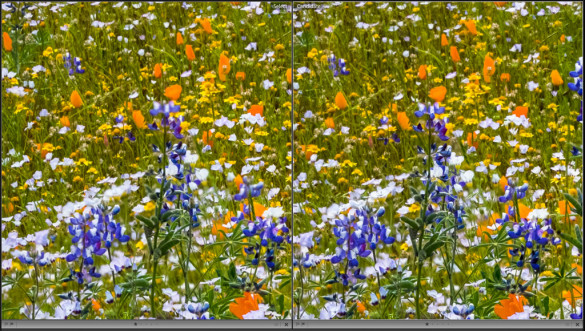
Focus stacking in Photoshop (left) compared to Helicon Focus (right). Helicon did a better job of picking the sharpest parts of each image to include in the final blended photograph.
In the Photoshop blend, the top of the most prominent lupine is blurred, because Photoshop didn’t choose the sharpest frame for that part of the blended image. Helicon did a better job on that flower (and others).
Since Photoshop uses layers masks, you can paint on the masks to modify the selection and improve the results. But that requires more work, and can get complicated. (Which layer has the sharpest image of that flower? Should I paint with white on that layer’s mask, or black on the mask of a higher layer?) And as I said, I like Helicon Focus’s new option to output the result as a DNG Raw file, keeping everything editable. There are several other programs also designed to blend a focus-stacking sequence, but I haven’t tried them, so I don’t know how good they are. Helicon Focus has always worked well for me, so I haven’t felt the need to try other applications.
There is one serious caveat about focus stacking: it doesn’t work well on windy days. Flower photography is always challenging in the wind, but focus stacking becomes problematic. Even if you use a fast enough shutter speed to freeze the motion, the flowers won’t line up between frames because they’re waving around in the wind. Any focus-stacking software will have trouble with this, and may leave ghost images, with the same flowers shown two or three times, as you can see here:
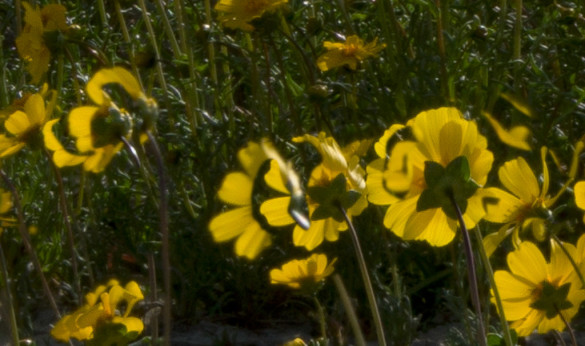
Ghosting caused by the wind; since the flowers moved between frames, some of them show up two or three times in the blended photograph, creating ghost images.
But on less windy days focus stacking works really well. Here are the four original images that were blended to make the final composite frame at the top of this post. The first image was focused on the foreground (the bottom of the frame), the second a little further back, the third yet further back, and the fourth on the background (the very upper-left corner of the frame). Each was captured at 1/10th of a second at f/16, 400 ISO. I’ve included magnified inserts to show the sharpness of the upper-right and lower-right corners, as well as a spot near the center of the frame. (You can click on all these images to view them larger and see the magnified inserts at 1:1 or 100%.)
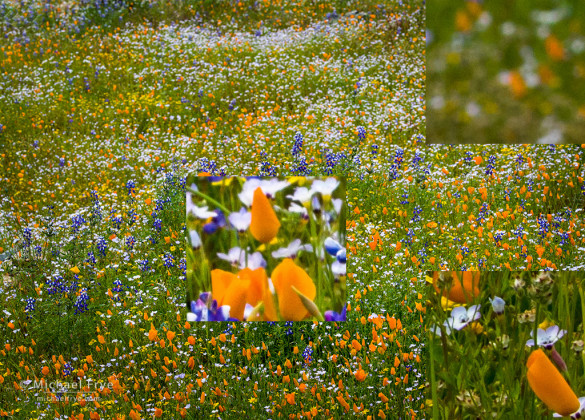
The first image of the focus-stacking sequence, focused on the foreground at the bottom (click the image to see it larger)
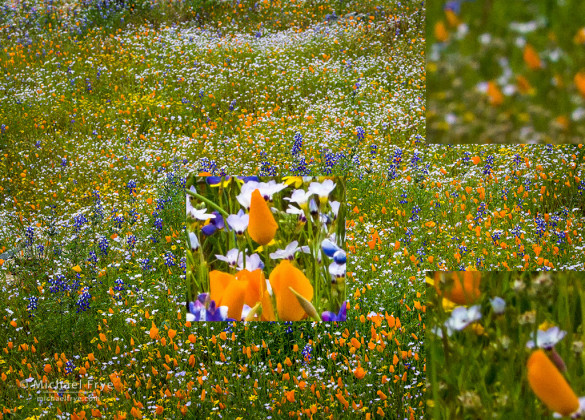
The second image of the focus-stacking sequence, focused a little further back
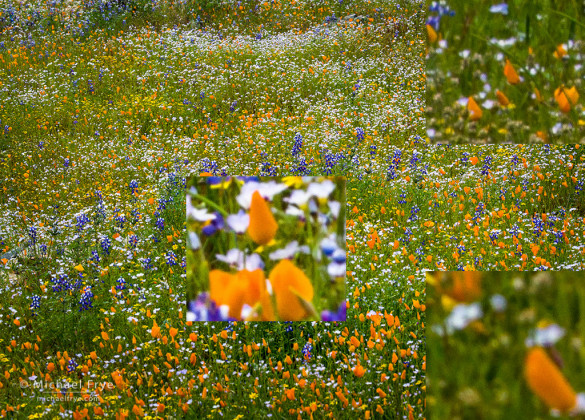
The third image of the focus-stacking sequence, focused still further back
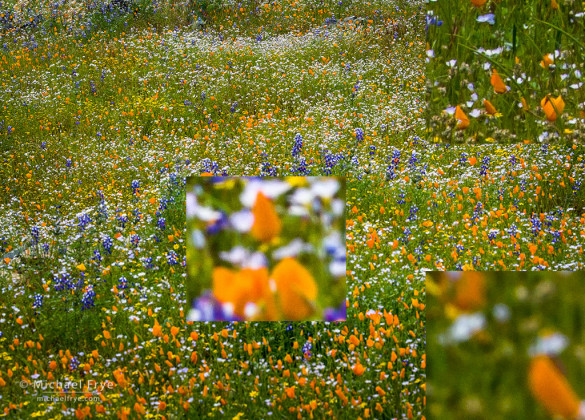
The fourth and final image of the focus-stacking sequence, focused on the background (the very upper-left corner)
And here again is the final image after blending the original four frames in Helicon Focus, plus magnified inserts showing that every part of the frame is sharp:
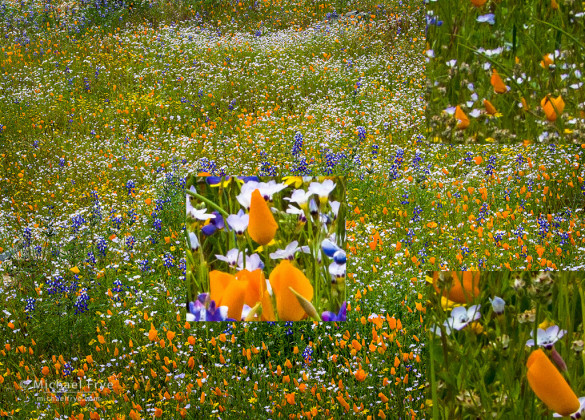
The final image after blending the four original exposures in Helicon Focus. The magnified inserts show that every part of the photograph is sharp.
Focus stacking is an advanced technique, and probably not necessary if you only show your images online or make small prints. But if you make large prints, and care about sharpness, focus stacking is a great way to get everything in focus in situations where that would otherwise be impossible. For me, focus stacking is an indispensable tool for wildflower photography.
— Michael Frye
P.S. Although I use focus stacking most often with wildflowers, it works for other things as well. Here are two more focus-stacked images of non-wildflower subjects:
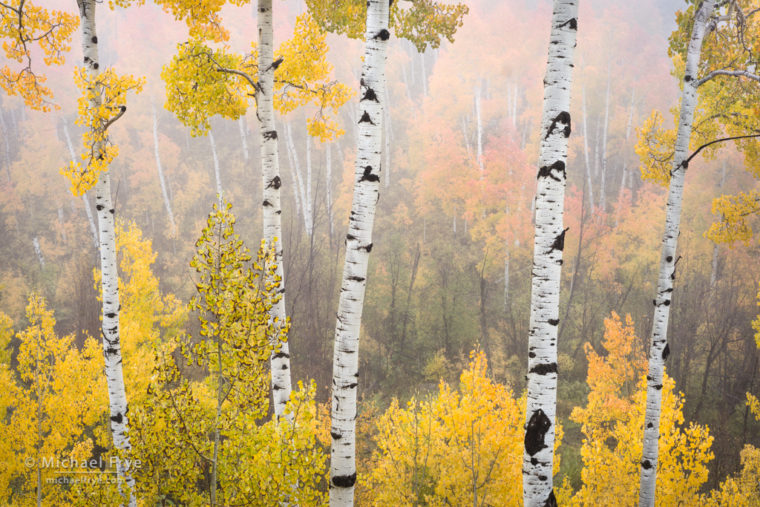
Aspens in fog near Ridgway, Colorado. With a 50mm lens at f/16 I couldn’t quite get everything in focus here, because the foreground trees were so close relative to the background. So I made three exposures, each focused at different distances, and blended them to get everything sharp. A tilt-shift lens wouldn’t have helped here, because the foreground and background trees aren’t on the same plane of focus.
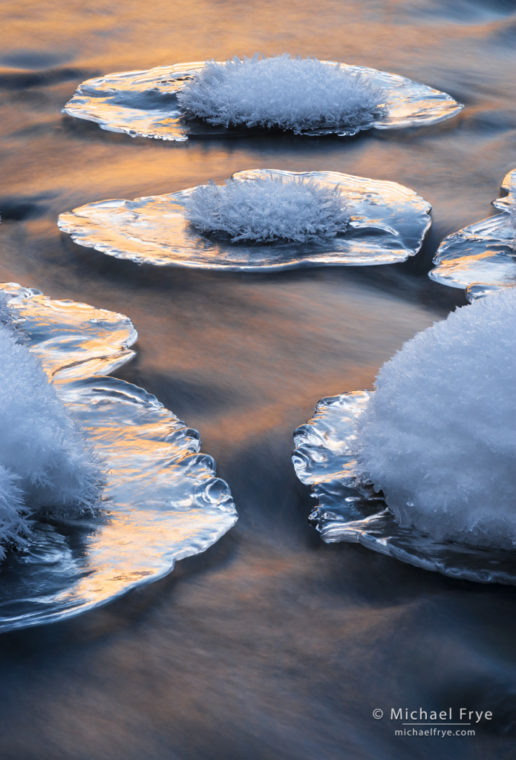
Ice formations in the Merced River, Yosemite. Three frames blended with Helicon Focus.
Related Posts: Wildflower Hunting; Redbuds and Poppies
Did you like this article? Click here to subscribe to this blog and get every new post delivered right to your inbox!
Michael Frye is a professional photographer specializing in landscapes and nature. He is the author or principal photographer of The Photographer’s Guide to Yosemite, Yosemite Meditations, Yosemite Meditations for Women, Yosemite Meditations for Adventurers, and Digital Landscape Photography: In the Footsteps of Ansel Adams and the Great Masters. He has also written three eBooks: Light & Land: Landscapes in the Digital Darkroom, Exposure for Outdoor Photography, and Landscapes in Lightroom: The Essential Step-by-Step Guide. Michael has written numerous magazine articles on the art and technique of photography, and his images have been published in over thirty countries around the world. Michael has lived either in or near Yosemite National Park since 1983, currently residing just outside the park in Mariposa, California.


Hello Michael. I use several of your eBooks and follow everything you do closely. I use the Sony A 7 M2 and am not an experienced photographer. I have the C2 button set to Focus Settings and when I press it in Manual Focus mode, the focus magnifier square comes on. I can move that square where I want in the frame and focus on that spot. I can do that successively. Does that answer your questioning wrt to knowing where the camera is focusing when the lens is stopped down on such cameras? Just hoping it helps you…and me! Highest regards,
Claude
Claude, thanks for chiming in. My question was about whether you can see a non-stopped-down view of the scene with with a Sony lens on a Sony E-Mount camera. It’s easier to see clearly where the lens is focused when the lens isn’t stopped down – when it’s wide open.
Great article, Michael!
Any advice on “focus breathing” while doing focus stacking? I find that some of my lenses shift their field of view slightly while focusing from near to far. Not much, but enough to make stacking difficult in PS. Does Helicon handle that well, or do you use lenses with less breathing?
Thanks!
OK. I watched the video and I see your lens is breathing as well, so Helicon must handle it well. Cool!
Yes, Helicon handles it well. So does Photoshop if you use the Auto-Align Layers option first. With Helicon, it first aligns the images, using, I think, similar algorithms to panorama-stitching software to stretch or contract images and get everything to align. Then it maps which part of which image to use for the final composite, choosing the sharpest frame for each flower (or whatever).
For anyone reading this who doesn’t know what Rick is referring to about “breathing,” when you change the focus with most lenses, the field of view changes slightly as well (it’s almost like the lens is zooming in or out a bit). On my Canon 70-200, which is the lens I use most often when focus stacking, the field of view narrows when focused closer, and expands when focused farther away. But I found out, to my surprise, that not all lenses work this way – with some the field of view narrows when focused farther away, and expands when focused closer! So you have to check your lens and see. When focus stacking you want to compose with the lens focused at the point where the field of view is narrowest. If you focus at a point where the field of view is wider, when you change focus (and in the process narrow the field of view) you could cut off something important along the edge of the frame.
Great, Michael! Thanks
Great article Michael! And the video demonstrates your technique perfectly and is very helpful. I have only tried FS once or twice on stable objects, using live view and auto-focus. I will definitely need to give this way a try. Thanks!!
Thanks Florian! Glad you found this helpful, and good luck. 🙂
Michael,
Really nice aspen and ice formation photos. Focus stacking appears to have many uses, besides photographing just wildflowers.
Cheers,
Alyn
Thanks Alyn, and yes, focus stacking can be very useful in any situation where you can’t get everything in focus with one frame. I just use it most often with wildflowers, because wildflower photographs seem to push the limits of depth of field.
Hi Michael,
A very useful article.
Thanks,
Doug
Thanks Doug!
Michael —
Good, helpful article.
I, too, make frequent use of focus stacking. I particularly like it when capturing the texture and patters of eroding sandstone bluffs along the coast. With an emphasis on texture, I tend to shoot at f/8 and can end up with a stack of 10 or 12 images. Flowers, subject to movement in the breeze, would be difficult to capture with as many images so I understand your use of a smaller aperture.
I have used Helicon Focus for several years and find the more recent releases (V5 and now V6) to be especially capable. Photoshop tends to leave annoying halos around objects when there is a step-function difference in distance to to sensor — say the stem of a flower compared to the background. Not so with Helicon Focus, especially the latest versions. I also find Helicon Focus to be blazingly fast in tackling a stack of 10 to 12 images; Photoshop tends to be annoyingly slow with a task that size and may not run at all if you lack sufficient RAM on your computer.
Highly recommended and the Helicon Focus people let you have it your way: you can buy a one-year term license or you can buy a perpetual license.
Frank
Thanks Frank, and I appreciate your comments on Helicon Focus. It’s not cheap, but worthwhile if you find yourself needing extra depth of field sometimes.
A tilt-shift lens is about $2,000 vs. Helicon Focus for $115. Another thing I preferred about HF was that it worked great with my old Vista computer on just 4GB of RAM. Just moved it over to my new 32GB box and it’s almost *too* fast. You look away for a couple seconds and it’s done stacking 8 images so fast you wonder if you forgot to click on Render.
There is a Rokinon 24mm tilt-shift lens for $700+. But generally they are quite expensive. My friend Dave Hoffman has another solution: he uses a Mamiya-to-Canon tilt-shift adapter. The Mamiya medium-format lenses are designed to cover a larger image circle, so they work well with the tilt-shift adapter. Makes me wish I hadn’t sold my Mamiya 645 lenses. 🙁
I think that focus stacking is the best option for this kind of shot – sooner or later I have to win my laziness that prevents me from post-processing outside Lightroom.
Back to tilt-and-shift… I second the suggestion about adapters. On Ebay there are e.g. Sony-to-Nikon adapters that transform a legacy lens in a tilt&shift. While I understand you need medium-format lenses to cover the FF circle, it seems that FF lenses are fine for an APS-C sensor. Tilt&shift adapters are sold around 250€/300€; but a simple tilt adapter is around 50€. I’ve just bought one and started trying it with a couple of full-frame legacy Nikon primes (50 f/1.8, 24 f/2.8). The optical quality seems fine on the a6000 (at full aperture fall-out is perhaps amplified, but nothing that cannot be fixed in post-processing).
Shooting is definitely more complex: while I know the theory of tilting, I’m still unable to “preview” what I’m going to shoot. But I think it’s just a matter of exercise.
Thanks for the information about tilt-shift adapters Fabrizio. That seems like a good solution for APS-C cameras like the A6000 or A6300. It might even be worth a try with full-frame sensors, as there may be some lenses that have enough coverage to tilt.
04/30/2017 – Michael, recently found your article “Focus-Stacking Season” April 11, 2016. In the Comments on April 13, 2016 you mentioned a Mamiya-to-Canon tilt-shift adapter. I have found Kipon Shift Lens Mount Adapter for Mamiya 645 to Canon EOS body – however, this does not provide Tilt. Could you perhaps provide more information on the Mamiya to Canon EOS Tilt-Shift adapter? Much appreciated if you can as I still have my excellent Mamiya Pro lenses. Thanks, Gary
Gary, Mirex in Germany produces the tilt/shift adapter that Michael mentioned.
http://www.mirex-adapter.de/index.htm
Seems like you used to be able to switch the site to English but I’m not seeing how at the moment. Just call or email them. They’re very responsive. The adapter is beautifully made. It is, however, a little more difficult to use then a t/s lens as the entire mechanism (tilt, shift, and rotate) has to be fitted into an adapter limited in thickness to the difference in registration distance between the Mamiya 645 and the Canon EOS.
Another thing, the prices on the site include the European value added tax (VAT) which is not applicable in the US, so the prices are significantly less than it would appear. You order directly from Mirex. Mine came in less than a week, as I recall.
Thanks for clarifying this Dave!
Thanks for another great article- I have been wanting to try focus stacking. Question on Helicon products based on your past experience-
As you must be using the Pro edition that results in raw DNG option, for the Lite product (without that option as I understand it)- is it best to process all files- basic exposure parameters- in Lightroom first before taking into the plug-in, as one is left with a non-raw file after? Or is the re-touch aspect of the plug-in a good option?
Thanks for any advice and clarification.
Barb —
My own two cents as a Lightroom and Helicon Focus (Lite) user. My work flow is to import camera raw files to LR (using a modified version of the presets recommended by Michael). The only adjustment I tend to make before export to Helicon Focus is white balance, and of course all images going into the stack need the same balance adjustment..Once the stacking is complete in HF, I bring the resultant TIFF file back into LR and then set about my normal image optimization work flow. White balance adjustments are still possible on the TIFF file but are in Adobe’s un-calibrated +/- scale, rather than Kelvin.
A slight subtlety here occurs back at image capture: use auto white balance or simply set a fixed color temp? Historically, I have tended to set a fixed color temp on my Nikon bodies and shoot at that temp when stacking. One of my objectives in shooting the stack is to keep variations as small as possible and deal only with slight adjustments to focus from image to image.
Will be interested to hear what Michael has to say.
Best, Frank
Appreciate your input Frank.
You’re welcome Barb – I’m glad you liked the article. I haven’t tried the retouching in Helicon Focus; since I’m outputting the merged image as a DNG, I’d rather use Lightroom’s Spot Removal tool for that, as that keeps things more flexible. If you’re using the Lite version, and outputting as a TIFF, I still see no reason why you couldn’t use Lightroom’s Spot Removal tool on the TIFF, which, again, would give you the flexibility to change or adjust the Spot Removal tool work later if you needed to.
Knowing that you’re going to output a TIFF, and therefore “bake in” the settings of the Raw files into that TIFF, before exporting to Helicon you’d want to set the camera profile, white balance, Detail Panel settings, and make sure the “Remove Chromatic Aberrations” box is checked in the Lens Corrections Panel for the Raw images. And if the images need major exposure corrections – the image is very underexposed, or you need to recover highlight or shadow detail, etc. – you’d want to make those corrections before exporting to Helicon as well. However, I think you should avoid adding contrast, either with the Contrast slider, Whites, Blacks, Highlights, Shadows, or the Tone Curve. It’s better to leave the contrast low and give yourself more leeway later.
Lets’ say, on the other hand, that you add just the right amount of contrast to all the images, then blend them in Helicon (or Photoshop, or any other program), and do some other work afterwards. A week later (or a month, or a year), you realize that the image has too much contrast. But at that point it’s really difficult to take out the contrast you added earlier. So you’ll have to start over: reduce the contrast in all the original Raw files, blend them again in Helicon, do the other work over, etc. Again, it would be better to leave the contrast low initially, then add contrast to the blended file in the Develop Module in Lightroom, or with with an Adjustment Layer in Photoshop. Either way would allow you to easily reduce the contrast later without starting over.
Thanks for the pointers, Michael. Looking forward to trying it out.
Michael & Dave Hoffman: Thanks for info regards to MIREX-TS Adapter mfg by MICO-Treppenwinkel GmbH in Germany. Rec’d my MA 645 to Canon EOS Adapter 6/7/17. Took 1 mo to receive due to back order. Cost 431.00 EUR / $490.22 USD which included FedEx Int’l Economy. I did not see any reference to VAT – Value Added Tax. Now to try it out and see if this was worth it. I agree Dave that this adapter is cumbersome to use compared to Canon Tilt-shift lenses which I have 2 of. This MIREX Adapter will allow me to try and use all of my Mimaya 645 lenses in a tilt-shift configuration. Thanks again for your help.
Happy to help Gary, and I hope it works out for you.
Dear Michael,
Another great article and very useful information. Thank you so much for sharing!
Best,
George
Thanks George!
Hi Michael,
I have been following your blog for a long time and love it. I get inspired over and over again. I just want to say that this was a great article with so much useful information. I have been doing focus stacking for quite a while, mostly using Photoshop, for macro subjects, but have decided to bite the bullet and get Helicon since I do focus stacking so much, including landscapes.
I hope to take a workshop with you at some point.
Alison P.
Thanks so much Alison – I’m glad you’re enjoying the blog! Hope to see you in a workshop sometime.
Nicely communicated Michael.
Focus stacking has been well embraced by macro enthusiasts for quite awhile. It has however continued to escape the notice of the majority of landscape and nature enthusiasts that obviously have not yet comprehended its advantages even though a few of us have publicly offered some golden nuggets. Such will likely remain so for a good while because communicating how much sharper large images can be with such a process is not something easily communicated on an Internet where most work must be considerably downsized due to monitor display limitations image security.
Thanks for chiming in here David. It is indeed difficult to convey much about printmaking, including sharpness, through small images viewed on screens.
I really enjoyed this article. I’ve tried focus stacking with Helicon with a macro with their free trial and it was pretty amazing. I’d actually forgotten about this until your article. I think I might try it with something like you did here. I LOVE the aspens!!!!!!
Thanks Laura, and good luck with your focus-stacking!
Darn, I wish I had seen this before I went on my wild flower trip! This is a great technique and one I could definitely have used. I have way too many shots where enough of the scene isn’t in focus the way I want.
Hello Michael. Reading this article once again after reading your post on F/16. Now that you’re using Sony mirrorless, do you have further recommendations on this topic. I bought a video from a “competitor” on focus stacking but found it unclear and geared to SLR’s. So it was of little help to me. Would love to buy one from you, but would appreciate getting your recommendations until such a time. Thank you kindly and highest regards from French Canada.
Claude, the only difference between focus stacking with an SLR vs. a mirrorless camera is that with a mirrorless camera the lens might be stopped down by default, making it more difficult to see what’s in focus and what’s not through the viewfinder. That’s the case with Sony mirrorless cameras and Sony lenses – that is, if you have the aperture set to f/16, the lens is actually stopped down even before you press the shutter, so the image you see in the electronic viewfinder shows the depth of field at f/16. With my Canon 70-200 and an adapter, however, the aperture stays wide open until I press the shutter, so I use the electronic viewfinder and use the exact same procedure as in the video here.
If you’re using a Sony lens on a Sony mirrorless camera, you can still use the same procedure, with a slight modification. First, you manually focus on the foreground, just as I did in the video. It might be easier to clearly see what’s in focus if you open up the aperture all the way to focus, then stop the aperture down to take the first frame. After taking that first frame (focused on the foreground), focus a little further back and take the second frame. Then focus a little further back and take the third frame, and so on, until you get to the point where you’re focused on the background. Again, this is just like the video. The difference here, the thing that makes it more difficult, is that it’s harder to see what’s in focus, and how much to turn the focusing ring each time. You’ll have to experiment with your lens(es) to get a feel for that. You could open up the aperture between each exposure to see the focus better, but that’s a pain.
Thank you so much for taking the time, Michael. You’re right on the difficulty of turning the focusing ring, even with the MF Asist and Magnifier (which can be clicked twice) and the peaking color. I’ll try the opening up suggestion to see how it goes. It might not be so bad when 3-4 frames suffice. Again, a million thanks for your time. Respect! p.s. I have Sony full frames and lenses
Following an “unofficial” polling of several photographers, accomplished in the digital darkroom, my findings suggest Zerene Stacker might be a better choice. Have you had any experience with it, enough to even compare with Helicon? Thanks.
I have used Helicon Focus for years and agree that DNG output is very valuable. Using Capture One, I have a very smooth workflow.
Normally, I delete all but the final stack when I am satisfied with the result.
I agree that stones in running water with long exposure times is ideally for stacking.
I normally use a Sony A7 Riii, bit have got good results with a smaller Panasonic 4:3 kamera. It allows you to set the closest focus point and then make choosen number of exposures with a choosen focus increase.
The main advantage is that focusing and exposures is very fast, good when there is a short wind break.
Thank you for your inspiration!
Yeah, the DNG output is a great feature. I wish more plugins had that capability. I have to say though that I don’t think it’s a good idea to ever delete the original images. What if a better tool comes along? What if there’s some flaw with the blended photograph that you don’t notice until later?
I wish my Sony had automatic focus-stacking like your Panasonic and some other cameras have.