
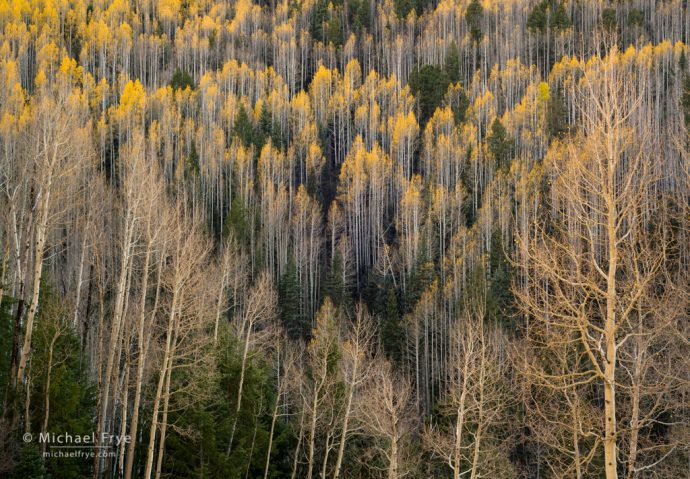
Late-October aspens near Silver Lake, June Lake Loop, Inyo NF, CA, USA. I used f/16 to get everything in focus in this 2008 photograph from the eastern Sierra. (The shutter speed was 1/6th second, the ISO 400.)
I sometimes post my camera settings here on the blog, and I’ve had many people ask me why I often use f/16. Is that the sharpest aperture on my lens? (No.) Don’t you get diffraction at f/16? (A little bit.) Is it for depth of field? (Bingo!)
As many of you know, most lenses are sharpest at middle apertures – generally around f/5.6 to f/11, depending on the lens.
Better lenses will perform decently at wide apertures like f/2.8 or f/4, but usually the corners are softer compared to the middle apertures. On the other end of the spectrum, at smaller apertures diffraction causes all lenses to get softer over the entire image (not just the corners).
But you get more depth of field at smaller apertures. That is, more of the scene will be in focus from front to back. And that’s a very important consideration with landscape photographs, where you usually want the entire image in focus – near, far, and everything in between.
When I don’t need much depth of field I pick the sharpest aperture for the lens I’m using. On some of my lenses that’s f/8, on others it’s f/11.
But when f/8 or f/11 isn’t enough to get everything in focus, I use f/16. Yes, I get some diffraction at f/16, but that’s preferable to having the foreground or background – or both – out of focus. And with my lenses the diffraction is minimal at f/16. I’ve made very sharp 30-by-40-inch prints from images captured at f/16 on my 36- and 42-megapixel Sony cameras. At f/22, however, the diffraction gets noticeably worse. So I avoid f/22 unless that’s the only way to get everything in focus. I’d rather use a wider aperture and focus-stacking to get everything in focus, but sometimes wind makes focus-stacking impossible.
So that, in a nutshell, is why I often use f/16: it’s a small enough aperture to get lots of depth of field, but not so small that diffraction seriously degrades the image. If you want to delve into the details a bit more, read on.
The Fine Details
Technically, diffraction can be detected at f/11 – maybe even f/8 on some very-sharp lenses (coupled with high-resolution cameras). But at f/11 the diffraction is usually barely noticeable. It becomes more noticeable as you stop down to f/16 and f/22.
So when does diffraction become so bad that it seriously degrades the image? That’s a bit subjective, of course, but for me, with my lenses, I’ve found that f/16 is reasonably sharp, while f/22 is distinctly softer. So that’s my cutoff point. Of course I have some very good lenses, and not every lens will perform well at f/16. But that’s one of the main reasons I use those lenses: because they’re good at f/16. If a lens isn’t sharp at f/16 it’s pretty useless to me. Unfortunately, many of the websites that perform lens tests don’t post results for f/16; they skip from f/11 to f/22. What’s with that? But if a lens performs well at f/11 it will probably also perform well at f/16. And I never rely on those websites anyway. Yes, they can help me decide whether a lens might fit my needs, but I rely on my own tests and my own eyes.
Sharpening
One aspect of this discussion that often gets overlooked is image sharpening. The slight softening created by diffraction at f/11 or f/16 can be largely mitigated by using the appropriate “capture” sharpening settings in raw-image processing software. In Lightroom and Adobe Camera Raw, the default sharpening settings are geared to general photography, not landscapes. Here’s what those default settings look like:
Adobe’s default sharpening settings in Lightroom and Camera Raw
However, the leaves, twigs, grasses, and other fine details in landscape photographs look sharper with a lower Radius, higher Amount, and higher Detail. I start with the Amount at 40, Radius at 0.5 (as low as possible), and Detail at 50, like this:

My default sharpening settings for landscape photographs in Lightroom
But that’s just a starting point. Before printing an image, or before exporting it out of Lightroom into Photoshop or another program, I’ll fine-tune those settings and optimize them for the particular image. With low-ISO images that usually means increasing the Amount and Radius.
Here’s an example, a photograph from Colorado made with my old Nikon 50mm lens at f/16:
Aspens and conifers, San Juan NF, Colorado. I needed f/16 to get both the foreground and background aspens in focus. (The shutter speed was 1/6th second, the ISO 100.)
The 100% (1:1) screen shot below shows Adobe’s default settings on the left. The right-hand screen shot shows the trees after I’ve optimized the sharpening settings – in this case pushing the Amount to 60 and Radius to 0.7, while keeping Detail at 50 and Masking at 0 (click on the image to actually view at 100%):
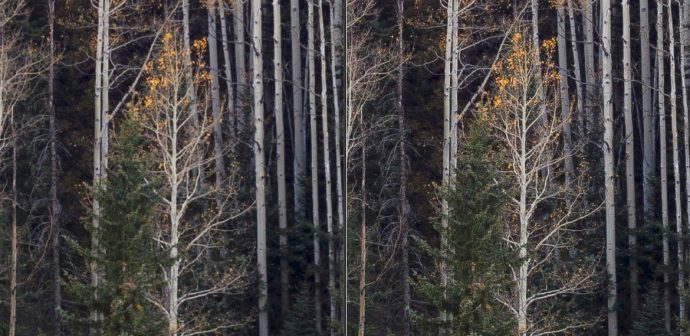
Adobe’s default settings on the left, my optimized sharpening settings on the right (Amount 60, Radius 0.7, Detail 50, and Masking 0). Click on the image to view at 100%.
With Adobe’s default settings the trees look a little soft. But increasing the Amount, lowering the Radius, and increasing the Detail made the trees look much sharper (again, click on the image to view at 100%). Keep in mind that this 100% screen shot shows a tiny part of a 42-megapixel file. With those optimized settings this would make a very sharp 30-by-40-inch print.
So am I concerned about diffraction? Yes, of course. But I don’t hesitate to use f/16 when I need more depth of field, because I know I can make large, sharp prints from those images.
— Michael Frye
Related Posts: Focus-Stacking Season; Yosemite Fall Color
Michael Frye is a professional photographer specializing in landscapes and nature. He is the author or principal photographer of The Photographer’s Guide to Yosemite, Yosemite Meditations, Yosemite Meditations for Women, Yosemite Meditations for Adventurers, and Digital Landscape Photography: In the Footsteps of Ansel Adams and the Great Masters. He has also written three eBooks: Light & Land: Landscapes in the Digital Darkroom, Exposure for Outdoor Photography, and Landscapes in Lightroom: The Essential Step-by-Step Guide. Michael has written numerous magazine articles on the art and technique of photography, and his images have been published in over thirty countries around the world. Michael has lived either in or near Yosemite National Park since 1983, currently residing just outside the park in Mariposa, California.


Thank you!
You’re welcome Rudolf.
Awesome post, thanks for sharing
Thanks Jan!
Hi Michael,
Thanks for the explanation on using f16 and your sharpening settings. My question is reagarding the mask setting. I can understand not using it on the aspen photo, but what about when you have smooth areas like skies. Are your settings similar with some masking or not? Do you use focus stacking instead of smaller aperture when there is little wind? A shutter speed of 1/6 sec would seem to result in blurring too. I haven’t tried it both ways in windy situations, so I’m curious as to your thoughts. Thanks.
You’re welcome Chris. The idea behind the Masking slider (as I’m sure you know) is to avoid sharpening smooth areas like sky and water, where sharpening would only enhance noise, while still applying sharpening to edges and textures. But with low-ISO images there is no noise (at least with most cameras, or unless you lighten the shadows a lot). So you don’t need to avoid sharpening the sky or water. Using the Masking slider with such images won’t hurt – unless you overdo it and miss sharpening textures – but there’s no benefit either. So I just don’t bother with it. But I do use Masking when I push up the ISO, even to 400, and sometimes even 200. I think the Masking slider is actually Lightroom’s best noise-reduction tool.
THANK YOU, Michael!! This is enormously helpful information for landscape shooting. It has brought into ‘focus’ several issues I’ve been struggling with and unclear about.
I can now go forward with experimenting with my settings with more confidence and a sense of direction.
Thank you, thank you!
You’re welcome Brent – I’m glad you found this helpful!
Let me echo that … Thank You!!!
You’re welcome Marty – thanks!
Hello Michael! Love your landscape info. In fact, I would love to attend one of your seminars. Im in total agreement with you on f16. It has been my ago-to for some time now, I only have 2 lenses for my a7R2: 24/70 and 24/240. I’m interested in your choice of lenses. I’m thinking about a wide angle and also macro. Shoot mostly landscape, architecture, and a little macro.
My best project now is making a book about an old historical courthouse.
Your 2nd paragraph said it all, and I was hooked. Great, straightforward explanations of when you do and don’t, and why and why not. Just really helpful.
Glad you found this helpful Mark – thanks!
Thank you, Michael. Will do a bit of experimenting in LR with the sharpening settings. Seems this also depends on the noise reduction settings. And these are dependent on ISO and much shadow reduction you do by sending the ‘shadow’ slider to the right. Could you make some comments about that regarding your experience? Thanks.
You’re welcome Greg. Sharpening and noise reduction are complex subjects. The settings I used here were for this specific image – a low-ISO photograph with a little softness created by diffraction, made with a high-resolution camera and no low-pass filter. If any of those things change I might use different settings. Having said that, my settings with this camera are usually similar for low-ISO images. Maybe a lower Amount, or perhaps a slightly lower Radius, if I shot it at f/8 with a sharp lens. I wouldn’t use any noise reduction with a low-ISO image, unless I lightened the shadows a lot and that lightening created noise. In that case I might use some Masking. I use Luminance noise reduction in Lightroom only with high-ISO images, and only as a last resort, after I’ve tweaked the sharpening settings.
As others have said, thank you Michael for the detailed explanation of your process. It has made me rethink always trying to find the sweet spot of the lens vs the right aperture for the composition.
You’re welcome John, and thanks!
Well said Michael. You were a Canon and now a Sony shooter and I would echo that advice too with my Nikon 14-24mm. For landscapes I mostly shoot at f16 which is sharp with this lens for past several years. Thanks for confirming that.
Thanks Karl. Lens and camera definitely matter with this discussion, but the Nikon 14-24 is an excellent lens, and I’m sure it performs well at f/16.
Very informative information.
Thanks Awais!
This article strenghtens my belief that better teachers of photography are very few! Thank you for sharing.
Thanks Claude!
Hi Michael,
Always enjoy your insight~
You talk about “capture” sharpening and then optimizing from there and then say that would make a sharp 30×40” print… if that is “capture” sharpening what do you do for “print” sharpening?
Thanks for sharing
Thanks Ron. What I do for print sharpening is… very little. Since I use a pretty high amount of capture sharpening, I use a pretty small amount of print sharpening with the Smart Sharpen filter in Photoshop. I’ll use a little bit stronger settings for Smart Sharpen with larger prints. (Lightroom’s output sharpening tools are too crude for me.) With high-ISO images (Milky Way photos, for example) I might not use any print sharpening at all – though I would use different capture sharpening settings than in the low-ISO example here, plus also probably add a little noise reduction.
Great explanation. I especially like the info about the masking filter and did not actually realize what it did.
Hi, Michael. I’ve never used those radius and detail sliders, they seemed rather confusing and excessive to me but your post inspired me to reevaluate them. That comparison between those two ways of sharpening looks very interesting, I can’t believe how much better the optimised setting works. Next time when editing a photo, I will experiment with the sliders to see the difference. Thanks for the inspiration!
The intricacies of the Detail Panel in Lightroom or Adobe Camera Raw are pretty complex, and I can’t explain them all here. But briefly, the Radius determines how far out from a contrast edge the sharpening effect is applied. Too large a Radius and the sharpening effect will spill over from one pine needle (or leaf, or twig) to the next, and actually blur those details. A small Radius hugs the edges of those fine details better, preserving and enhancing detail. So for landscape photographs, I find that a larger Amount and smaller Radius work better. Having said that, these differences will appear rather subtle in most prints.
Hello Michael
Appreciate the simplicity of your answers.
As a note: It is not just the aperature that one chooses that affects the sharpness of the image. There is only one true plane of focus each time you take an image. Decreasing the aperature allows for an increase in depth of focus; But the further a detail is away from that plane the less sharp it will be. My old text books used the term,’circle of confusion’, to describe this. With wide angles the affect is less. I find around the 50 to 60mm mark I have to take this into consideration. I use f 11 to 16 a lot. Even 18 to 20 depending on the lens. If I do stop down that much, I am very careful to put the plane of focus on my most important details if possible.
Cheers, Ian
Thanks Ian. Yes, you’re right, an object at the focused distance will be slightly sharper than objects in front of or behind that point, even at small apertures. When we talk about depth of field in a photograph, we’re talking about what’s acceptably sharp in front of and behind the actual focused distance. “Acceptably sharp” is obviously a bit subjective, and depends on many factors. For example, when I moved from a 16-megapixel camera to a 36-megapixel camera I found that I needed to use a smaller aperture for a given situation in order to get acceptably sharp results when viewing the image at 100%. The increased resolution of the camera made small differences in focus and depth of field more apparent.
Having said all that, when looking at an actual print I think there’s little or no practical difference between objects that are in perfect focus and objects that are “acceptably sharp” in front of and behind the focused distance – with the caveat that I’m pretty persnickety about what’s “acceptably sharp.”
Thanks Michael for sharing this useful information. I am wondering what’s your opinion on using a small aperture like f/16 vs. focus stacking multiple images with the sweet spot aperture of the lens, say, f/5.6 for achieving higher depth of field. Thanks in advance!
You’re welcome Arup. For me, focus stacking for that purpose is unnecessary and often impractical. Unnecessary because I can get super-sharp, large prints at f/16, so there’s no need to go to the trouble of focus stacking. Impractical because wind can make focus stacking difficult or impossible when photographing any kind of vegetation. I might wait for 30 minutes for a lull long enough to capture a focus-stacking sequence at f/5.6. Or I could use f/16 and be done in five minutes, allowing me to photograph several other compositions during those remaining 25 minutes – and one of those later compositions might be better.
I’m concerned about image sharpness, and want to make as high-quality prints as I can. But I’m also practical. On screen at 100% I might be able to see a difference in sharpness between a focus-stacked image captured at f/5.6 versus a single image captured at f/16, but the difference in a print is undetectable unless you put your nose right up to it and know what to look for. (And even then it might be undetectable.) And if striving for the nth degree of sharpness hinders my creativity I think that’s a poor tradeoff. My goal is not to make technically perfect photographs, but to make expressive photographs that convey a mood or feeling. I strive to also make those images as sharp as I can, but that’s secondary. Or as Ansel Adams put it, “There’s nothing worse than a sharp image of a fuzzy concept.”
Well said Michael! Thanks for the quick response!
Great info again —especially about default sharpening in LR! Do you also sharpen after all edits are done and you r ready to print? I have never known for sure what the proper methjod is for shrpening—so many different opinions out there! I trust your info greatly. I have been using Luminosity sharpening for a yr now after all edits are complete. Do you sharpen at end of editing? If so do you suggest a particular technique—thanks.
Thanks Donna – glad you found this helpful. Yes, I usually add a small amount of sharpening in Photoshop with the Smart Sharpen filter as a final step before printing. When you say “Luminosity sharpening,” are you talking about using Lab mode, or maybe using the Fade command after sharpening with the mode set to Luminosity?
Thank you, this information is just what we love about your blog. A tremendous help!
Thanks Moffie!
Great post, Michael. With a “general” landscape do you focus at the one-third/two-thirds point?
Thanks Gary. No, I don’t focus a third of the way in (whatever that means) or a third of the way from the bottom of the frame. Those methods are too vague, and only work in certain situations. I can’t describe the procedure I use in enough detail here, but you can find it in my Photographer’s Guide to Yosemite book or app, or in my Digital Landscape Photography book.
Can I purchase a copy of your Digital Landscape Photography book directly from you?
Michael, I just saw this article.
I have a term that I like to use when discussing sharpness: “subjective sharpness.” As you know, some people get hung up on things like “sharpest aperture” and similar terms. But the perception of sharpness is more complicated than its objective measurement.
“Subjective sharpness” recognizes that sometimes a wide open shot (not the sharpest aperture!)) with an out of focus background and nice luminosity differentials between subject and background plus appropriate color differences may appear subjectively very sharp. Or that a a small aperture exposure with slightly less than optimal sharpness but great overall sharpness may look quite sharp enough.
How sharp an image “feels” is a different thing than how sharp it measures. Of the two, I prefer the right feel!
I think that’s a good way of thinking about it Dan. Sharpness is very subjective, as what’s acceptably sharp for one person may not be for another. People sometimes ask me how big a print they can make from a certain camera with so-many megapixels, and the answer is, of course, that it depends. It depends on a lot of factors that affect sharpness other than megapixels, like the lens, aperture, focus, subject movement, camera movement, noise, and so on, but also on each individual’s subjective idea of what’s acceptably sharp. And as you point out, it also depends on the image content and treatment.
I also like to think in practical terms; in other words, maybe this is theoretically sharper than that, or you can detect a slight difference when looking at an extreme magnification. But can you see a noticeable difference when looking at an actual print? And even if you can detect a slight difference when you stick your nose up to a large print, does that difference affect a viewer’s enjoyment of the print and appreciation of the photographer’s message? For me, as a viewer, a print that’s significantly soft or mushy may detract from it (assuming the photographer wasn’t intending to make a deliberately soft-focus image), but I’m probably more critical of that stuff than 99% of viewers.
But as critical as I am, I think the minute differences in sharpness that some photographers obsess over misses the point. There’s that famous Ansel Adams statement, “There is nothing worse than a sharp picture of a fuzzy concept.” The goal of photography isn’t to make the sharpest photograph. For me, my goal is to make a photograph that says something, that expresses something meaningful (to me). Sometimes a lack of sharpness might detract from that message. If viewers notice a technical flaw, rather than focusing on the image’s message and content, then that’s distracting. But it’s highly unlikely that the slight difference in sharpness due to diffraction in a photograph made at f/16 vs. f/11 is going to cause such a distraction. (It’s actually more likely that having something out of focus due to lack of depth of field would cause a distraction.)