Swirling dogwood blossoms, Yosemite. I used a slow shutter speed (1/2 second) to deliberately blur the motion of these dogwood blossoms, but usually I’m trying to make my photos as sharp as possible.
It’s always disappointing to find out that one of your photos isn’t sharp – especially if it’s an image you like (and you weren’t trying to deliberately blur the image). Yet we all make mistakes. Even professionals like me sometimes take unintentionally blurry photos (as you’ll see below!). But after you’ve swallowed your disappointment, it’s important to figure out why the image is soft so that you don’t make the same mistake again.
There are basically five causes of blurry photos: camera movement, subject movement, missed focus, insufficient depth of field, and lens softness.
To find the source of the blurriness, you’ll have to channel your inner Sherlock Holmes and do a little detective work. First try to remember what you did when taking the photo. Were you handholding at a slow shutter speed? Then camera movement is a likely culprit. Were you using a tripod, but with a long telephoto lens? Again, camera movement could be the cause, as long lenses magnify even slight vibrations. Were you using a wide aperture, like f/2.8 or f/4? Then maybe you missed the focus, or needed to use a smaller aperture to get more depth of field. Were you using a cheap kit lens? Then perhaps the lens is the problem. Did you stop down to f/22? Then lens diffraction might be the culprit. Was the wind blowing? Then maybe the wind moved leaves or flowers, or caused the tripod to vibrate.
Next, take a closer look at the evidence. Start by looking at your photo at 100% (or 1:1). (You should do this routinely for all your photos anyway to look for problems and learn how to judge sharpness.) See if any part of the photo is sharp. If something is sharp, then you can rule out camera shake. And you didn’t entirely miss the focus (though maybe you didn’t get the most important parts of the image in focus).
If nothing is sharp, then camera movement could be the culprit. But it could also be a major focusing error or lens softness. Let’s look at each of these causes, with clues to help you determine which one was responsible for the blurry photograph.
Camera Movement
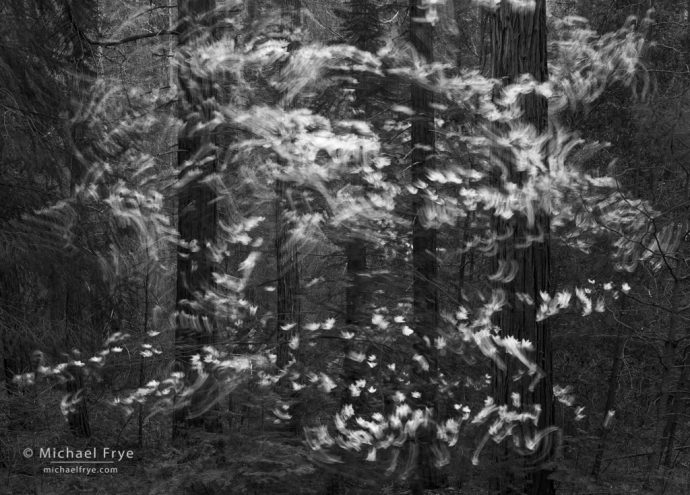
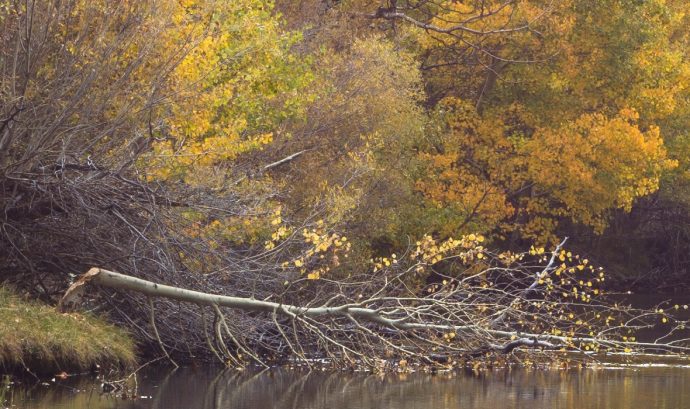
If the blurring was caused by camera movement you’ll often see a slight ghosting or double-image when you look at the image at 100%. This is especially true of tripod-mounted images, where the blurring is caused by vibrations rather than continuous movement. Here’s what that looks like (click on the image to view at 100%):
This view shows the ghosting (double image) characteristic of images blurred by camera movement. (Click on the image to view at 100%).
Do you see how the smaller branches here are ghosted, or doubled? That only happens with camera movement or subject movement. (Often the ghosting is more subtle, so you have to look hard for it.)
In this case, since the whole photo looks this way, it’s not wind-created subject movement, as the wind would move the leaves and smaller branches more than the trunks. So it has to be camera movement.
If you see something like this and you were handholding at a slow shutter speed, then, well, there you go. Next time hold the camera steadier, use image stabilization, set a faster shutter speed, or use a tripod.
If you were using a tripod there could be many causes: a flimsy tripod; not using a cable release, remote, or self timer; bumping the tripod; forgetting to turn off image stabilization; mirror slap; shutter vibration; wind shaking the tripod – and probably some other things I can’t think of right now.
It can be hard to pinpoint the precise cause of tripod vibrations after the fact, so it’s important to magnify your images on the back of the camera to check sharpness in the field. Then if a photo isn’t sharp you can experiment to find the cause. Make sure image stabilization is off. Try using mirror lockup. If it’s windy, lower the tripod, weigh it down, wait for a lull, or use a faster shutter speed. With Sony A-series cameras, try turning on e-Front Curtain Shutter or even Silent Shooting to eliminate shutter vibrations.
Subject Movement
With subject movement you’ll typically see the same kind of ghosting, or double image, as you see with camera movement, except that you’ll usually only see it in specific parts of the image. If flowers were blown by the wind, for example, then some flowers will be sharper than others, and objects not affected by the wind, like rocks, will be sharp. Here’s an example:
With wind-created subject movement, some objects will be sharper than others – even though they might be in close proximity – and you’ll often see some ghosting (a double image). (Click on the image to view at 100%.)
Notice how some of the leaves and thicker branches seem almost sharp, while other branches, leaves, and flowers look quite fuzzy. This is typical with wind-blown vegetation. Also, notice the ghosting (double-image) in the upper-left.
With moving people or animals, the extremities (hands, feet, tail, wingtips) will usually be more blurred than the body.
The cure for subject movement is either patience (to let the wind die down), or a faster shutter speed (usually along with a higher ISO). Again, it’s better to catch things like this in the field, so you can fix problems before it’s too late. Get in the habit of frequently magnifying your images on the back of the camera to check sharpness.
Missed Focus
It’s unusual for a photograph to be completely out of focus. With landscape photographs you’re typically using medium to small apertures, and most people use autofocus, so usually something is in focus – though maybe not everything, or the most important things.
It’s still possible, however, to miss the focus entirely. Maybe you turned off autofocus for some reason, then forgot to turn it back on (who hasn’t done that?). When this happens you won’t see the ghosting or double-image caused by camera movement; instead, the whole image will just look soft. But one clue indicating missed focus is that usually some parts of the image will be a little sharper than others. If objects closer to the camera are sharper, then you focused in front of everything. If objects farther from the camera are sharper, then you focused behind everything.
Here’s a 100% view of a photograph where I missed the focus (click on the image to view at 100%):
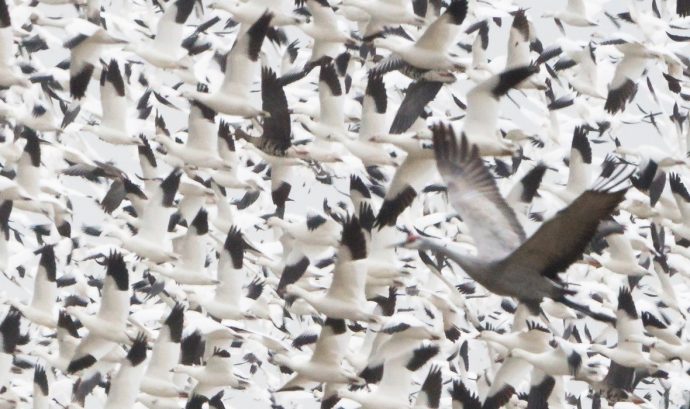
The crane is blurred, while the geese behind it are sharper – a sure sign that I focused behind the birds.
The crane (the large gray bird) is soft. But the geese (the white birds) behind it are sharper. In fact the farther the birds are from the camera, the sharper they are, showing that I focused behind everything.
You could say that the problem was insufficient depth of field, since a smaller aperture would have made the crane sharper. But I used f/9.5, and all the birds were far away, so I should have been able to get them all in focus at f/9.5. So I really just missed the focus. (I was focusing manually because the autofocus stopped working with my adapter. Long story, but that’s what you get when you try to focus manually on flying birds!)
It’s more common to miss the focus when photographing wildlife, portraits, or in street photography, where subjects are moving, when you’re often using wide apertures, and it’s critical to get a key spot in focus – like the subject’s eyes.
No camera’s autofocus can perfectly track and focus on moving subjects all the time. But if you’re consistently missing the focus in such situations with an SLR, first try calibrating your camera’s autofocus (something you should be able to adjust yourself within the camera’s menu). If that doesn’t help, you might consider getting a camera with a better autofocus system.
With Sony A7-series cameras using Sony lenses, I’ve noticed that autofocus sometimes completely misses the mark when the lens is stopped down to f/11 or f/16. (This camera/lens combination keeps the aperture stopped down all the time, and it’s hard to focus precisely at small apertures because the depth of field is so great, making everything seem almost in focus.) The solution is to open up the aperture to, say, f/4 to focus – either manually or with back-button autofocus.
Insufficient Depth of Field
This is a common problem with landscape photographs. If part of the image is in focus, but the foreground, background, or both are out of focus, then either you needed a smaller aperture, you focused at the wrong distance, or it was impossible to get everything in focus no matter what.
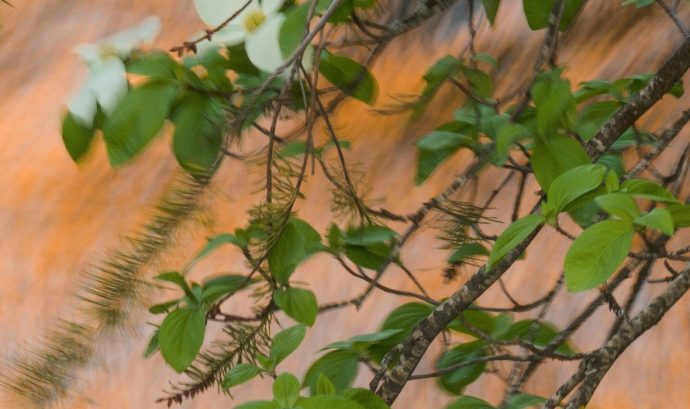
Here’s an example. The image looks reasonably sharp at this size:
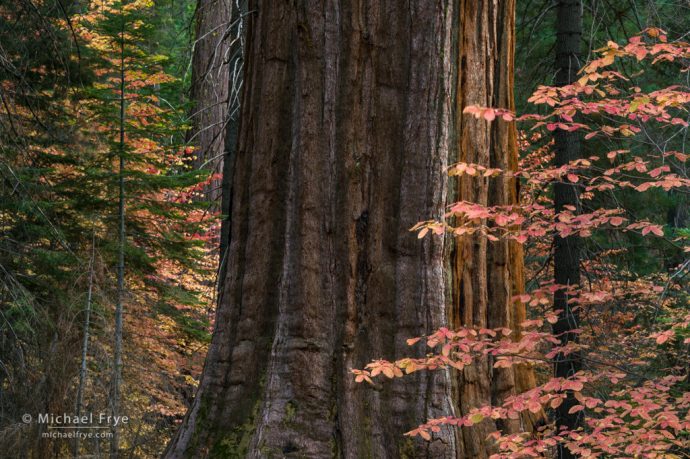
Dogwoods and giant sequoia, Yosemite
But at 100% you can see that foreground leaves are in focus, while the background is slightly blurred (there’s a also a little wind-created subject movement in the foreground leaves):
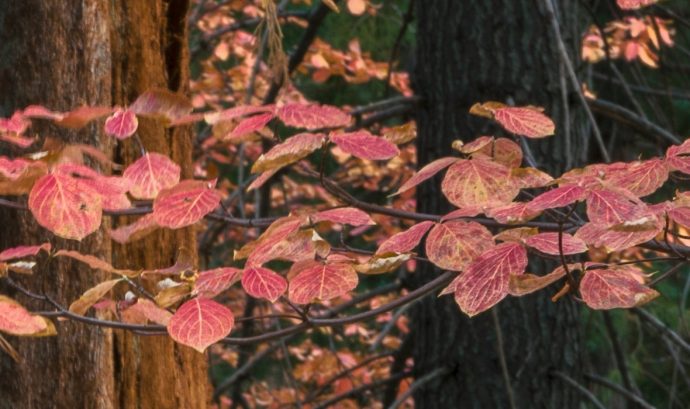
The foreground leaves are (mostly) sharp, while the background leaves are a little soft, indicating either a focusing error or insufficient depth of field (even though I used f/16).
I tried focusing farther back, which made the background sharper, but now the foreground leaves are slightly out of focus:
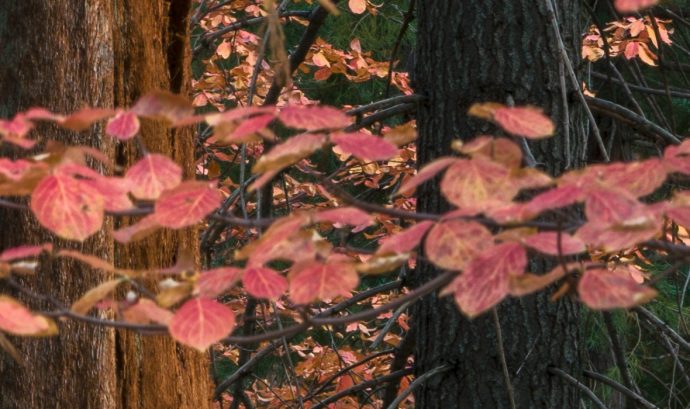
I focused a little farther back, which put the background trunks and leaves into focus, but now the foreground leaves are a little soft.
Both of these images were shot at f/16. I could have stopped down to f/22, but that would have created serious diffraction, and still might not have been enough to get everything in focus. I chose to keep the aperture at f/16 and focus-stack.
Obviously focus and depth of field are related. There are times when, say, f/11 might be a small enough aperture to get everything in focus – if you focus at the right distance. But if you focus too close to the camera, the background will be out of focus. And if you focus too far away, the foreground will be out of focus. When the scene has a lot of depth, and getting everything in focus is a challenge, you have to focus in between the foreground and background – but closer to the foreground, as there’s more depth of field behind the spot you’re focused on than in front of it.
Admittedly, focusing “closer to the foreground” is a bit vague. Focusing for maximum depth of field is a complex subject, so I recommend that you read this post if you want to understand some of the complexities. But if you find that many of your images have out of focus foregrounds or backgrounds, then you need to be using smaller apertures, focusing more precisely, or both. And maybe this goes without saying, but use a tripod! A tripod will allow you to use the slow shutter speeds required for small apertures, without having to push up the ISO.
Lens Softness
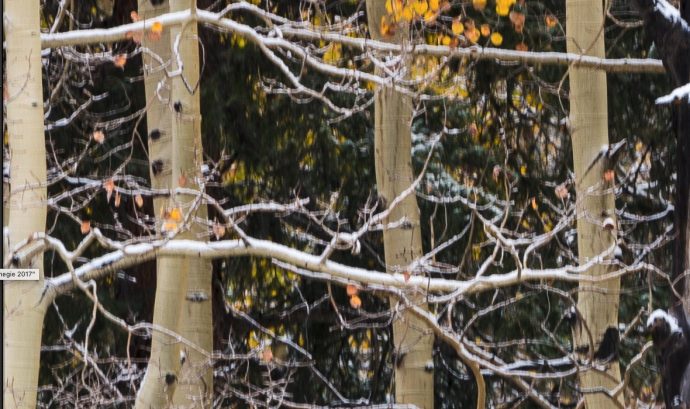
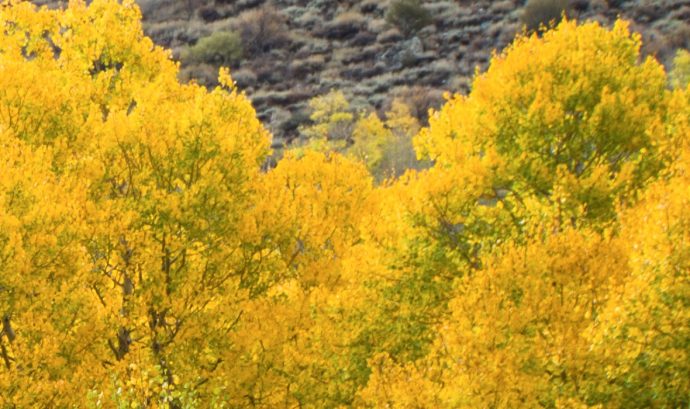
Lens softness will sometimes make the whole image fuzzy, but usually it’s just the corners that are soft. Here’s an example:
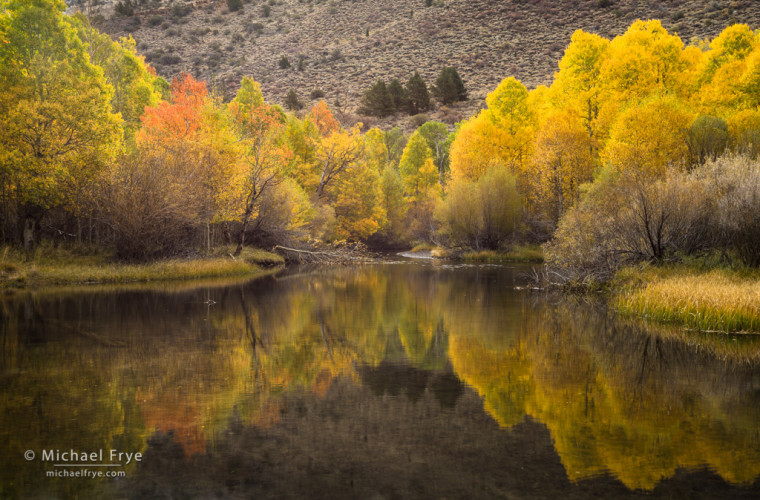
Aspens along a creek in the eastern Sierra Nevada, California
The image looks fine at this size, doesn’t it? And a magnified view of the center it looks quite sharp (click to view at 100%):
The center of the photo looks sharp. (Click on the image to view at 100%.)
But the upper-left corner it looks mushy:

The upper-left corner is soft.
And the upper-right corner looks just as bad:
The upper-right corner is also soft.
Since the middle is sharp we can rule out camera movement or a major focusing error. Subject movement is unlikely unless the wind somehow blew the leaves in the corners and not the middle. The trees in the middle are about the same distance from the camera as the trees in the corners, and the aperture was reasonably small (f/11), so I doubt that insufficient depth of field caused the problem.
And besides, anytime you see a sharp middle with soft corners, the most likely suspect is the lens. This image was made with a Canon 17-40mm f/4L lens at 40mm. F/11 is its sharpest aperture in the corners, but, well, it’s just a crappy lens. (Canon users can get the newer Canon 16-35mm f/4L or 16-35mm f/2.8L III instead.)
Sometimes the lens can make the whole image soft. If everything is a little fuzzy, and you used f/16 or f/22, then diffraction could be the culprit. Next time use a wider aperture if possible (if the wider aperture will provide enough depth of field). (For more about f-stops and diffraction, see this post.)
On the other hand, some lenses can be soft at wide apertures, even in the middle of the picture. And some lenses can be soft at any aperture. This is especially true of wide-range zooms, like a 28-300mm, or cheap kit lenses. While some of the newer wide-range zooms can be relatively good, they tend to get soft at longer focal lengths, like 200-300mm. Teleconverters can also make an image soft.
Long lenses also exacerbate camera movement, tripod vibrations, and focusing errors. So with telephoto lenses, how can you tell whether the lens (or lens-teleconverter combination) is soft, or whether some other problem made the photo fuzzy?
First, look for ghosting, as shown in the “Camera Movement” section above. Then check the shutter speed. If the shutter speed was fast – like 1/500th of a second or faster – then camera movement is less likely to be the problem, and you’re probably looking at lens softness or a focusing error.
Next, look at many photos made with the same lens, at the same focal length (if it’s a zoom). If you can find any images with this lens-and-focal-length combination that are sharp, then you know the lens is capable of making sharp images, But if you can’t find any sharp images made with that lens/focal length combination, then you have to suspect that the lens just isn’t very good – at least at that focal length.
If you can find some sharp photos with a certain lens-and-focal-length combination, then you might check the apertures you used, and see if there’s a correlation between f-stops and sharpness. You should also probably check shutter speeds, and see if the sharper images were made with faster shutter speeds. If so (and again, we’re talking about long lenses), then the fuzziness at slow shutter speeds is probably caused by camera movement. Use mirror lockup. If you’re already using mirror lockup (along with a remote, cable release, or self timer), then maybe it’s time to buy a sturdier tripod. (And again, for Sony A-series cameras, try using e-Front Curtain Shutter or Silent Shooting.)
We all make mistakes, and we’ve all made photographs that are unintentionally blurry. But with a little detective work we can learn from those mistakes and make consistently sharp photographs.
— Michael Frye
P.S. If you’re trying to figure out whether a lens is responsible for some blurry photos, it’s easy to find images made with a particular lens in Lightroom Classic. In the Library Module, select All Photographs in the Catalog panel (second panel down on the left side). Then, in Grid Mode, click on the Metadata tab in the Library Filter at near the top of the screen (if you don’t see the Library Filter, go to View > Show Filter Bar). By default you’ll see four tabs: Date, Camera, Lens, and Label. Just select the right lens from the list below the Lens tab:

Using Lightroom Classic’s Filter Bar to find images made with a specific lens.
You can then narrow your search further to include only images with the same focal length, or even the same focal length and aperture. Choose any of the other tabs under the Metadata filter, change it to focal length, and click on the focal length you want to search for. (You can even choose a range of focal lengths by shift-clicking.) Choose another tab, change it to Aperture, and select the aperture you’d like to search for:

Refining the filter to show images made with a particular lens, focal length, and aperture.
Related Posts: Why F/16?; Focus-Stacking Season
Michael Frye is a professional photographer specializing in landscapes and nature. He is the author or principal photographer of The Photographer’s Guide to Yosemite, Yosemite Meditations, Yosemite Meditations for Women, Yosemite Meditations for Adventurers, and Digital Landscape Photography: In the Footsteps of Ansel Adams and the Great Masters. He has also written three eBooks: Light & Land: Landscapes in the Digital Darkroom, Exposure for Outdoor Photography, and Landscapes in Lightroom: The Essential Step-by-Step Guide. Michael has written numerous magazine articles on the art and technique of photography, and his images have been published in over thirty countries around the world. Michael has lived either in or near Yosemite National Park since 1983, currently residing just outside the park in Mariposa, California.


Great article per your usual, Michael. Especially appreciate the info on the lens image data bank avaiable. Will check that out! One change I would make in addressing the issue of DOF. Instead of shooting between the near and far focus, I would suggest focus stacking – just 2 or 3 shots could make a big difference. And since it’s landscape, often there is no subject motion, or if there is wind, that motion will be the same with or without focus stacking so may as well use it to bring the essential DOF as high as you can.
Thanks Greg. Focus stacking is a great solution for many situations where you can’t get everything in focus with one frame. But I can’t recommend it as a routine procedure. First of all, it requires more work in processing the images, which slows down your workflow. Second, many people can’t or don’t want to spend the money on a program like Helicon Focus to blend the images together, or spend the time to learn the software. Third, wind actually makes focus stacking virtually impossible. The wind-blown leaves or flowers in one frame don’t line up with the wind-blown leaves or flowers in the next, so when you try to blend the images together you’ll get ghosting. Even a light wind is problematic. I’ve tried this many times, and these days if there’s any wind movement in the vegetation I simply don’t try focus stacking because I know it won’t work. So I strongly recommend that people learn how to get everything in focus with one frame when possible – which means learning how to find the optimum focusing distance.
Great article Mike. I enjoyed it. Again, you show us your great expertise that is sincerely appreciated!
Michael, I found this post so very helpful—at least while reading it. We shall see if I can translate that to getting sharper images. I also enjoyed your focus-stacking post. Many thanks.
Thanks Carol, and I hope it does help!
Excellent article Michael. But I’ve always struggled to know how far you can enlarge the image to check for sharpness before you are considered to be pixel peeping and going too far. After all, everything becomes blurry if you enlarge it enough. Is there a simple guideline for checking in post? How much enlarging is just right and not too much? Thanks.
Thanks John. When viewing on a computer screen, 100% or 1:1 has long been considered the standard for viewing fine details and evaluating sharpness and noise. With newer high-resolution screens (like a Retina display), 100% isn’t as much of an enlargement as it used to be, so 200% or 2:1 might be better.
It’s trickier to find the right magnification on the back of the camera. If the camera (or its manual) tells you what a 100% view is, use that. Otherwise, zoom in until things get fuzzy, then back off until the details look sharp again. Then figure out how you got there, and use that same magnification level every time thereafter. So in other words, if pressing the zoom button six times gets you to the right magnification level, then always press that zoom button six times. The most important thing is consistency, so you’re always comparing apples to apples. If you know what a sharp image looks like at that magnification level, then you’ll know when an image isn’t sharp.
Thanks Michael. I’ll give those guidelines a try. I’ve always been over the screen trying to figure out where to draw the so called line with magnification, on the images where I’m not so sure. 🙂
Thank you again.
Thanks, Michael, this is a very helpful article. I’ve always struggled with getting sharp focus, but over the years I’ve gotten better with it. If I’m shooting an image where focus might be a problem and if I have time, I’ll enlarge the image in my viewfinder to check focus. Most of the time I try to focus one-third into the scene and it’s also helpful that my Fuji X-T2 has a manual focus indicator which shows the distance in focus. None of this always works, however, so it’s always good to keep the steps in mind that you’ve discussed above. Many thanks!
I’m glad you found this helpful Bob.
Great article, as usual, Michael! And, timely too. I had a friend just ask me about some focusing issues, so I’ll forward your article over to him.
Thanks Charlotte – I hope this helps your friend.