Reviews
by Michael Frye | May 23, 2021 | Night Photography, Reviews
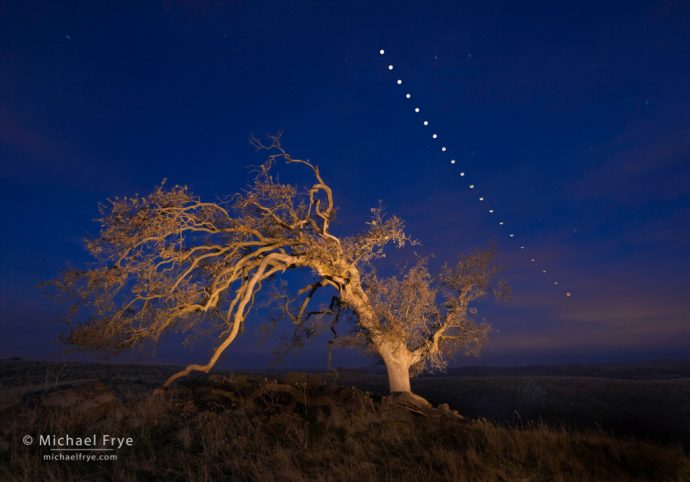
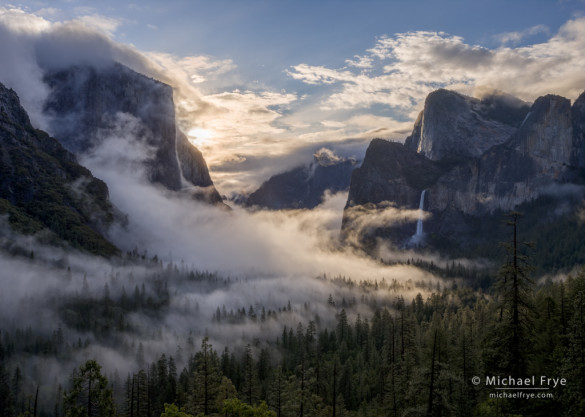
Oak tree and lunar eclipse sequence, December 10th, 2011, Mariposa County, Sierra foothills, California. In this sequence, the moon was setting to the west-northwest just before sunrise. In the upcoming eclipse, the moon will also be setting just before sunrise for viewers in the western U.S. – but to the southwest. (Click here to read the story behind this photo.)
In case you haven’t heard, there’s going to be a total lunar eclipse this week in some parts of the world. That includes western North and South America, Australia, New Zealand, and eastern Asia. You can see all the places where the eclipse will be visible on timeanddate.com.
The total eclipse will last about 14 minutes, from 11:11 to 11:25 UTC (Universal Time) on Wednesday, May 26th. That translates to 4:11 to 4:25 a.m. Wednesday here in California. The partial eclipse begins at 9:44 UTC, and ends at 12:52 UTC (2:44 a.m. and 5:52 a.m. Pacific Time).
(more…)
by Michael Frye | Nov 26, 2017 | Reviews

I don’t often post reviews here, but QT Luong’s Treasured Lands is a book I thought you should know about, and QT is currently having a sale on signed copies.
Treasured Lands is a big, beautiful, coffee-table book with photographs of all 59 U.S. national parks. Just visiting all 59 parks would be quite an achievement, but to make artistic photographs of all these places in different seasons and varying weather conditions is an amazing feat. It’s not surprising that it took QT twenty years to accomplish this.
(more…)
by Michael Frye | Aug 6, 2017 | Night Photography, Reviews
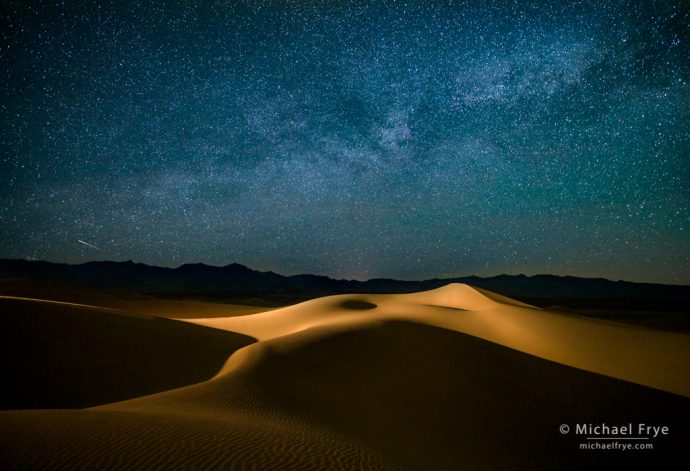
Milky Way over sand dunes, Death Valley. I was puzzled by talk about the “star-eater” issue with Sony cameras, since all my nighttime photos made with my a7R II showed plenty of small stars – including this image made in April from Death Valley.
There’s been a lot internet chatter lately about the so-called “star-eater” issue with Sony cameras. If you haven’t heard of this, last August Sony issued a firmware update for the Mark II versions of all its full-frame E-mount cameras (a7 II, a7s II, and a7r II), and many people have reported that since then these Sony models have been making smaller stars disappear in nighttime photographs. It seems that the new firmware included some kind of noise-reduction algorithm (even with Raw files) that blurred or eliminated those smaller stars. And, unfortunately, there’s no way to revert these cameras to the previous firmware version. In June of this year Sony released new firmware updates for these models, but some initial reports indicated that this new firmware didn’t fix the “star-eater” issue.
(more…)
by Michael Frye | Jul 1, 2015 | Reviews
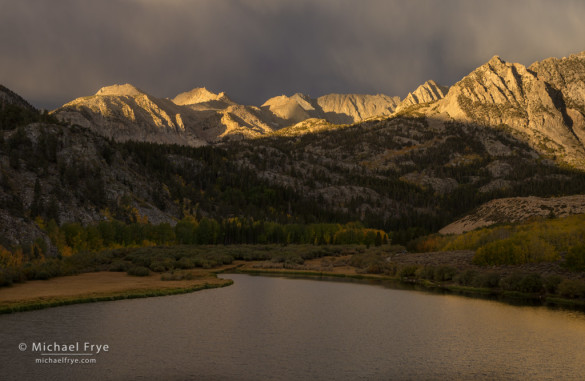
First light on peaks above North Lake, Bishop Creek Canyon, Inyo NF, CA, USA
In my recent post about high-resolution cameras, I stressed the importance of sharp lenses to get the most out of these 36+ megapixel sensors. But lens sharpness is an issue with any camera – at least when you start making larger prints. Even with a 16- or 20-megapixel sensor, lenses make a significant difference in large prints (16×20 inches and up). This is especially true in the corners; most professional-quality lenses are sharp enough in the center (at least with middle apertures like f/8 or f/11) for even a 36-megapixel camera. It’s the corners and edges that separate the decent lenses from the great ones. Those great ones are hard to find, and tend to be expensive.
Wouldn’t it be nice if you could fix imperfect lenses with software? Well yes, of course. But my experience with such fixes hasn’t been good. I’ve seen some great before-and-after examples online showing a blurry photo fixed with software, but when I’ve tried those programs myself I’ve invariably been disappointed. These cures tend to be just more-sophisticated sharpening methods, which may help a little, but if you apply more than a small amount things get really crunchy, or you see other weird artifacts. I can usually do just as well by selectively adding more sharpening to the corners in Lightroom or Adobe Camera Raw.
Piccure+
A few months ago I stumbled across another program that promised to help with fuzzy images, called Piccure+. I decided to download the free trial, and found that it worked surprisingly well. It’s not a magic bullet; there’s really no substitute for sharp lenses. But it can help with those soft corners, or overall softness caused by diffraction. Like any of these tools, it will definitely make the image look too crunchy if you overdo it, but I’ve been able to push the sharpening effect further in Piccure+ than with other software I’ve used, with good results and minimal artifacts.
(more…)
by Michael Frye | May 31, 2015 | Reviews
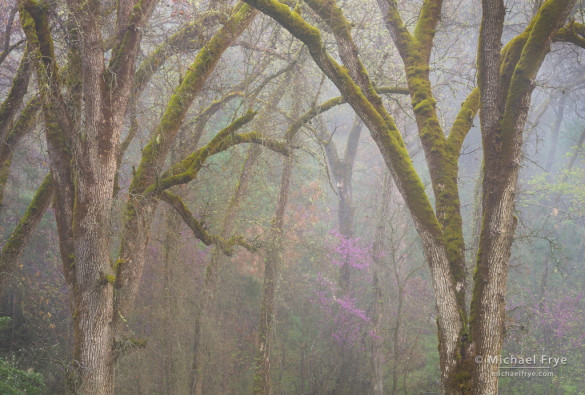
Oaks and redbuds in the fog, Mariposa County. A sharp lens, good technique, and the 36-megapixel sensor on my Sony A7r captured an incredible amount of detail in this photograph; I’ve printed it up to 40×60 inches with great results.
I’ve been getting a lot of questions lately about Canon’s new 50-megapixel cameras, the 5DS and 5DS R. These models haven’t been released yet, but many Canon users are wondering whether they should upgrade.
Since these cameras aren’t available for testing yet, it’s hard to say anything definitive about them. But since I bought my 36-megapixel Sony A7r over a year ago I’ve learned a lot about working with high-resolution cameras, and some of those lessons might be relevant to people who are considering buying one of those new Canon models, or a 36-megapixel camera like the A7r, Nikon D800, or Nikon D810.
(more…)
by Michael Frye | Apr 30, 2015 | Announcements, Reviews
Swirling mist from Tunnel View, Yosemite. The new HDR Merge in Lightroom 6/CC did a great job with this high-contrast scene, producing a natural-looking result, and doing it with a completely non-destructive workflow.
After months of rumors, last week Adobe finally released Lightroom 6 and Lightroom CC. When I saw the list of new features, I have to say I was a bit disappointed. I was hoping for improvements to Lightroom’s retouching tools, and to the Adjustment Brush. It would be nice to add a curve to only part of an image, for example, and the Auto Mask function of the Adjustment Brush has long needed improvement.
Changes to the Develop Module
Alas, Lightroom 6/CC offers only small improvements to the Develop Module, like the ability to move and copy Adjustment Brush pins, and to modify Graduated Filter and Radial Filter selections with a brush. Nice, but hardly earth-shattering.
There is, however, a new, unadvertised feature of the Spot Removal Tool that I stumbled upon, and find rather useful: you can now place new cloning or healing spots over old ones by hiding the tool’s circles. Press the H key to hide or reveal the circles (the Tool Overlay). Though this seems like a small thing, the ability to add cloning or healing in layers, one step on top of another, is vital for any serious retouching job, and a significant improvement to Lightroom’s retouching capabilities. (There was a workaround in previous versions of Lightroom, though rather an awkward one: you could place a new spot outside any existing ones, then drag it over an existing spot. The new implementation is much better.)
(more…)


