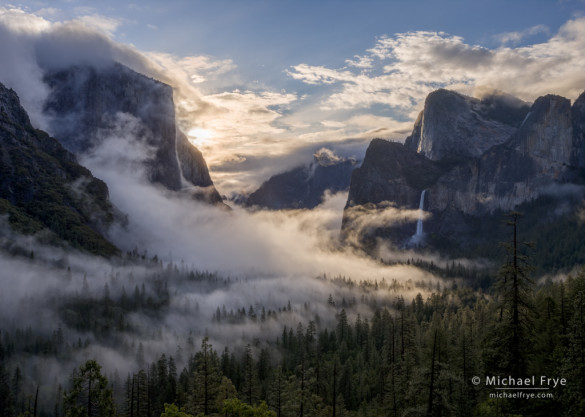
Swirling mist from Tunnel View, Yosemite. The new HDR Merge in Lightroom 6/CC did a great job with this high-contrast scene, producing a natural-looking result, and doing it with a completely non-destructive workflow.
After months of rumors, last week Adobe finally released Lightroom 6 and Lightroom CC. When I saw the list of new features, I have to say I was a bit disappointed. I was hoping for improvements to Lightroom’s retouching tools, and to the Adjustment Brush. It would be nice to add a curve to only part of an image, for example, and the Auto Mask function of the Adjustment Brush has long needed improvement.
Changes to the Develop Module
Alas, Lightroom 6/CC offers only small improvements to the Develop Module, like the ability to move and copy Adjustment Brush pins, and to modify Graduated Filter and Radial Filter selections with a brush. Nice, but hardly earth-shattering.
There is, however, a new, unadvertised feature of the Spot Removal Tool that I stumbled upon, and find rather useful: you can now place new cloning or healing spots over old ones by hiding the tool’s circles. Press the H key to hide or reveal the circles (the Tool Overlay). Though this seems like a small thing, the ability to add cloning or healing in layers, one step on top of another, is vital for any serious retouching job, and a significant improvement to Lightroom’s retouching capabilities. (There was a workaround in previous versions of Lightroom, though rather an awkward one: you could place a new spot outside any existing ones, then drag it over an existing spot. The new implementation is much better.)
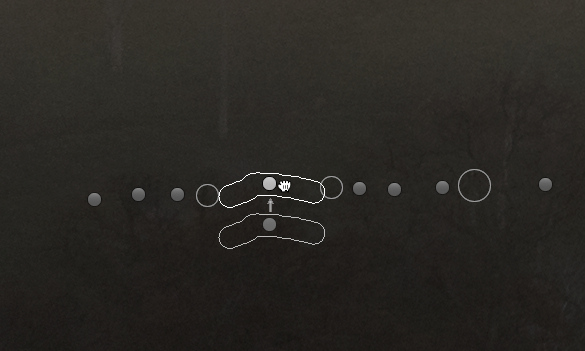
With the circles (Tool Overlay) visible, the cursor turns into a hand when it’s over an existing circle, so you can move the spot, but you can’t paint over it.
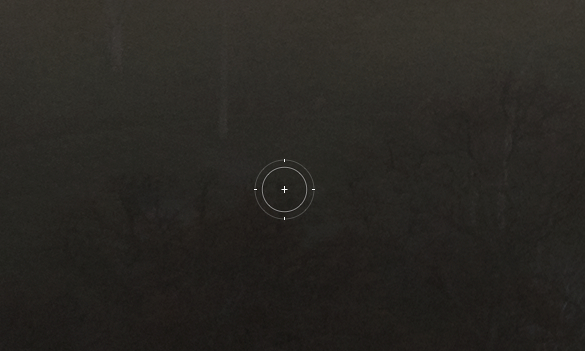
Now in Lightroom 6/CC, if you press the H key to hide the Tool Overlay, and place your mouse over an existing circle, the brush appears…
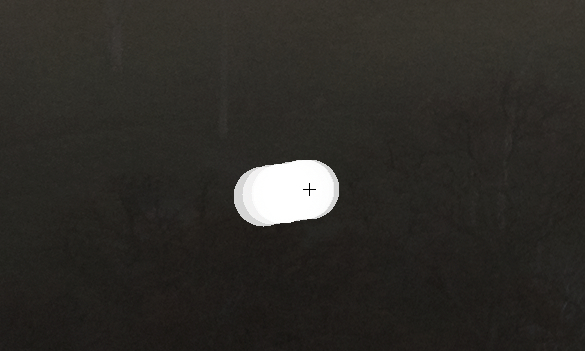
… and you can click or drag to paint over the previous spot.
HDR Merge
But the biggest additions to Lightroom 6/CC are the ability to create HDR images and panoramas directly from Lightroom, without using Photoshop or another application. I don’t create many panoramas, nor do I use HDR very often because Lightroom is so good at handling high-contrast scenes with just one image. But of course I had to try these new HDR and panorama features to see how they worked. And I have to say that they’re well done. Adobe has managed to add improved performance, functionality, and flexibility, yet keep the workflow simple.
The new HDR Merge looks like a significant improvement over previous methods of creating HDR images, but to explain why we need a little background. First, HDR is a two-step process. You start by creating the 32-bit HDR image, which contains the full dynamic range of all the merged files. But that full dynamic range can’t be viewed on a monitor, so you have to do a second step, called tone mapping, to compress the tones into a usable range.
It’s that tone-mapping part that often leads to surreal and garish HDR effects. But since version 4.1, Lightroom has had the ability to work with 32-bit TIFF files. This allowed (and still allows) you to create the 32-bit HDR image with another program, like Photoshop or Nik HDR Efex, but do the tone-mapping in Lightroom, with its fabulous Highlights and Shadows tools. This has been, by far, my favorite HDR method – on those rare occasions when I use HDR – because it usually yields excellent, natural-looking results.
The problem with this workflow is that it’s convoluted. You have to do things a certain way to get that 32-bit HDR TIFF from Photoshop into Lightroom. It’s even more complicated to create a 32-bit TIFF in HDR Efex and get an editable version into Lightroom to tone-map it.
But the new HDR Merge in Lightroom bypasses all the confusion. You just select the images you want to merge in Lightroom and choose Photo > Photo Merge > HDR. In the ensuing dialog you have a few simple choices. (I’d suggest unchecking Auto Align unless you were hand-holding the camera. If something moved between frames, like clouds, you might choose a Low, Medium, or High Deghost Amount. I also prefer to leave Auto Tone unchecked, though these settings can be changed later if you do check it). Then after you click Merge, a 32-bit DNG file will appear in Lightroom, which you can tone-map in the Develop Module. If you left Auto Tone unchecked, start by dragging Highlights to the left, and Shadows to the right, then tweaking Exposure, Contrast, and possibly Whites and Blacks.
Notice that the merged HDR file is a DNG, not a TIFF. This is a significant advantage, allowing you to keep a completely non-destructive workflow with HDR images – something previously unheard of. With this DNG file you can still adjust all the underlying settings of the Raw files, including the camera profile, sharpening, noise reduction, white balance – everything. It’s like having a Raw file with a huge dynamic range, and being able to adjust that file with all the power and non-destructive flexibility of Lightroom’s Develop Module. With any previous HDR method, adjustments made to the Raw files before creating the HDR file were baked in, and the only way to change them was to go back to the original Raw files, make the changes, and start over.
So, as I said, all this is well thought out and implemented. I was concerned, however, about Lightroom’s ability to generate a good 32-bit HDR file to begin with – one without artifacts. I’d sometimes found problems with Photoshop’s HDR function in the past. With one of my photographs, for example, a section of sky had a strange, hard-to-fix greenish patch. But when I tried merging this same bracketed sequence with Lightroom’s new HDR Merge, there was no greenish patch, nor could I find any other strange artifacts. In fact it worked beautifully – it’s the image at the top of this post. I’ve included the three original Raw files below, so you can see what went into the final image. I’ve tried the Lightroom 6/CC HDR Merge on a few more images now, and have not seen any objectionable artifacts (though that is, of course, a small sample size).
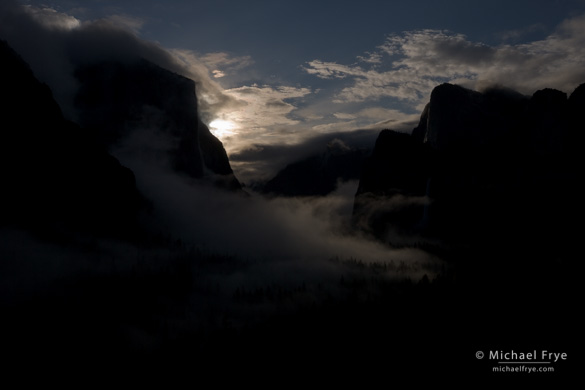
The first exposure of three used to create the final, merged HDR image at the top of this post
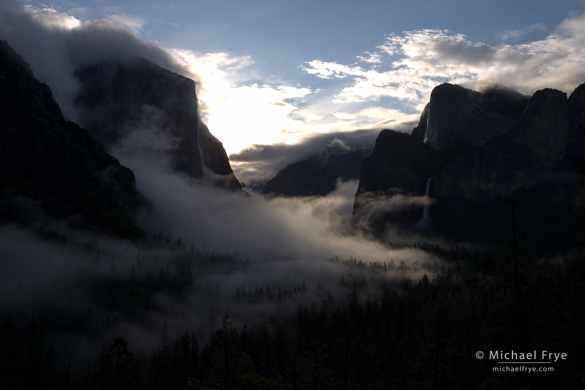
The second exposure merged to create the image at the top of this post (it’s two stops lighter than the first)
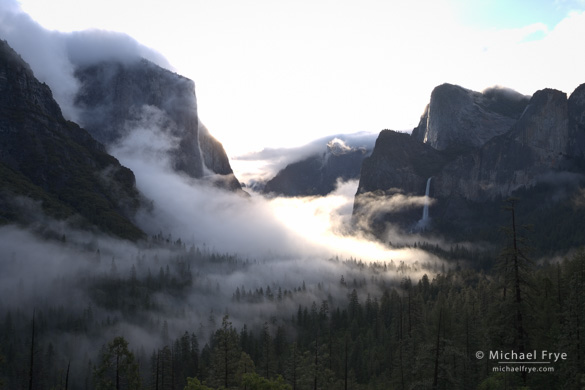
The third exposure merged into the final image at the top of this post (two stops lighter than the second)
Because of the ease and flexibility of the new Lightroom HDR Merge, I foresee this quickly becoming my preferred method for creating HDR images. If you want surreal, over-the-top HDR effects, this isn’t the tool for you. But if you want natural-looking results, and the scene’s contrast is too great to handle with one exposure, Lightroom’s new HDR Merge is definitely worth a try.
Panorama Merge
The new Panorama Merge in Lightroom 6/CC works in a similar way. Select the images you want to use for the panorama in Lightroom, then choose Photo > Photo Merge > Panorama. In the ensuing dialog, I’d suggest that you uncheck “Auto Select Projection,” then try both the Spherical and Cylindrical projection methods, and choose the one you like best. For this nighttime panorama from the Trona Pinnacles, I stitched eight images (all in vertical orientation with a 24mm lens) using the Spherical projection method:
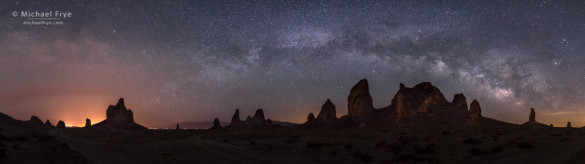
Trona Pinnacles and the Milky Way, Trona Pinnacles National Natural Landmark, California – a panorama stitched together with Lightroom 6/CC’s new Panorama Merge
Again, the resulting merged file is a DNG, and retains all the editing flexibility that you’d expect from the Raw file, including the ability to adjust the camera profile, sharpening, noise reduction, white balance, etc. Very nice.
Performance
Adobe also says that performance has been improved in Lightroom 6/CC, which is always welcome. I haven’t noticed a huge difference on my older Mac laptop, but some things are a bit quicker.
Other Changes
Many of the new features in Lightroom 6/CC are focused outside the Develop Module. These include facial recognition, video slide shows, new web galleries, and improvements to Lightroom Mobile. You can see all the new features listed here. (I might actually like using Lightroom Mobile, but I just don’t have enough room on my phone for those DNG files! Surely I’m not the only one with this dilemma… )
Conclusions
Lightroom 6/CC probably won’t revolutionize your workflow, but you may discover new features that are helpful, like modifying the masks in the Graduated and Radial filters with a brush, and painting over existing circles with the Spot Removal Tool. And the new HDR and Panorama merge functions are well done, providing flexible, easy-to-use options for processing high-contrast scenes and stitching panoramas.
Lightroom 6 and Lightroom CC are essentially the same, but Lightroom 6 is a standalone application and can be purchased with a perpetual license, while Lightroom CC is a monthly rental, available to Creative Cloud subscribers, including subscribers to Adobe’s $9.99-per-month Creative Cloud Photography Program (which includes Lightroom CC and Photoshop CC). (One important difference is that Lightroom Mobile is only available in the CC version.)
If you’re a Creative Cloud subscriber, there’s no reason not to upgrade – it won’t cost you any more. If you own a standalone license to Lightroom 5, it’s a tougher call. If you like creating panoramas or use HDR frequently, I’d say go for it. If not, well, there might not be a compelling reason to upgrade, but then again the upgrade is only $79. If you own an earlier version of Lightroom, like Lightroom 3 or 4, then this is a no-brainer: upgrade now! The change from Lightroom 3 to 4 was huge, and the improvements to the Spot Removal Tool alone in Lightroom 5 and 6 are worth upgrading from Lightroom 4.
Will I Be Updating My Landscapes in Lightroom 5 ebook?
Yes, absolutely. First, let me say that Landscapes in Lightroom 5: The Essential Step-by-Step Guide is all about the Develop Module, and little has changed there in Lightroom 6/CC. So everything in the ebook and its accompanying videos is still relevant and up to date (with a few minor exceptions).
But I will be making additions, corrections, and updates where necessary – both to the text and videos. I’ll also be adding two more examples, one where I take you step-by-step through processing an image using the new HDR Merge, and another where I do the same with a panorama.
People who have already bought the ebook will get the updated, expanded version free. But when the new version comes out, the price will go up. So in the meantime you can still get Landscapes in Lightroom 5 for just $14.95, and then get the updated version for free when it’s available. But if you wait until the new version comes out, the price will go up to $27.
Just to sweeten the deal a bit, you can get 20% off the retail price of Landscapes in Lightroom 5 now by subscribing to my blog. Just go to the upper-right corner, where it says “Subscribe by Email,” enter your email address, and you’ll get a code for a 20% discount. (If you’re already a subscriber, and haven’t purchased the ebook yet, email us or just reply to this email for the code.) You can find out more about the ebook, and it’s accompanying videos and Raw files, here.
In the meantime, I recommend Piet Van den Eynde’s ebook Lightroom 6 Up to Speed from Craft & Vision. Piet does a great job of explaining all the new features in Lightroom 6/CC, including all that stuff outside the Develop Module like Facial Recognition, web galleries, and so on.
So have you tried Lightroom 6/CC? Let me know what you think about it in the comments, and feel free to ask me questions about the new version.
— Michael Frye
Related Posts: Outdoor Photographer Excerpts My Landscapes in Lightroom 5 eBook; Lightroom 5 Beta
Did you like this article? Click here to subscribe to this blog and get every new post delivered right to your inbox!
Michael Frye is a professional photographer specializing in landscapes and nature. He is the author or principal photographer of The Photographer’s Guide to Yosemite, Yosemite Meditations, Yosemite Meditations for Women, Yosemite Meditations for Adventurers, and Digital Landscape Photography: In the Footsteps of Ansel Adams and the Great Masters. He has also written three eBooks: Light & Land: Landscapes in the Digital Darkroom, Exposure for Outdoor Photography, and Landscapes in Lightroom 5: The Essential Step-by-Step Guide. Michael has written numerous magazine articles on the art and technique of photography, and his images have been published in over thirty countries around the world. Michael has lived either in or near Yosemite National Park since 1983, currently residing just outside the park in Mariposa, California.


Hi Michael
Great write-up. I’ve been playing with it myself and agree completely. I really like the new HDR and Panorama to a DNG. That was a neat surprise. The deghosting has worked well, as has the alignment when I’ve been tripod-challenged.
Do you keep the same workflow with the HDR files, meaning starting at -1 exposure and -33 contrast? I’ve been starting there (I’ve always liked that workflow for everything, including people and travel, etc) and have had decent luck. Even the camera profiles come over!
I also with they would implement curves in the adjustment brush!! I’d never need photoshop again!
As a quick tip, the setting to use the GPU (Graphics processor) of the computer comes on by default. I have been using a Surface Pro 3 as a poor man’s Cintiq and had to turn that check box off, since I actually lost a little performance with it on. This was especially noticeable if I was running Lightroom and opened Photoshop at the same time (something the surface barely blinks at usually). I’m not sure if it’s Adobe or Microsoft’s graphics drivers but figured I would throw it out there if it affected anyone else.
Also oddly, the CC update logged me out of creative cloud. If that happens log back into the creative cloud application on your computer before you run lightroom 6 or it will just sit there and never load.
Thanks again Michael for the great writeup.
-John
Thank you John. Yes, I start with Exposure at -1.00 and Contrast at -33. But apparently it doesn’t matter with the HDR Merge, as Adobe used some algorithm for that which ignores the Basic Panel Tone settings. However, the Panorama Merge does use your settings in the Basic Panel from the primary selected image. In both cases Lightroom also ignores the Spot Removal Tool, so you’re wasting your time cloning out spots before doing a Panorama Merge. But if you remove spots on one of the Raw files before doing an HDR Merge you could always sync the Spot Removal settings from that original Raw file to the merged HDR.
Thanks for the tip about the GPU. It may be better to turn it off for some people. And thanks also for the heads up about logging you out of the Creative Cloud. I heard about something like that from other people as well.
Thanks for the insight Michael. That tip on overlaying adjustments sounds really helpful. I’ve only just started using LR 6. I’m seeing some improved speed which is nice. I’ve tested the HDR and am very impressed with the simplicity and the fact that the end result is still a raw file. I’ll be shooting more HDRs now. I’m looking forward to my next trip to Sentinel Dome to try making a panorama. I’ve avoided panoramas in the past because they were too much work for an occasional one off. Not any more.
Coming from 4 there are obviously more new features for me. But I find it an amazingly powerful tool for those of us who do not use Photoshop. Well worth the $79 upgrade fee.
Looking forward to you update to the ebook.
Thanks. 🙂
You’re welcome John, and thanks for chiming in here. I’m glad you like Lightroom 6!
Hi Michael
Your concern about putting DNG files on your phone is mitigated by the fact that Lightroom Mobile uses Smart Previews which are only about 3% the size of the original DNG. https://helpx.adobe.com/lightroom/help/lightroom-smart-previews.html
Thanks for pointing this out Eric. I should have worded things more carefully, as yes, Lightroom Mobile doesn’t use full-size DNGs, but rather Smart Previews of them. However, even the Smart Previews are too big if your phone is already full! Which is the case with me.
Thank you for the update on LR6. I’ve been really happy with the HDR feature – something I have previously avoided for many of the reasons you discussed. It is quick, easy, and creates very natural looking files that can be processed normally. I hadn’t noticed the update to the spot removal tool but am looking forward to trying it out. That will be a big help.
I also really like your Trona panorama!
You’re welcome Kyle, and thank you! Glad you like the Trona panorama.
“you can now place new cloning or healing spots over old ones by hiding the tool’s circles. ”
This is huge, and I’ve been doing the same in ACR for some time now.
Dan
Dan, I noticed that in Adobe Camera Raw not long ago, but I didn’t know how long that feature had been there. And it’s possible that Adobe added that to Lightroom five-point-something without me being aware of it, but I use the Spot Removal Tool a lot, and I think I would have noticed. So maybe they tried it out in Adobe Camera Raw first? Anyway, do you know a keyboard shortcut for hiding and revealing the Spot Removal Tool overlay in Adobe Camera Raw? The only way I know how to do it in Adobe Camera Raw is unchecking and checking the Show Overlay box.
Oh, and the facial recognition feature is quite powerful. It won’t help much with trees and rocks… but after chewing through my 8000+ photographs of a couple of classical musical performance groups I think I can now face the task of tagging who appears in nearly every one of them.
Dan
Since I usually avoid photographing my fellow humans, I don’t have much need for facial recognition software. 🙂 But I can see how it would be very helpful for your musician project.
Hi Michael
Great post and glad to find new feature like the overlaying adjustments.
I have found the new Brush tool within the Graduated Filter very useful.
Often you have something that is not in line with the horizon, like a mountain or similar.
And with this feature you can remove the graduated filter effect using a paint brush.
Love it!
Best regards
Thommy
Thanks Thommy, and I’m glad you like the new brush option with the Graduated Filter tool!
Thanks Michael – and a small comment: As I was curious about the bit depth of the HDR merged DNG files, I opened a couple of examples in Photoshop, and found them to be 16 bit. If this is generally the case, I suppose that the editability of these files might be reduced compared to workflows involving 32 bit.
You’re welcome Karsten. I don’t know the bit depth of the DNGs, but I’m not concerned about it as long as it works well – and so far it seems to.
Michael-
Thanks for your first thoughts on LR 6/CC. Finally, Adobe has included HDR Merge & Panorama Merge in the new version, which is something that was sorely needed in LR without exporting to Photomatix (HDR) or some other panorama plug-in. Wonder what this will do to Photomatix with their HDR program?
I am concerned about possible “bugs” in LR 6, have you noticed any at this point? Seems like LR 4 & LR 5 both had bugs which Adobe had to fix in the upgrades. On Adobe’s Community Lightroom forum, other users have had problems with CC locking them out of LR 6. Have you or your readers had a similar problem?
The Spot Healing Tool did need some work, from your blog it looks like LR has also addressed this matter.
Wish LR would allow the user to insert more than one line of text in the Slideshow module. Currently I have to create multi-line text in Elements or Photoshop, and then import it into LR when I compile my slideshows.
Again, thanks for your insights, your comments are always “spot on.”
Just visited Adobe’s Community Lightroom forum, and they have released an update called LR CC 2015.0.1/LR 6.0.1 to fix installation/launch issues, and accessing Help.
FYI. (Knew it would happen, see previous post above.)
Great, thanks for the heads up Bill.
The integrated HDR and pano support is worth the price of the upgrade for me. Plus, the one “feature” of it still being a stand alone app, no matter how much they try and push everyone towards CC… Yup, I’m still in the non creative cloud group. I also think the masking out of radial filters will be really handy.
I’ve got a pano and multi exposure shots from my latest trip that I need to try out.
Thanks for the article.
Doug
Doug- Yes Adobe seems to be pushing the hard sell of the CC subscription. Guess the Adobe bean counters figured that $9.95 x 12 months x #of years was going to net them more money than the $79 upgrade price.
One thing that I’m not clearly understanding is…will the LR6 stand alone have updates as they become available? Or is it just LR6 CC?
Thanks
Bill
The perpetual license will get all the minor upgrades. The .1,.2,.3 etc. But those will only be for bug fixes and new profiles. If/when Adobe adds a legitimate new feature, it will only be in CC. I have already downloaded the upgrade mentioned above and I am using 6.
The real question is whether or not Adobe ever sells a Lightroom 7. To my knowledge, they have never added new features between major releases. They are going to have to start adding real features if they want to encourage the holdouts to go subscription. And even then it remains to be seen how well that works. I have no interest in not owning the software I use.
JohnC-
Thanks for responding. That answered my question.
I, too, want to own the software that I load on to my PC.
Bill
I’m afraid we’re ultimately going to be on the losing end of this one, but I will resist to the bitter end, and then I will decide whether or not to switch to another app with all the pain that implies :-(. They have already lost my $$ on Photoshop; I have switched to a different app.
I personally will not drop my money onto a product that requires me to keep a subscription running to be able to open my files or anything that requires me to have an internet connection.
If their subscription enabled me to keep and use the latest version I had paid for, that would be a different thing. But, in general, I consider it a predatory practice, and I will not support it. They are, of course a business and will do whatever they think is best for their business.
Doug
Yup! I’m with you!
Bill
You didn’t mention the focus stacking capability of LR6. Check it out. Works great.
Paul, I didn’t mention it because I didn’t know about it. Are you talking about using the new Panorama Merge for focus stacking, or something else?
Paul, I’d like to know about this also. Pano or HDR Marge?
Thanks
Read an interesting article, by Pete Collins, on Scott Kelby’s “Lightroom Killer Tips” a few minutes ago. One of the commenters stated that he created a “backdoor” HDR image by taking a good photo with an acceptable range of tones. Create two virtual copies, and adjust both copies for exposure, one with +2 stops, and the second with -2 stops, and then merge those using [Shift] +
Cntl (or Cmd) + H. Sounds like an interesting idea that I’ll have to try out.
Anybody else want to give it a try?
Not sure I understand the point. If the dynamic range of the original photo does not clip the highlights or the shadows, wouldn’t creating the HDR merely narrow the dynamic range at both ends? Is the idea that creating the HDR would be easier and get as good or better result than manually adjusting the original photo?
That’s a good question, I don’t know the answer yet. The “typical” HDR photo consists of 3 bracketed photos taken at +2, 0, and -2 stops of exposure, and then merged together to form the HDR image. It would seem to me that it would expand the dynamic range of the merged image.
If you had a high contrast situation I would want to take say 5 or 7 images for the merge, adjusting in 1 stop increments. You might use this backdoor method if you had an image that you really liked but the dynamic range was very large.
I threw my initial comment out because I thought it was an interesting idea that I would try and also share with others to get their thoughts.
Yes, but in theory, the reason you bracket and then HDR is because the dynamic range presented in nature is too wide to capture in one image. You have to clip one end or the other in order to capture the opposite end. Then by merging you recapture that which could not be captured in just one photo, due to the too wide dynamic range. It just seems as though if your original scene does not blow out the highs or clip the shadows, then you have all the dynamic range you need, you just have to work the details. Or at least that what it seems like to me.
Maybe Michael can comment.
My first thought was similar to John’s – that if you already have detail in highlights and shadows, there wouldn’t seem to be a need to make two versions of the image and merge them with HDR. If it’s a question of balancing the light better between, say, a bright upper part and darker lower part of an image, then the Highlights and Shadows tools in Lightroom should be able to handle that, along with the Adjustment Brush and maybe the Graduated Filter.
But I thought I’d try the technique Bill described anyway, and, well, I didn’t find any advantage to it. The merged file didn’t have any bigger dynamic range than the original. I shouldn’t have been surprised at this, actually, since Lightroom ignores Basic Panel Tone settings when doing an HDR Merge. So if you have two Virtual Copies with different Exposure settings, Lightroom’s HDR algorithm doesn’t see any difference between the two, so it’s like merging two identical files.
Possibly this idea could work if you made the Virtual Copies, then exported them as TIFFs, then used Lightroom’s HDR Merge on the two TIFFs. But this seems like a lot of trouble for a file that already has enough highlight and shadow detail to begin with. It might be worth pursuing if you wanted, say, and HDR grunge look, but then you’d be better off using Photomatix for the HDR rather than Lightroom.
Michael & JohnC-
Thanks for your imput! The “backdoor” method did seem like a lot of work for very little gain in the image.
Michael-
Any way to edit my comments on your blog? Now & then I screw up and forget how to spell!
Thanks
Bill, there’s no way for you to edit them. I can edit them if you tell me what to change, and it’s really important to you. 🙂
Hello Michael,
any news about the date release of the new version of book? Thank you.
I can’t give you a precise date yet Antonio, but we’re getting close.
That’s good to hear Michael. I’ve been looking forward to the update too. 🙂