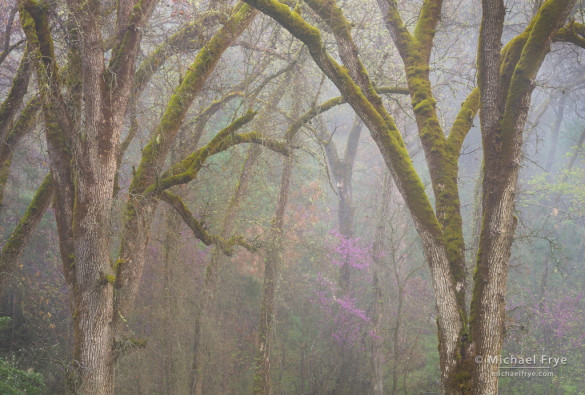
Oaks and redbuds in the fog, Mariposa County. A sharp lens, good technique, and the 36-megapixel sensor on my Sony A7r captured an incredible amount of detail in this photograph; I’ve printed it up to 40×60 inches with great results.
I’ve been getting a lot of questions lately about Canon’s new 50-megapixel cameras, the 5DS and 5DS R. These models haven’t been released yet, but many Canon users are wondering whether they should upgrade.
Since these cameras aren’t available for testing yet, it’s hard to say anything definitive about them. But since I bought my 36-megapixel Sony A7r over a year ago I’ve learned a lot about working with high-resolution cameras, and some of those lessons might be relevant to people who are considering buying one of those new Canon models, or a 36-megapixel camera like the A7r, Nikon D800, or Nikon D810.
Do You Need All Those Megapixels?
First, if you’re considering buying one of these high-resolution cameras, can you really tell the difference between, say, 20 megapixels and 36, or 50? The answer is yes, absolutely – if you make a large print, and if you use sharp lenses and good technique with those high-res bodies. With my A7r, I can make 30×40-inch prints with all the detail I could want. Every blade of grass, twig, and pine needle is well-defined, even when you get right up to the print and look at it closely. And even in a 16×20 print the difference is noticeable, though obviously more subtle.
Of course, people don’t usually look at large prints closely. From five feet away, the difference between 20 megapixels and 36 might be discernible in a 30×40 print, but most people – even most photographers – wouldn’t notice.
So I love being able to create really sharp, large prints from my A7r. As a professional, I want to make the highest-quality prints I can. But most photographers never make large prints, or only make them occasionally for hanging in their office or on their living room wall, to be viewed by friends, family, and co-workers – people who won’t be inspecting the print from inches away to see how sharp it is.
So if you’re really picky about print sharpness, you should definitely consider buying a 36- or 50-megapixel camera. But honestly I think a 16- to 24-megapixel camera is probably more than enough for most photographers.
The Difference Between 36 and 50 Megapixels
If you’re still interested in one of these high-resolution cameras, will you be able to tell the difference between the 36-megapixel Sony sensors and the new 50-megapixel Canon sensor? Will the Canon produce sharper prints?
In theory, yes. With really sharp lenses, the higher-megapixel Canon should be able to make sharper prints than the Sony and Nikons. But as the number of pixels gets larger, and the photosites on the sensor get packed closer together, you need sharper lenses to resolve the difference between one photosite and the next. I suspect that you’ll be able to tell the difference only with some of the very sharpest lenses available today.
What About Noise?
You have to also consider noise. The more photosites you pack into the sensor, the smaller those sites have to be. Larger sites gather more light, which means the signal doesn’t have to be amplified as much, resulting in less noise. So all other things being equal, cramming more megapixels onto the sensor, requiring smaller photo sites, should result in higher noise.
But of course all things aren’t equal. Even at the pixel level, the Sony-made sensors in the D800, D810, and A7r have less read noise than the highest-resolution Canon bodies currently available, like the 5D Mark III (22 MP) and 6D (20MP). When you down-sample those 36 megapixel files from the Sony sensors to 22 megapixels, the difference is even greater.
So one of the biggest questions I have about the new 50-megapixel 5DS and 5DS R is about the noise levels. Canon says that the noise of the 5DS and 5DS R is about the same as the 5D Mark III at the pixel level. Since there are a lot more pixels in these new cameras, that should translate into less noise in the final print compared to the 5D Mark III.
But, of course, we only have Canon’s word on this so far, and will have to wait for actual tests. And the read noise at the pixel level of the Sony A7r, Nikon D800, and Nikon D810 is lower than the Canon 5D Mark III, so I suspect that the Sonys and Nikons will still outperform the new Canon when it comes to noise. We’ll see. (I compared the noise between the Canon 5D Mark III and Nikon D800 in this post.)
Lenses
Lens quality matters with these cameras. This always makes a difference when you start making large prints, even with 16 or 20 megapixels. But a 36- or 50-megapixel sensor magnifies any lens flaws, and buying one of these cameras might show you just how bad your lenses really are.
That was certainly my experience. I’m not using any of the lenses that I owned 18 months ago. I’ve replaced my old Canon 70-200 f/4L with a much better copy. I’m also using that vintage Nikon 50mm f/1.8 lens that I talked about recently, and a very sharp Rokinon 24mm f/1.4 lens, which I bought for nighttime photography, but works well in the daytime also. And I’ve swapped my Canon 17-40 f/4L for a slightly sharper copy, though I plan to replace it with a better wide-angle zoom at some point.
I’m telling you this because if you really want the extra resolution from a 36- or 50- megapixel camera you may need to upgrade your lenses too. The center shouldn’t be a problem. Most professional-quality lenses, including zooms, are sharp enough in the center to take advantage of these high-resolution sensors. It’s the corners that separate the merely good lenses from the great ones. And when you’re looking at a print from a 36-megapixel camera, mushy corners really jump out at you when compared to a beautifully-crisp center.
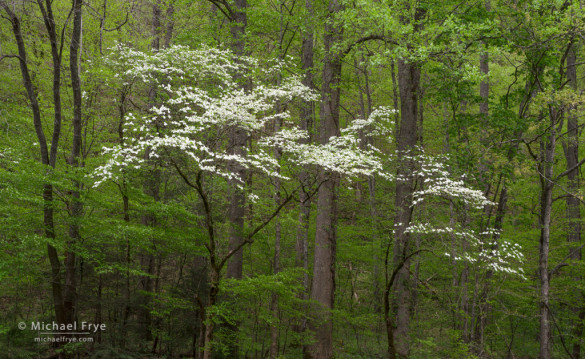
Dogwoods, Great Smoky Mountains NP, North Carolina. I used my Canon 17-40mm f/4L zoom (at 40mm) at its sharpest aperture (f/11) to capture this photo. As you can see in the closeups below, the center is sharp, but not the corners.

A 100% or 1:1 view of the center of the dogwood photograph (click to view actual size)

100% view of the upper-left corner (again, click to view actual size)
I wish I could give you an easy formula for finding great lenses, but I haven’t found one. Just because a lens is expensive or has some fancy letters attached to its name (like L or ED) doesn’t mean it’s a great lens. Lens design is complicated. And even if the lens design is good, some copies are better than others. Also, I haven’t found much correlation between the online reviews and my real-world experience. All too often I’ll test a lens that has a great reputation, and gets good reviews from some of the lens-testing sites (DPReview, Photozone, DXO Mark, etc.), and find that it’s actually quite bad. Some of this is probably due to variations between copies, but I also think that the lab tests performed by these sites sometimes don’t translate into the real world. To me, the most useful online information comes from viewing actual full-size files made with the lens. But this only works when you can see all four corners in focus in the scene that was photographed for the test. It’s all too common to find lenses that are de-centered – softer on one side than the other, or even just soft in one corner – so seeing one corner isn’t enough.
Ultimately there’s no substitute for testing the lenses yourself. I’ve set up my own home-made lens-testing chart in my office, but unfortunately any set up like that only allows you to test lenses at relatively close focusing distances, and lens performance can change when you focus at infinity. So the best way to test lenses is to use them in the field. And make sure that when you buy a lens you can return it if you get a bad copy!
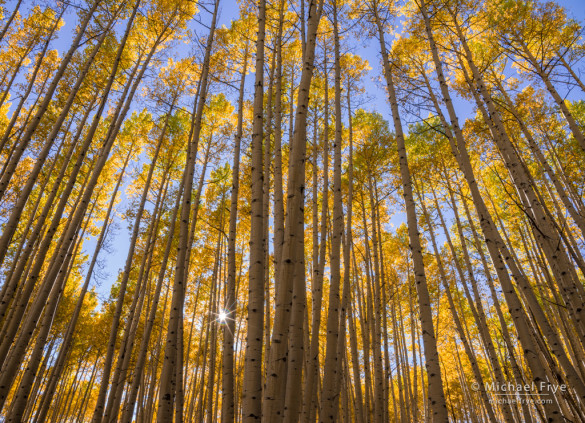
Quaking aspens, late afternoon, Gunnison NF, Colorado. This photograph was made with my Rokinon 24mm f/1.4 lens at f/11, and is much sharper in the corners than the dogwood image.
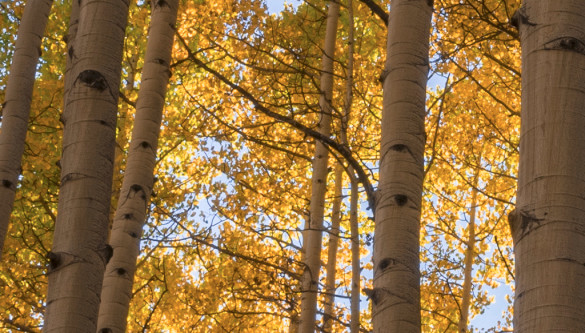
100% view from near the center (click to view at 100%)

100% view of the upper-right corner (click to view actual size)
Having said all that, it’s sometimes possible to get good results with less-than-perfect lenses by understanding your lenses’ strengths and weaknesses. That means, first of all, knowing what aperture yields the sharpest corners at each focal length. And if the lens is de-centered you should know which side or corner is softest, so you can use the soft corners on the sky whenever possible. With 50 megapixels you could zoom out slightly, with the intention of cropping off the edges of the frame, and still have enough resolution to make beautiful large prints – though of course you wouldn’t be getting the full resolution and sharpness the camera is capable of.
There are also some software solutions that might be able to improve lens sharpness. There are no magic bullets here, but sometimes these can help. My favorite of these is Piccure+, which I plan to write more about soon.
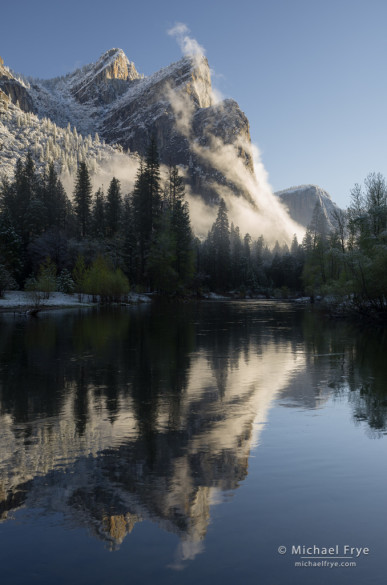
Three Brothers after a spring snowstorm, Yosemite. Corner sharpness doesn’t matter in this photo, where the corners don’t include any fine details – only sky and water.
Technique
High-resolution sensors also magnify any flaws in your technique. Of course you need to use a sturdy tripod with a cable release, remote, or self-timer. You should also lock up the mirror on DSLRs, and make sure image stabilization is off when you use a tripod.
In addition, tiny focusing errors become more noticeable with a 36-megapixel camera. If depth of field isn’t an issue (if everything is at infinity, for example, which happens fairly often in landscape photography), then autofocus can work, provided it’s calibrated properly. But probably the best way to ensure accurate focus is by zooming in with live view and focusing manually.
Depth of field also becomes more critical with high-resolution sensors, because a foreground or background that’s slightly out of focus becomes more noticable. I’m using focus stacking more often now with my A7r, and tilt-shift lenses could be useful also.

This closeup of a scene from Tunnel View shows what happens when you accidentally leave image stabilization on when using a tripod. The focal length was 200mm, and the shutter speed 1/15th of a second.

Aspens in fog near Ridgway, Colorado. Even though the depth of field wasn’t extreme here, I still needed a three-image focus stack blend to get everything in focus. The settings were 1/15th second at f/16 for each frame, with a 50mm lens.
Computers
More megapixels = larger files = filling up hard drives really quickly. Plus you may start wishing you had a newer, faster computer with more RAM, as the bigger files can slow down Lightroom or Photoshop. I put a solid-state drive into my now four-year-old Mac laptop, and that helped immensely. But it may be time for a new computer soon.
Conclusion
It may sound like I’m trying to discourage people from buying a 36- or 50-megapixel camera. I’m not – believe me, I love mine. But you should know what you’re getting into.
And print sharpness isn’t the most important thing in photography. It might not even be on the top ten list. The image content – the light, composition, subject, and the emotional impact that those elements convey – is always far more important than how crisp the print looks when examined closely.
So I’m glad that Canon users will now have a high-resolution body available to them. And there are rumors about Sony and Nikon coming out with new 50-megapixel cameras (but so far just rumors). All that is great – the more options the better. But these cameras aren’t for everybody, and we should try to remember what really matters in photography.
— Michael Frye
Related Posts: Should Your Next Camera Be a Sony?; Testing the Nikon D800E
Did you like this article? Click here to subscribe to this blog and get every new post delivered right to your inbox!
Michael Frye is a professional photographer specializing in landscapes and nature. He is the author or principal photographer of The Photographer’s Guide to Yosemite, Yosemite Meditations, Yosemite Meditations for Women, Yosemite Meditations for Adventurers, and Digital Landscape Photography: In the Footsteps of Ansel Adams and the Great Masters. He has also written three eBooks: Light & Land: Landscapes in the Digital Darkroom, Exposure for Outdoor Photography, and Landscapes in Lightroom 5: The Essential Step-by-Step Guide. Michael has written numerous magazine articles on the art and technique of photography, and his images have been published in over thirty countries around the world. Michael has lived either in or near Yosemite National Park since 1983, currently residing just outside the park in Mariposa, California.


Good article, Michael. I’ll likely add a link to it from something I just posted on the subject. A couple thoughts concerning two of your points:
1. The question of whether there will be much difference between 36MP and 50MP is a good one. I think that many people will be surprised at how little difference it makes to increase the number of photo sites from what the Sony/Nikon cameras provide to what the Canon will provide. I tend to subscribe to the rule of thumb suggesting that a doubling of photo sites is most likely to be significant. (At least to those who aren’t going to be perfectly fine with existing sensors — e.g. those who don’t print large or take extreme care with their images.)
That said, the perspective is likely to be a bit different for those of us still shooting Canon DSLRs, which previously provided no more than about 22MP. For us, the 36MP to 50MP comparison isn’t so relevant as the 22MP to 50MP comparison! And that one does meet my “double the MP” test.
2. There is several factors to weigh when it comes to noise. One of these is the “grain size” of the noise in prints and other presentations. I’ll bet we can both think of at least one photographer who made prints from 35mm film (quite beautiful prints, by the way) that have huge grain. It isn’t so much that amount of grain that is the issue — it is its size. The same holds true with noise, the digital rough equivalent of film grain. If it is big, a given level is more obvious than if it is very small. And with the 50MP sensors the size of the noise (e.g. the size of the pixels) is also quite small.
Lots to think about. My feeling is that the 5Ds and 5Ds R are not the sorts of cameras that every photographer will need to rush out and buy. As you point out, getting the most from these high resolution systems requires a commitment — to good lenses, to excellent focusing technique, to aperture selection, to camera stability, to work in post. For those who work that way, there will be benefits. For those who don’t, or for those who value other things more than they value sensor resolution, the additional photo sites may not make a significant difference.
Take care, and I hope we run into each other in the field again before long!
Dan
Great comments as always Dan – thanks!
Oh crap Michael!
Now you’ve got me “lusting” over these HR camera body. However am I to explain this to my significant other?
You and G Dan raised some very good points about high resolution. Besides the camera bodies, I would think that photogs are going to demand a higher quality in lenses, with perhaps better testing and quality control before it leaves the factory. As you said, you can spend high dollar on a lens, only to find out its of poor quality. This higher quality demand would surely raise the price of lenses.
Shooting technique will be even more critical with HR cameras. Look forward to your upcoming article about Piccure+.
Thanks for the article.
Bill
Sorry Bill. But I’m sure you’ll come up with something persuasive. 🙂
I think the lens designs are getting better, but I’m not so sure about the quality control. I hope you’re right that this will improve too. But as you point out, the prices will probably go up as well.
Michael,
Thanks for timely, thoughtful, and practical review of high megapixel 35mm cameras. I pre-ordered a Canon 5dsr body back in March. There have been a lot of reviews that have just paraphrased Canon’s Feb. press release about the June launch and a few interesting hands-on reports from a lucky few that had a brief opportunity to used a prototype model. Your comments set the stage with great questions and issues to help anyone sort out what to expect from high megapixel sensors in the market and what process changes to expect in their workflows. Best regards, Peter
Thanks Peter, and nice to hear from you – hope you’re doing well.
I am too am lusting for the 50 mp but I will wait. One other critical factor related to sharpness is dynamic range. At the moment, Canon lags behind Sony and Nikon and not just a little but significantly 11.8 vs 14.8. That additional DR equates to more detail in highlights and shadows. It is evident in all print sizes and on screen. We’ll just have to wait and see what DR Canon puts out on the 50 mp. You know it will be controversial whatever it is.
If I never print large why would I want to purchase a 50 mp? I just want that choice. In addition, if I am at a special place and happen upon very special light, I want to be able to capture the best image possible. Ansel’s “Moonrise Hernandez” was as much luck as anything else. It is my pursuit, my passion to do what he did. Who knows, we all might get that chance.
Thanks for bringing up the topic of dynamic range – another significant quality issue. And I agree with the idea of wanting the choice. You may not print large normally, but it’s nice to know you can if you capture something great.
An excellent article. It convinces me that my 20 MP 7DII will last me the rest of my life. (I assume that a replacement of the 7D is 5 years away.)
If I ever become good enough to need 50 MP you give me sobering thoughts. At 85 will I have the technique to utilize all those pixels? The rest of the needed equipment only requires money.
It certainly is difficult to discover how good a piece of equipment is. Constant use seems the only way. I am still learning how to shoot a simple landscape. So when I use a piece of gear is any inadequacy my error or poor gear.
Wow, I didn’t know you were 85 Vince! Hope you’re photographing for many years to come.
Thanks for the clear article on using a very hi res camera.
A major plus for me would be the ability to seriously crop, selecting a virtuous and perhaps unnoticed, detail in the frame.
You’re welcome David – and thanks. I’m not sure that 50 MP would allow you to crop as much as you think. Cropping only 1/3 from 50 MP would give you almost the exact same number of pixels as the 22 MP 5D Mark III. Crop half or more and you’re down to 12 MP territory. Not the end of the world, but it does limit the how big a print you can make and keep it sharp.
I think that this is overblowing things quite a bit. The 7D2 has the same pixel pitch as the 5DS(r) and hasn’t shown any particular signs of needing special lenses or having problems with noise. Really these new cameras have sensor characteristics we are already very familiar with, just writ in a full frame rather that a compact sensor.
Thanks for your comments Felder. What I wrote is based on my own experience. I’ll add that if you’re using lenses designed for full-frame cameras on the 7D2 you’re only using the center of the lens, and therefore the best part. And even if you’re not using FF lenses, the lower resolution sensor will not show the differences between sharper center and soft corners as much as the 50 MP sensor. As for noise, the 7D2 is not bad, but not great in that category, especially in the read noise, which shows up when you try to lighten shadows.
Thanks for your thoughts on high resolution cameras, Michael… I agree with the numerous points you made… While many of us will never use all or even most of the capabilities the high res cameras have, it is nice to know they are there… And they will certainly force one to improve their technique! One other benefit of higher resolution cameras is the research & development factor… They stretch the boundaries of what equipment can do, & force improvement in lenses & all related technology… When that happens, there are innovators that find new ways to utilize those capabilities. So there are intended benefits as well as indirect benefits of high res sensors, & is another forward step in the field of photography.
You’re welcome David, and thanks. I think you’re right about these new cameras spurring advances in lenses – at least I hope so! Though as Bill points out, the prices of lenses will probably go up accordingly.
I ended up getting a D800 when they came out because I always liked the 4:5/8:10 ratio, and it had the capability of croping in the camera. The added bonus to that any soft corners are eliminated, more images per memory card and if you really want high resolution, stitch several images together. When you make a 16X20 horizontal print from 3 vertical images stitched together, the resolution is amazing.
JJ, when you crop in the camera, I wouldn’t think that translates to the Raw file, does it? Or do you just use that in the field to help you visualize how you’ll crop it later… ?
Sorry for the delay, but cropping in camera actually is the smaller file. You can see the number of images left on your memory card go either up or down when switching formats. So you’re not just blocking the view in the viewfinder, but creating a smaller image…same height, but shorter worth. I use the full sensor when I do pans, either vertical or horizontal or if I want the extra real estate, but most times I prefer to use the 4:5 crop. I sometimes crop that down to a square image. But the 4:5 is just a personal preference and I generally don’t crop that down any smaller. I guess it goes back to my 645 film days when I took the extra time, if I had it, to carefully compose the shot, because sending out film to editors didn’t allow for further editing before they saw the image.
Thanks for clarifying JJ. I didn’t realize the D800 had that option.
Thank you for this excellent bit of information
You’re welcome Michael!
Hoping to get my 5DSR soon! It will be my first Canon body upgrade since getting my 1ds3 8 yrs ago. Did not feel the 5d2 or 5d3 were any good upgrade for me. I did get a D800E a few years back and benefitted from the increase in DR and resolution. I have a few Nikon mount lenses which I can use on both Canon and Nikon bodies but also have quite a few Canon only mount lenses which will benefit from the new 5DSR’s increased resolution. Hoping the CFA’s in the new 5DSR render better colors more like my old 1ds3 and improvement over the high iso focused 5d2’s and 5d3’s. It still won’t have the DR and cleaner shadows of my D800E but will work around that or use D800E. Like you mention it is more important to have good compositions and light than the gear. The photo forums are full of sharp images of “fuzzy concepts”! 🙂 Learning how to see is the most important thing.
Yes, I am sorry … gear is overstated. Yes, I bought it all and concluded it wasn’t the gear, just me. An expensive lesson to learn. But here was the caveat, because I had great gear, I shot more often which increased my experience and learning opportunities. The more you shoot the better you will shoot. That includes post processing. Unfortunately, we are bombarded with the concept that gear is the end all and it certainly does contribute. But composition and light beats gear every time. I am amazed what people can capture on their cell phones.
Thanks for your comments Wayne!
I always appreciate you sharing your real world experiences. I am in the process now of upgrading glass so your comment about it not being easy to find a ‘good copy’ of a lens struck home.
I’ve been buying equipment from B&H for about 25 years. Since no retailer wants to deal with what they believe are pixel peepers can you tell me how you go about it?
Thanks for any guidance you can provide.
Thanks Ray. B&H is very good about exchanging lenses, and Amazon returns are always no-questions-asked.
Good point about sharpness not being the most important thing. I just made two 20×30 prints from similar shots I made with a D800E and a 4×5. The 4×5 was obviously sharper, and I actually also liked it better, but my wife, who is an artist but not a photographer, preferred the D800E image for its qualities of color and contrast.
Thanks for your input John!
Hi Michael,
Great article! Thanks for posting images zoomed at 100% as examples. I’ve been content with my 5DII for the last 6 years and was thinking of upgrading to the new 5DS when it comes out. The only two reasons are for better resolution and less noise. (Not in that order) The huge increase in file size is not something that I am equipped to deal with though. Another thing that you didn’t mention that is a possible negative is the increase in insurance premiums to protect the equipment. Your article has me thinking that maybe I should just upgrade to the MkIII (used or new) as prices continue to inevitably drop. Especially if the manufacturer is claiming the noise levels will be the same in the 5DS. Thanks again for sharing this article.
Thanks Michael! You bring up an interesting point about insurance, but since the 5DS isn’t that much more than, say, the 5D Mark III, I don’t know that the insurance would be much more.
Especially when backpacking I’m torn between what format to use, micro four thirds (Olympus) or Nikon D800. I don’t print larger than 17 x 22 inches and in a couple of comparisons I’ve made, I’m surprised just how good the smaller camera is with a sharp lens. However, in low light situations, I find the superior dynamic range of a full frame camera to be a plus. Also I find highlights to be more easy to control in a full frame image.
Hey Michael on my upcoming adventure, I’m bringing along a 50mm 1.8 prime and two zooms. It is small, light, and sharp.
Thanks for your input Hugh. For 17×22 prints, Micro Four Thirds should work well. It’s the noise as dynamic range, as you point out, that might be more of an issue.