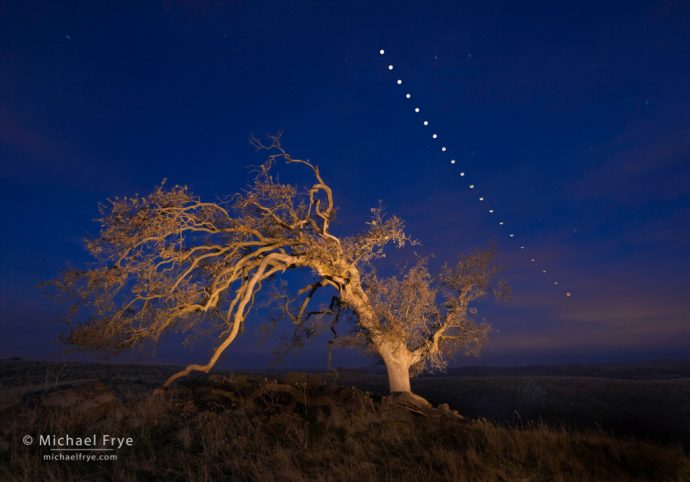
Oak tree and lunar eclipse sequence, December 10th, 2011, Mariposa County, Sierra foothills, California. In this sequence, the moon was setting to the west-northwest just before sunrise. In the upcoming eclipse, the moon will also be setting just before sunrise for viewers in the western U.S. – but to the southwest. (Click here to read the story behind this photo.)
In case you haven’t heard, there’s going to be a total lunar eclipse this week in some parts of the world. That includes western North and South America, Australia, New Zealand, and eastern Asia. You can see all the places where the eclipse will be visible on timeanddate.com.
The total eclipse will last about 14 minutes, from 11:11 to 11:25 UTC (Universal Time) on Wednesday, May 26th. That translates to 4:11 to 4:25 a.m. Wednesday here in California. The partial eclipse begins at 9:44 UTC, and ends at 12:52 UTC (2:44 a.m. and 5:52 a.m. Pacific Time).
First, how do you photograph a lunar eclipse? I’ll refer you to this previous post, which covers that in detail.
In this post I’ll focus more on figuring out where the moon will be in the sky, and in relation to foreground objects, during the eclipse.
Here in the western U.S. the eclipse will be visible to the southwest in the wee hours of the morning. On the west coast the sky will actually be starting to lighten during the total eclipse as dawn approaches. The moon will be fairly low in the sky, which makes it easier to juxtapose the moon with foreground objects.
To me, the best tools for figuring out exactly where the moon will be are PhotoPills, The Photographer’s Ephemeris (TPE), and The Photographer’s Ephemeris 3D (TPE 3D). And of those, my favorite, by far, is TPE 3D, because it allows you to place yourself virtually on the ground at your chosen location, and visualize exactly where the moon will be in relation to mountains, hills, lakes, and other features of the landscape. (Note that, unfortunately, TPE 3D is only available for iPhones and iPads, not Android devices.)
Don’t get me wrong: PhotoPills and the regular version of TPE are very useful for this kind of stuff. They have lots of features that TPE 3D doesn’t have. Those include a search function, which allows you to search for future times when the sun or moon might be in a certain position. And they both have augmented reality, where you can hold up your phone and see where the sun or moon will be in relation to the scene in front of you. (I have a slight preference for the augmented reality tool in PhotoPills, because it has a couple of nice extra features, but they’re both good.)
Augmented reality is especially useful for visualizing where the sun, moon, or Milky Way will line up in relation to smaller foreground objects, like a rock formation, tree, sea stack, or building. Those objects are usually too small to show up on the maps in TPE 3D (or the maps in PhotoPills or the regular TPE for that matter).
But augmented reality requires standing at the spot where you’re hoping to take the photo. TPE 3D allows you to see where the sun or moon will be in relation to larger features of the landscape without having to travel to that spot in advance.
Yes, you can use PhotoPills or the regular TPE to figure out where and when the sun or moon might crest a ridge. But doing that doesn’t allow you to actually visualize the scene, and it’s also rather convoluted. You have to place a red pin on the spot you’ll be standing, a gray pin on the ridge that you think the sun or moon will rise or set over, then look at the elevation angle of that ridge, and the sun or moon elevation compared to that – and hope that you’ve really found the highest point on the ridges between your spot and the sun or moon.
Using TPE 3D is much simpler, and gives you a clear, unambiguous, virtual picture of what the scene will look like, and where the sun or moon will be in relation to mountains, hills, lakes, and other objects. It even shows you how the light on the land will look (including both sunlight and moonlight).
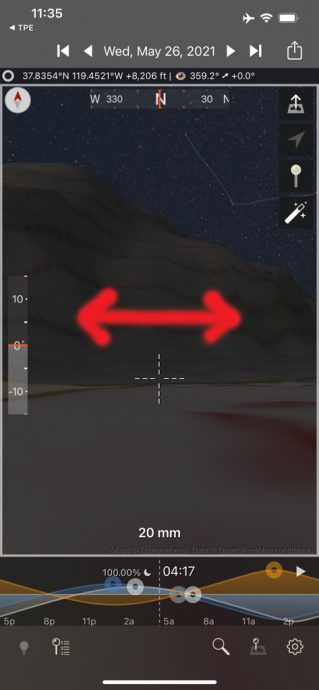
Here, for example, is a screenshot from TPE 3D showing where the moon would be on Wednesday morning during the total eclipse, looking southwest from South Tufa at Mono Lake:
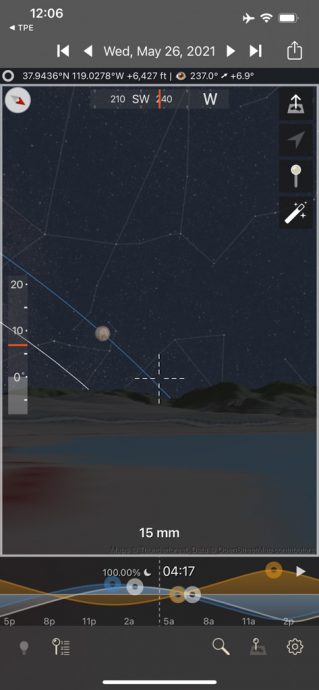
I think the moon might be too far left from this spot; rather than looking over the water toward prominent mountains like Mt. Dana and Mt. Gibbs (seen on the right side of this screenshot), you’d be looking more over land, toward less interesting peaks. But that’s valuable information. It’s important to find out – in advance – what won’t work, so you can look at other options. (For example, maybe you could just put tufa formations in the foreground, rather than trying to include the lake and mountains.)
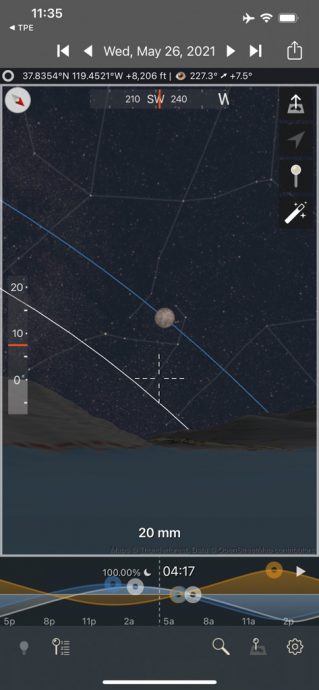
Here’s another screenshot, showing the view toward the eclipsed moon from the east end of Tenaya Lake, in the Yosemite high country. This looks better, since you’d be looking directly over the water. Unfortunately, the Tioga Road isn’t scheduled to open until May 27th, so reaching this spot would require a very long hike!
But you get the idea. TPE 3D is an incredible tool for planning things like this.
You can use TPE 3D by itself, but it has rather low resolution maps, so it can be difficult to find the exact spot you want. Instead, I suggest using it in combination with the regular version of TPE. Then just follow these steps:
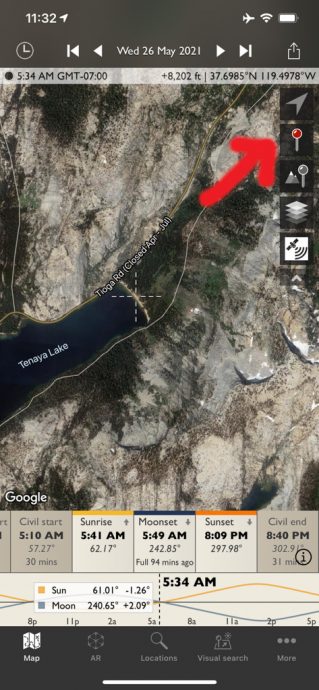
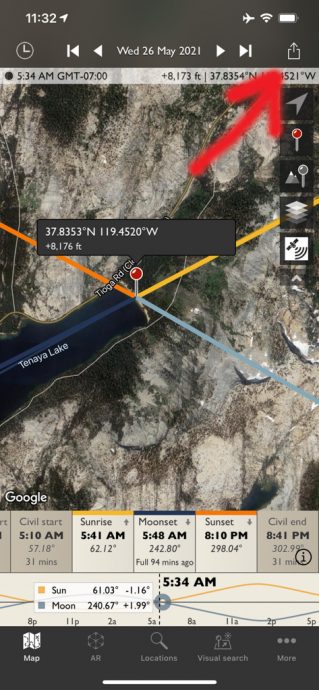
1. In the regular version of TPE, set the date you’re interested in, then find your prospective camera location on the map. Next, center the crosshairs on that spot, and tap the red pin icon. This screenshot shows the crosshairs centered on the eastern shore of Tenaya Lake, where I then tapped the red pin icon:
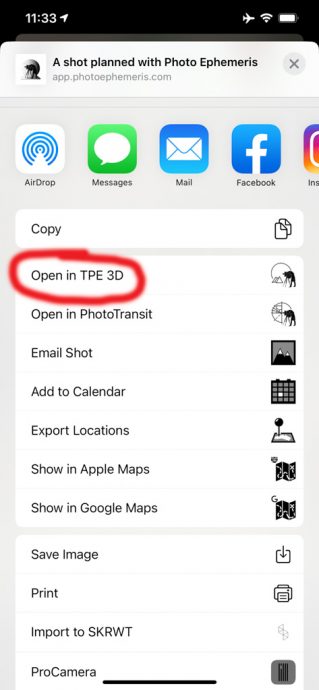
2. This places a red pin at the crosshairs. Then tap the Share icon in the upper-right, and select Open in TPE 3D:
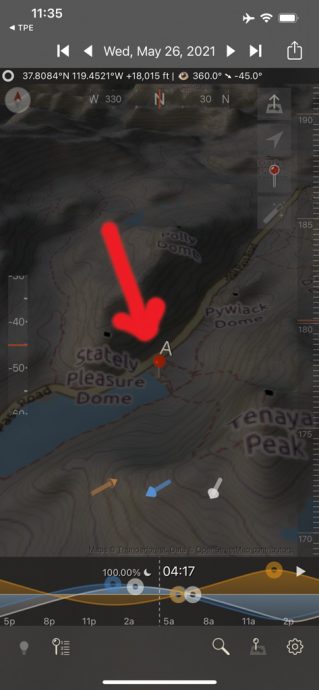
3. This will launch TPE 3D, place a red pin at the same spot, and take you to that pin on the 3D map. Then double-tap the red pin in TPE 3D; that will put you virtually on the ground at that spot:
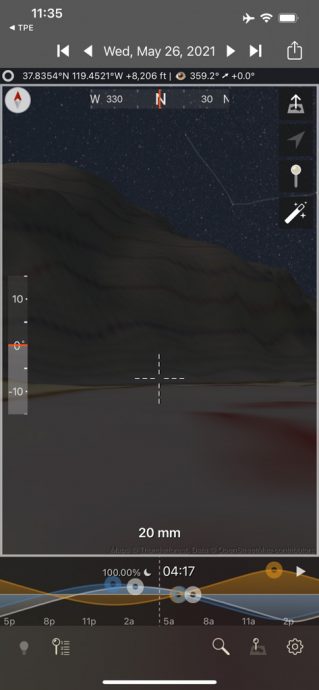
4. You’ll be facing north by default. Use your finger to pan around and look at the scene, pinch or spread your fingers to zoom in or out, and scroll the timeline to see the light change, and watch the sun, moon, stars, and Milky Way move through the sky in relation to the landscape:

By default, the sun and moon will look bigger than they really are as you move around or scroll the timeline, but if you don’t do anything for a few seconds the sun/moon will shrink to its actual size. (You can change this behavior in the Settings.)
That’s really it! There’s more to TPE 3D of course, and a lot more to the regular version of TPE, and PhotoPills. But 99% of the time when I want to see how the sun, moon, or Milky Way lines up with the landscape, that’s all I do.
One more thing: before deciding where to go, look at the weather forecasts. You won’t be able to see the eclipse through clouds!
Good luck!
— Michael Frye
Related Posts: Photographing the Lunar Eclipse January 20th and 21st; Lunar Eclipse Over the Trona Pinnacles; Eclipse
Michael Frye is a professional photographer specializing in landscapes and nature. He is the author or principal photographer of The Photographer’s Guide to Yosemite, Yosemite Meditations, Yosemite Meditations for Women, Yosemite Meditations for Adventurers, and Digital Landscape Photography: In the Footsteps of Ansel Adams and the Great Masters. He has also written three eBooks: Light & Land: Landscapes in the Digital Darkroom, Exposure for Outdoor Photography, and Landscapes in Lightroom: The Essential Step-by-Step Guide. Michael has written numerous magazine articles on the art and technique of photography, and his images have been published in over thirty countries around the world. Michael has lived either in or near Yosemite National Park since 1983, currently residing just outside the park in Mariposa, California.


This is a very helpful article for people who are interested in getting it done the right way. Thank you for your detailed explanation as well.
Glad you found this helpful Kouros!