In the Moment:
Michael Frye's Landscape Photography Blog
by Michael Frye | Oct 26, 2017 | Digital Darkroom

I used the new Range Mask tool in Lightroom Classic CC to improve the green colors in this photo from Rabbit Ears Pass in Colorado
Adobe announced two new, different versions of Lightroom last week. And, unfortunately, the names have created a lot of confusion. Here are the essential things you need to know:
No More Perpetual License
Adobe will no longer make new standalone versions of Lightroom with a perpetual license. That means new versions of Lightroom will be available by subscription only. Lightroom 6 is the last non-subscription version that you can purchase outright. Lightroom 6 is still available for now, but won’t be updated to support new cameras. (You can still use Adobe’s free DNG converter to convert Raw images from new cameras into the DNG format, then import those DNG files into Lightroom 6.)
New Lightroom Classic CC
The new version of the program we’re familiar with is called Lightroom Classic CC. This is the traditional, folder-based version of Lightroom. It is essentially the same as Lightroom CC 2015, but with performance improvements and a new Range Mask tool that allows you to make more precise selections with the Adjustment Brush, Graduated Filter, and Radial Filter.
(more…)
by Michael Frye | Nov 13, 2015 | Announcements, Digital Darkroom
A quick reminder that the price for my Landscapes in Lightroom ebook and video package will go up on Sunday (at midnight Pacific time) from $14.95 to $27.00. This is your last chance to get the new edition at the old price! The new version has been updated for Lightroom 6 and Lightroom CC, and includes eight step-by-step examples, plus ten video tutorials. Click the Add to Cart button below, or visit this page for more information.
Landscapes in Lightroom: The Essential Step-by-Step Guide
PDF ebook plus video tutorials
103 double-page spreads
14.95 until Sunday, November 15th, after which the price goes up to 27.00
FAQ
Purchase from the Eduction Center
(more…)
by Michael Frye | Oct 7, 2015 | Announcements, Digital Darkroom
Landscapes in Lightroom: The Essential Step-by-Step Guide
PDF ebook with video tutorials
103 double-page spreads
14.95 for a limited time, after which it goes up to 27.00
FAQ


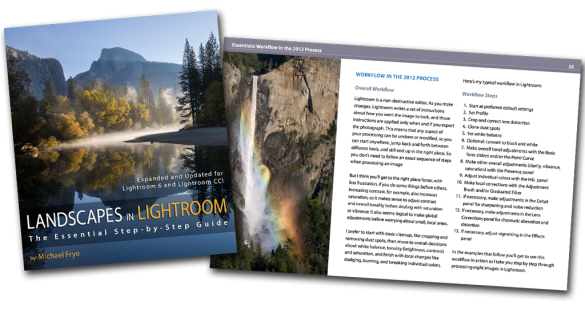
Here it is! The latest update to my ebook, Landscapes in Lightroom: The Essential Step-by-Step Guide, is now available. This new edition is revised and updated for Lightroom 6 and Lightroom CC, and includes two new examples and videos demonstrating how to use the most significant new features – the HDR Merge and the Panorama Merge.
Of course this new version still has all the features that made the first edition so popular. First, you can download the original Raw files used as examples in the ebook, and then follow along with each step yourself – just as if you were attending one of my workshops.
Second, when you purchase the ebook you get exclusive access to ten videos demonstrating different aspects of Lightroom’s Develop Module, like using the Adjustment Brush, Spot Removal Tool, and Point Curve, advanced retouching in Lightroom, the new HDR Merge, and much more. It’s great to read about a tool or technique; it’s even better to watch a demonstration, and then try it yourself on the same image.
And third, there’s the PDF ebook itself. This includes eight examples, where I take you step-by-step through processing each image in Lightroom. You’ll get to see my workflow in action, with a variety of images – high contrast, low contrast, color, black and white, HDR merge, and panorama. You’ll learn many specific techniques and tips, but perhaps more importantly, you’ll gain insight into the decision-making process that so many photographers struggle with. How much contrast is enough? How far can you push the saturation without making the image look garish or fake? What’s the right white balance?
(more…)
by Michael Frye | Jun 26, 2015 | Digital Darkroom
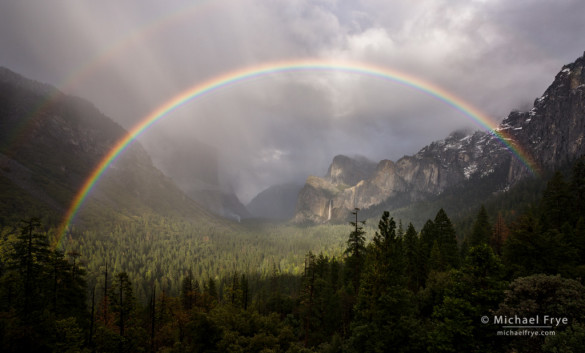
Rainbow over Yosemite Valley from Tunnel View – after applying the Dehaze control
Last week Adobe added an update to Lightroom CC, designated the 2015.1 release. It includes a couple of new features. The main one is a Dehaze slider, designed to reduce the appearance of atmospheric haze. It’s found in the Effects Panel of the Develop Module.
I’m usually skeptical of things like this. Is it really different than adding Contrast or Clarity? Well, yes, actually. Adobe says, “The Dehaze technology is based on a physical model of how light is transmitted, and it tries to estimate light that is lost due to absorption and scattering through the atmosphere.” I’m not sure how they do that exactly, but it seems to work more effectively than just adding Contrast or Clarity.
(more…)
by Michael Frye | Apr 30, 2015 | Announcements, Reviews
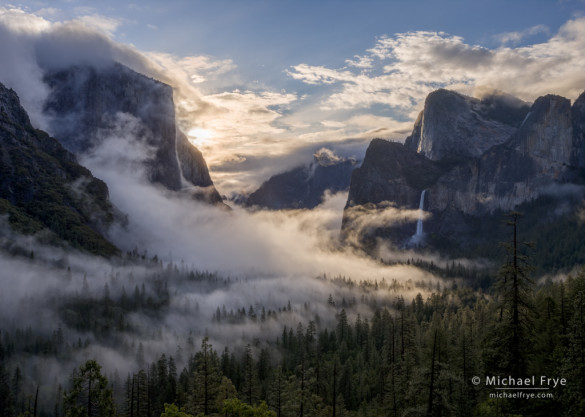
Swirling mist from Tunnel View, Yosemite. The new HDR Merge in Lightroom 6/CC did a great job with this high-contrast scene, producing a natural-looking result, and doing it with a completely non-destructive workflow.
After months of rumors, last week Adobe finally released Lightroom 6 and Lightroom CC. When I saw the list of new features, I have to say I was a bit disappointed. I was hoping for improvements to Lightroom’s retouching tools, and to the Adjustment Brush. It would be nice to add a curve to only part of an image, for example, and the Auto Mask function of the Adjustment Brush has long needed improvement.
Changes to the Develop Module
Alas, Lightroom 6/CC offers only small improvements to the Develop Module, like the ability to move and copy Adjustment Brush pins, and to modify Graduated Filter and Radial Filter selections with a brush. Nice, but hardly earth-shattering.
There is, however, a new, unadvertised feature of the Spot Removal Tool that I stumbled upon, and find rather useful: you can now place new cloning or healing spots over old ones by hiding the tool’s circles. Press the H key to hide or reveal the circles (the Tool Overlay). Though this seems like a small thing, the ability to add cloning or healing in layers, one step on top of another, is vital for any serious retouching job, and a significant improvement to Lightroom’s retouching capabilities. (There was a workaround in previous versions of Lightroom, though rather an awkward one: you could place a new spot outside any existing ones, then drag it over an existing spot. The new implementation is much better.)
(more…)


