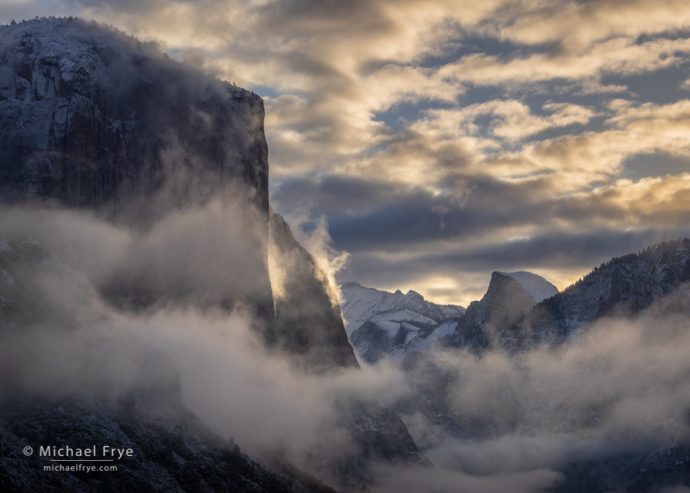
Sunrise from Tunnel View after a spring snowstorm, Yosemite (2015). In my Landscapes in Lightroom: Advanced Techniques course I show how to subtly enhance the inherent qualities of light in photographs like this.
Also, if you purchase any of my Lightroom courses you’ll be able to attend the live Lightroom processing webinar I’ll be giving on January 8th, and submit images for possible inclusion in this webinar.
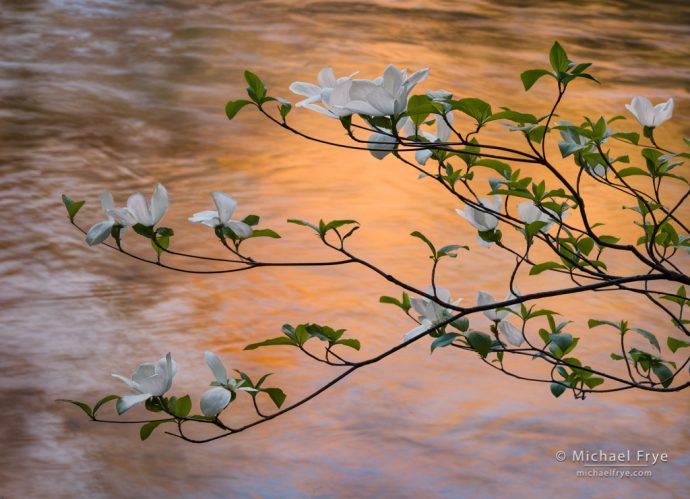
Dogwood blossoms and sunset reflections, Yosemite. I used the Color Range and two Brush components in Lightroom’s Masking Panel to select and lighten just the dogwood blossoms in this photograph.
On Saturday, January 8th (10:30 a.m. Pacific Time) I’ll be hosting a live webinar where I’ll pick two or three images from members of our Education Center and show how I would process them in Lightroom – with special emphasis on using the new Masking Panel.
The new Masking Panel is one of the biggest changes to Lightroom since 2012. It’s incredibly powerful and flexible, with better tools for viewing and organizing all your local adjustments, two new AI-powered selection tools (Select Subject and Select Sky), and best of all, the ability to combine selections in almost unlimited ways to create exactly the selection you want.
I’m really excited about all these new capabilities, but there’s a lot to learn, and it takes some getting used to. So I’ve just finished a new three-part video tutorial all about Lightroom’s Masking Panel.
I’ve included Part 1 here for free to help get you up to speed with the Masking Panel. This video will help you navigate the new layout and learn how to use its great new tools for viewing, organizing, and renaming your masks.
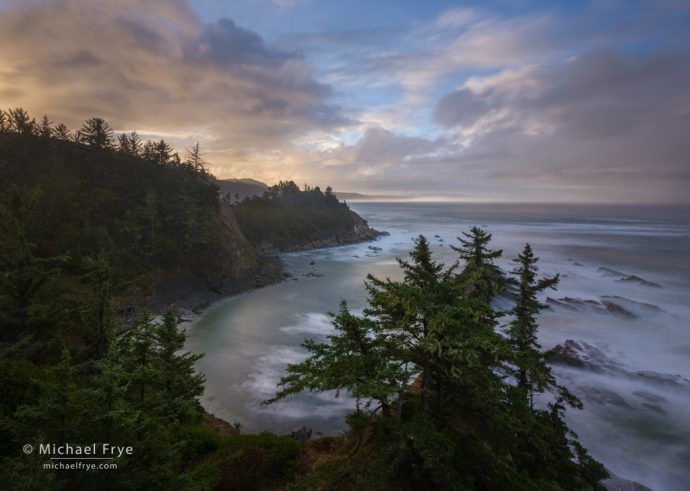
Sunrise along the Oregon Coast. I used some of the powerful selection tools in Lightroom’s new Masking panel to re-process this image, balancing the bright highlights and dark shadows, and bringing out subtle colors and definition in the foreground.
Today Adobe officially released a major update to Lightroom, Lightroom Classic (v11.0), and Camera Raw (v14.0), featuring a completely revamped method of making local adjustments called Masking. This new implementation improves the layout and functionality of the local adjustments, adds some powerful new selection tools, and allows you to combine tools in almost unlimited ways to create exactly the selection you want.
With the new Masking panel, all of your local adjustments can be viewed together, rather than spread out between three panels (Graduated Filter, Radial Filter, and Adjustment Brush). You can also rename each mask, turn each mask off and on, and view the masks with different overlays.
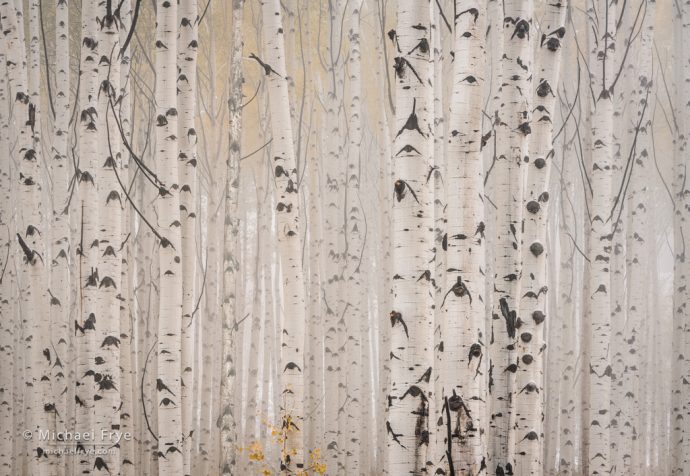
Aspens in fog, White River NF, Colorado. I used a bit of negative Dehaze to slightly soften this image.
In preparing my recent presentation for the Out of Chicago Live conference, I was digging through my archives for examples to use, and found some interesting images I had overlooked. In some cases I had put them aside, too busy to process them at the time, and then just forgot about them. In other cases I think my perceptions had changed. And sometimes I could see the potential to process an image differently, using new tools and new skills.
One of those tools is the Dehaze slider in Lightroom. It’s not that new (2015), but didn’t exist when I initially processed some images, and can sometimes make a big difference – especially with fog. I’m a big fan of fog for forest scenes, and these days I’m often using Dehaze selectively with the Adjustment Brush to cut through fog in one part of an image, or thicken fog in another area to hide or deemphasize something. (Just to be clear, you can’t create fog where none existed; there has to be some fog to begin with. But you can make some tenuous fog look a little more substantial. I show how to do all this in my latest Lightroom course, Landscapes in Lightroom: Advanced Techniques.)
On October 20th Adobe released an update to Lightroom, Lightroom Classic, and Adobe Camera Raw that included a new tool – the Color Grading panel. It replaces the old Split Toning panel.
What is color grading? I guess I have a broader definition of that term than Adobe does. To me, color grading includes a wide range of color adjustments that go beyond the basics of setting a white balance and adjusting saturation. Mainly I think about adjusting individual hues to either bring the colors of an image into better harmony, or to separate and differentiate hues to create more color contrast.
I’ve been using Lightroom since Adobe released the beta version in 2006. Over the years I’ve learned many shortcuts, and in this video I share some of my favorite tips – things I use all the time to streamline my workflow:
We will never sell or share your email address with anyone. Read our complete Privacy Policy.
Subscribe to My Blog:
Success! Now check your email to confirm your subscription.