Free Video: Profile Browser Overview
This free video includes the first 9 minutes of the complete 33-minute video, and shows how to use and navigate the Profile Browser, how to add and remove profiles from your Favorites list, how use the Amount slider with Creative Profiles, and more. The complete video is included in my Landscapes in Lightroom ebook and video package. If you’re viewing this post as an email, click here to see the video.
In April Adobe added a new feature to Lightroom Classic CC: the Profile Browser. The initial release of this update (Version 7.3) had many bugs, but those problems seem to have been resolved now, so I thought it was time to delve into this new feature in detail.
Profiles are actually nothing new. Every raw file needs a profile to convert the raw data into the colors and tones you see on your screen. And ever since Lightroom 2 you’ve been able to choose different profiles (essentially different flavors of color and contrast), but those options were hidden down in the Camera Calibration panel, where most people never found them.
I think choosing a profile is a fundamental step, something you should probably do early in your workflow, so I’m happy to see that the new Profile Browser occupies a much more prominent spot in the Develop Module – at the top of the Basic Panel, where people are more likely to find it and use it.
Better yet, we now have many more profile choices. Most of these new options are the so-called “creative” profiles, designed to add a canned, “artistic” look to an image. That’s not something I’m particularly interested in, as I prefer a more natural look for my images, but I’m sure many people will find these creative profiles appealing.
But the extra choices also include several new profiles in the Adobe Raw section of the Profile Browser. In addition to the Adobe Standard profile, which has been the default raw profile for most cameras for many years, we now have Adobe Color (the new default raw profile), Adobe Monochrome, Adobe Landscape, Adobe Neutral, Adobe Portrait, and Adobe Vivid.
For landscape photographs, I’m not a big fan of the new Adobe Neutral profile (too flat) or the Adobe Vivid profile (too harsh). But I’m happy to have the Adobe Color, Adobe Landscape, and Adobe Portrait options. Sometimes one of these is just right for a particular image.
The Adobe Landscape profile is particularly interesting, because it seems to have been designed for high-contrast images. This profile dampens highlights and opens up shadows a bit more than other profiles. It also adds more local contrast, which is helpful for high-contrast scenes, where compressing the tones – darkening the highlights and lightening the shadows – can make the image look flat. Unfortunately the Adobe Landscape profile often completely over-saturates the colors, but that’s easy to fix. I find myself using this profile a lot for high-contrast images, and then doing something I rarely ever did before – actually pulling down the Saturation slider.
Here’s a comparison. The first image below has the Adobe Color Profile, the second the Adobe Landscape profile. All the other settings are identical, except in the first one (with the Adobe Color profile) I pushed Vibrance up to +20, and Saturation up to +15, while in the second one (with the Adobe Landscape Profile) both Vibrance and Saturation are set to zero to better match the saturation levels in the first image. In the second image, with the Adobe Landscape profile, there’s a little more definition in the clouds around the sun, while the shadows are slightly lighter. And there’s a bit more local contrast everywhere. The differences are subtle, I know, but every little bit helps:
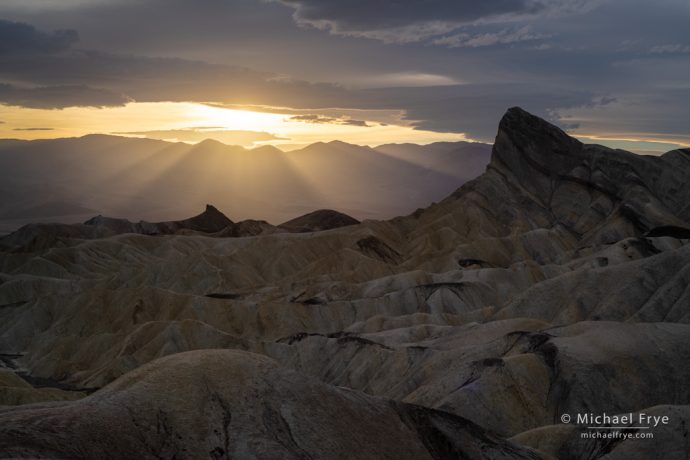
Sun setting behind Manly Beacon, Death Valley, with the Adobe Color profile.

Sun setting behind Manly Beacon, Death Valley, with the Adobe Landscape profile. There’s a bit more definition in the clouds near the sun and the sunbeams, plus a little more shadow detail.
Along with these new profile choices for color images, Adobe has also completely changed how images are converted to black and white. Before, you could add a Black & White Mix on top of a color profile. Now, a black-and-white image has to have a specific black-and-white profile. And if you make a preset for a Black & White Mix, you have to include a profile with that preset. And if you sync the Black & White Mix settings from one image to another, you also have to sync the profile.
I delve into all of this in depth in a video that’s included in the new edition of my Landscapes in Lightroom ebook and video package. This video shows how to use the new profile browser, what to look for when choosing a profile for a raw image, and how to approach converting images to black and white in this new system. The free video at the top of this post includes the first 9 minutes of the complete 33-minute video, and shows how to use and navigate the Profile Browser, how to add and remove profiles from your Favorites list, how use the Amount slider with Creative Profiles, and more.
As a reminder, the new edition of my Landscapes in Lightroom ebook and video package is available at the old price of $26.95 for another seven days, but on Tuesday, July 10th, the price will go up to $39.00. This package includes the complete video about the Profile Browser, new videos about the powerful Range Mask tools, plus 14 other videos covering the Adjustment Brush, Spot Removal tool, HDR Merge, Panorama Merge, and much more. And the ebook itself includes nine examples where I take you step-by-step through processing a variety of images – high contrast, low contrast, black and white, HDR, panorama, and a Milky Way photograph. Plus you get to download the DNG raw files so you can follow along with each example.
To purchase the ebook and video package, or learn more about all the features of this new edition, click here:
Landscapes in Lightroom: The Essential Step-by-Step Guide
— Michael Frye
Related Posts: Lightroom eBook Updated!; Big Lightroom News
Michael Frye is a professional photographer specializing in landscapes and nature. He is the author or principal photographer of The Photographer’s Guide to Yosemite, Yosemite Meditations, Yosemite Meditations for Women, Yosemite Meditations for Adventurers, and Digital Landscape Photography: In the Footsteps of Ansel Adams and the Great Masters. He has also written three eBooks: Light & Land: Landscapes in the Digital Darkroom, Exposure for Outdoor Photography, and Landscapes in Lightroom: The Essential Step-by-Step Guide. Michael has written numerous magazine articles on the art and technique of photography, and his images have been published in over thirty countries around the world. Michael has lived either in or near Yosemite National Park since 1983, currently residing just outside the park in Mariposa, California.


Hi. Will it work with photo shop. Latist. Version.
Yes, the Profile Browser is available with the latest version of Adobe Camera Raw, which comes with Photoshop. I believe your Favorites list in the Profile Browser will even sync between Adobe Camera Raw and Lightroom.
Hi Michael,
I watched your video on the new LR presets and found it
to be very informative.
This will be a great starting point for our LR edits.
Thanks so much for putting together this most helpful
video tutorial.
Don & Carmen Mowrer
Thanks Don – I’m glad you found that helpful!