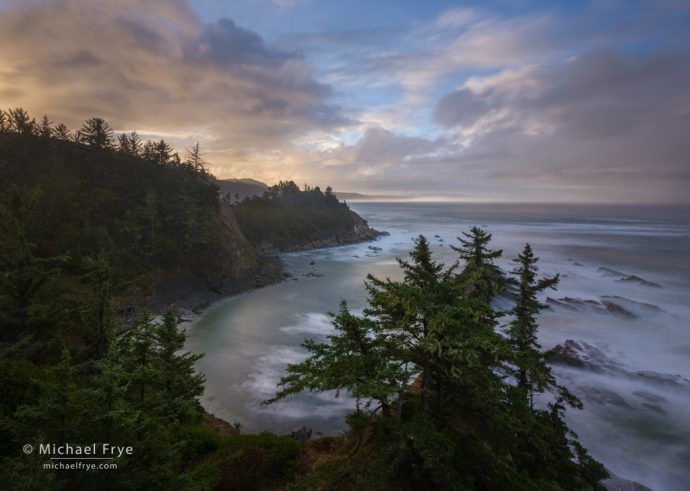
Sunrise along the Oregon Coast. I used some of the powerful selection tools in Lightroom’s new Masking panel to re-process this image, balancing the bright highlights and dark shadows, and bringing out subtle colors and definition in the foreground.
Today Adobe officially released a major update to Lightroom, Lightroom Classic (v11.0), and Camera Raw (v14.0), featuring a completely revamped method of making local adjustments called Masking. This new implementation improves the layout and functionality of the local adjustments, adds some powerful new selection tools, and allows you to combine tools in almost unlimited ways to create exactly the selection you want.
With the new Masking panel, all of your local adjustments can be viewed together, rather than spread out between three panels (Graduated Filter, Radial Filter, and Adjustment Brush). You can also rename each mask, turn each mask off and on, and view the masks with different overlays.
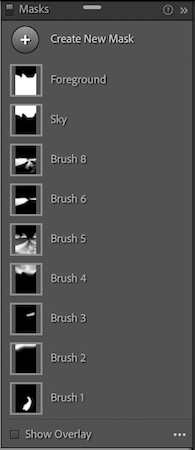
The new Masking panel
Like every change, this new layout takes a little getting used to, but I think it’s a big improvement. When I go back to an image I previously worked on, I no longer have to try to remember whether I used the Adjustment Brush, Graduated Filter, Radial Filter, or some combination of those, since I can see all the local adjustments in one place. And I can quickly turn a mask’s eyeball off and back on (much like Photoshop) to see the effect of that adjustment.
But the new layout is just the beginning. There are two new selection tools: Select Subject and Select Sky. These are AI-powered methods of automatically selecting the subject or sky in an image. Also, the Luminance, Color, and Depth Range masks are now separate tools, so you can use them independently, rather than only in combination with a brush or gradient.
I’ve been working with pre-release versions of the new Masking feature for many months now, and the new Select Subject and Select Sky tools work really well. They’re not always perfect, but usually pretty darn close. For photographs of people or animals, for example, you can select your main subject to lighten it and make it stand out, then duplicate that selection, invert it (yes, you can duplicate selections, and invert them as well!), and darken everything else but your subject. I did both of those things with this photograph of a kestrel; here are before and after versions (“before” on top):
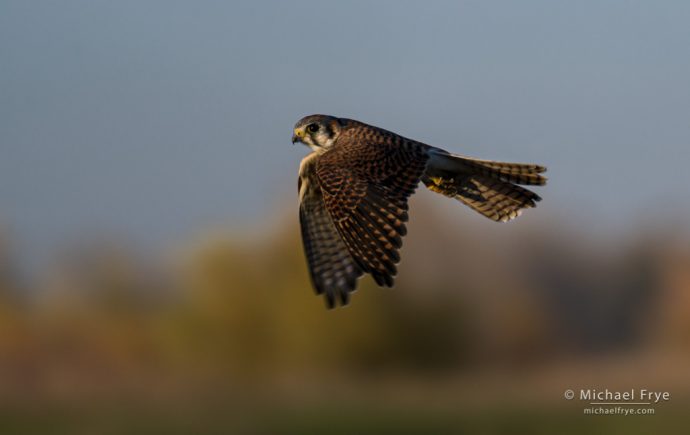
Kestrel, before
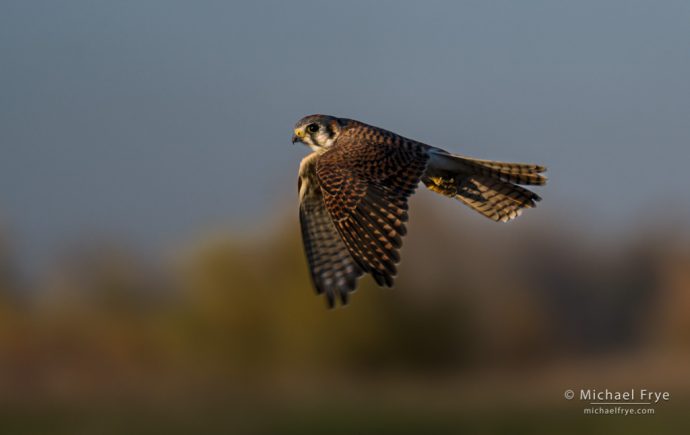
Kestrel, after using Select Subject to lighten the bird and darken the background
And I think landscape photographers will find the Select Sky tool very useful, allowing you to automatically select just the sky, then darken it, add contrast, adjust the color, or whatever you want to do. Or you can select the sky, invert that selection, and adjust everything but the sky. I did both in this image from the California Coast, darkening the sky and lightening the foreground (“before” image on top):
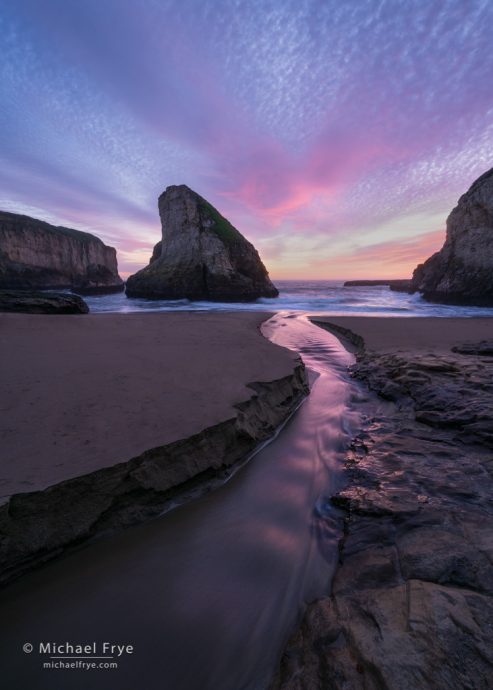
Before
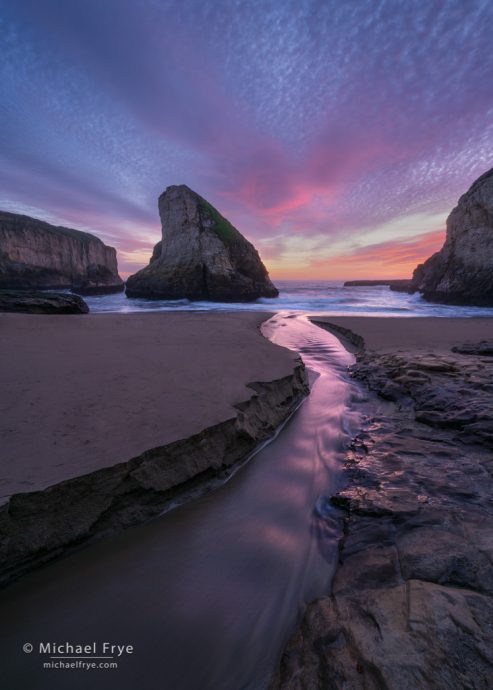
After using Select Sky to darken the sky and lighten the foreground
But the most powerful feature of the new Masking panel might be the ability to combine multiple selection tools in almost unlimited ways to create exactly the selection you want. You’re no longer limited to combining a brush or gradient with one range mask (and only where those two tools intersect or overlap). You can start with any of the eight selection tools, then add, subtract, or intersect that initial selection with any other tool (or even with the same tool). And then you can add, subtract, or intersect that resulting selection with another tool – and so on, as many times as you like, to get exactly the selection you want. You can, again, invert any selection, or combine one tool with the inverse of a selection made with another tool.
If that previous paragraph made your head spin, I don’t blame you. It’s a lot to wrap your brain around. When you first start using the new Masking panel I’d suggest that you keep things simple. Try combining just two different selection tools at first. Experiment with adding, subtracting, and intersecting one selection with another (hold down the Option or Alt key to see the Intersect button).

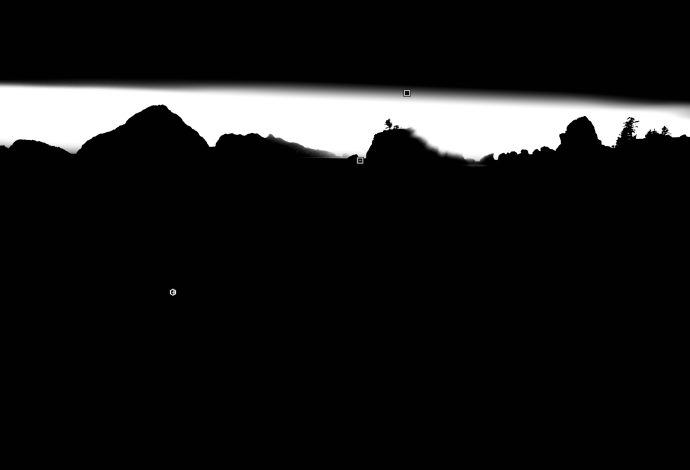
This bright strip of sky above the horizon needed to be darkened
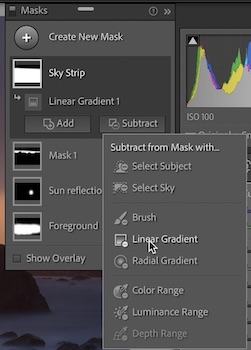
It also might help to see some examples of how you might combine different selection tools and methods to create the selection you want. For this image from the Northern California coast, I wanted to darken just the bright strip of sky above the horizon. So I started with a Linear Gradient (formerly known as the Graduated Filter) to select everything from the top of that bright strip down:

Then I clicked on Subtract, chose Linear Gradient again…
… and subtracted everything below the bottom of that bright strip. (Yes, you can combine two Linear Gradients together – finally!) Here’s what the mask looked like at that point:
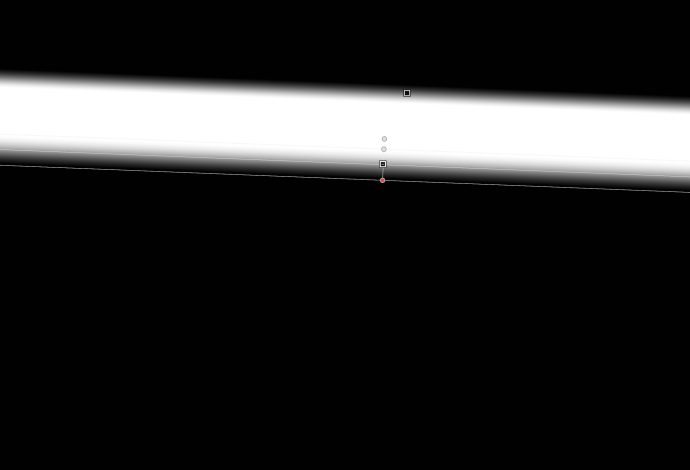
So far, so good, but this selection included the tops of the sea stacks, which I didn’t want to darken. So next, I clicked on Subtract again, chose Luminance Range, and adjusted the sliders to select only the shadows – that is, to subtract the shadows from the selection, and drop the sea stacks out of the selection. Here’s that final mask:
Then I dragged down the Exposure slider for that mask to darken the strip of sky. Here’s the finished image:

The final image
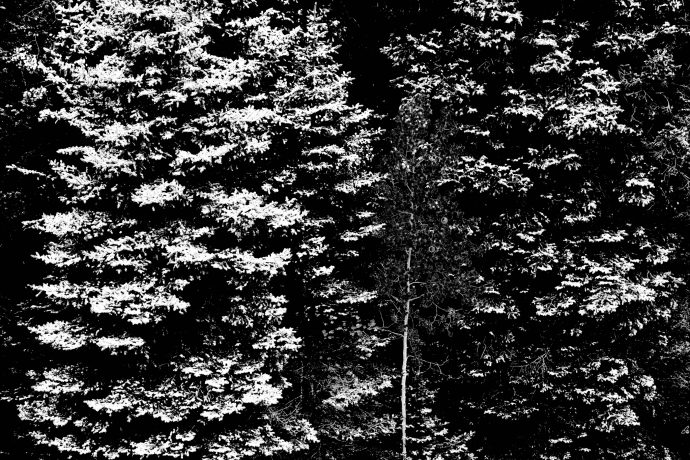
For this next photograph, I wanted to lighten the branch tips of the fir trees to give them more texture and definition. Here’s what the image looked like before I did that:
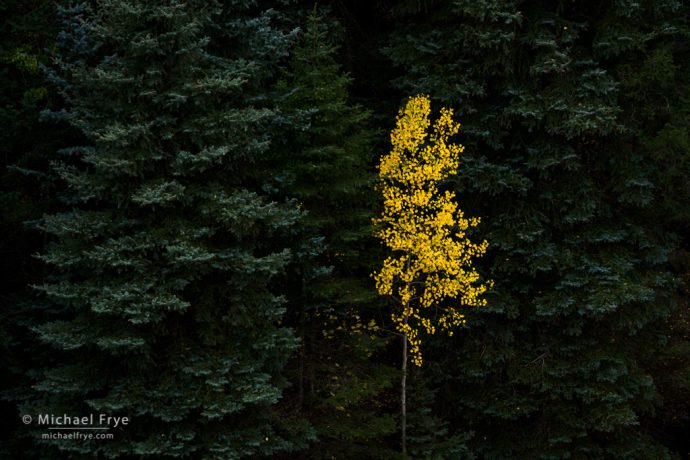
Before lightening the branch tips
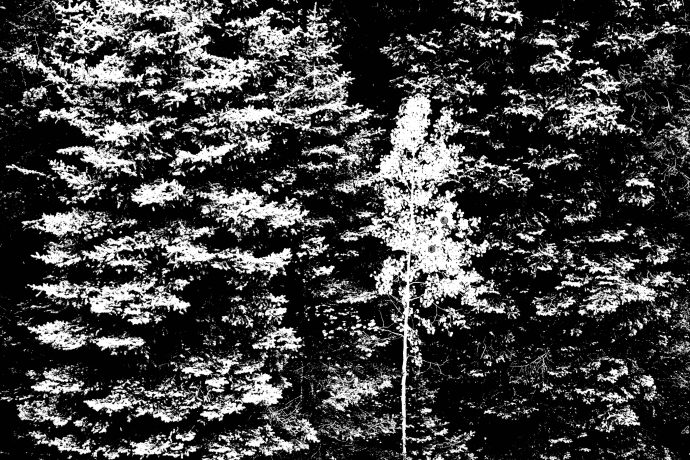
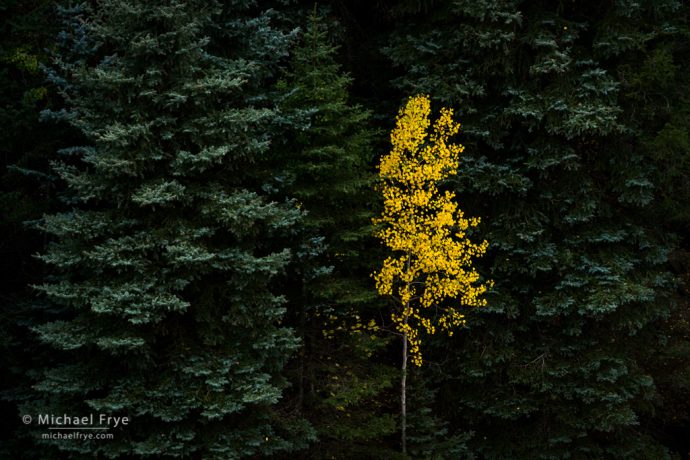
I started by using the Luminance Range tool to select just the brighter tones. That selected the tips of the firs, but also the yellow aspen leaves. Here’s what the mask looked like at that point:
Since I didn’t want to include the yellow aspen leaves in the selection (they were already bright enough, thank you), I clicked on Subtract, then Color Range…
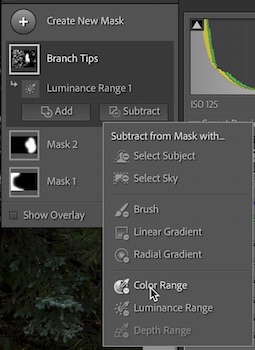
… and used the eyedropper to select the yellow leaves to subtract them from the selection. Much better – here’s the mask at that stage:
But I didn’t want to brighten the tips of those fir branches all the way out to the edges of the frame, as that would draw the viewer’s eye out of the picture. So I clicked Subtract again, selected Brush, and brushed away the selection along the edges of the frame. Here’s the final mask:
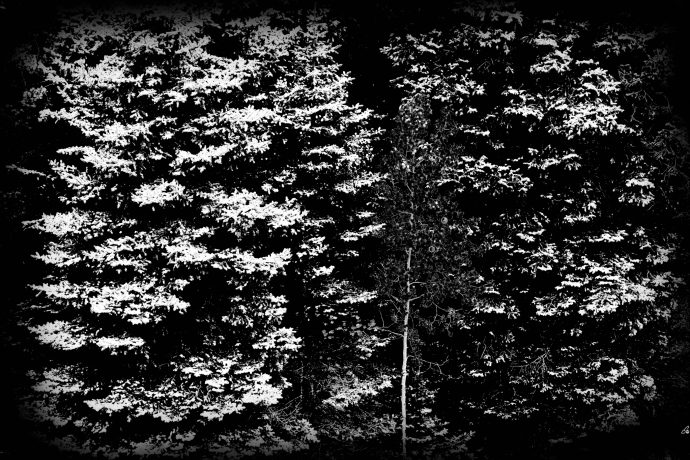
Finally, I pushed the Whites slider for this mask up to +50 to lighten those branch tips. Here’s an overall before-and-after comparison. It’s subtle, but the fir branches have more definition:
Before lightening the branch tips
The final image
That’s really just the beginning. As I said, you can combine selections in almost infinite ways to make the selection you want. It brings a new level of power to Lightroom, allowing us to make sophisticated selections that were previously only possible in Photoshop.
But there’s a lot to it – more than I can possibly cover in a blog post! So I’m finishing the edits on a new, in-depth video tutorial about Masking that I’ll add to both of my Lightroom courses (The Essential Step-by-Step Guide, and Advanced Techniques). If you’ve already purchased either of those courses you’ll get this new tutorial at no extra cost. But if you haven’t yet enrolled in either course, now is the time to do so, because after adding the new Masking tutorial the price of both courses will go up.
And just to add a some extra incentive, I’m offering 15% off either course (or both together), until that price increase goes into effect. Use the code MASKING15 upon checkout to get that discount. Click this link to get more information about my Lightroom courses:
Learn more about my Lightroom courses
As you can probably tell, I’m very excited about the new Masking panel. It’s a game changer! I hope you like it as much as I do.
— Michael Frye
P.S. One tip: For people who are used to using the Range Masks in previous versions of Lightroom, you’ll find that there’s no obvious or straightforward way to use the same workflow in the new Masking panel – that is, to make an initial selection with the Brush or a gradient, then refine that with a range mask. Starting with the Brush, for example, then clicking Add, and choosing Color Range, will add that Color Range selection to the entire image, not just the area you brushed over. If you try Subtract, it will subtract that color from the area you brushed – not what you’re after!
But if you subtract the Color (or Luminance) Range mask, then check the Invert box, that will work (instead of subtracting out the color, you invert that selection and add it in). Better yet (and easier to wrap your head around – at least for me), instead of choosing Subtract, hold down the Option or Alt key, which replaces the Add and Subtract buttons with an Intersect button:
Then select your range mask of choice. That’s actually what we’ve been doing with the range masks for the past few years: intersecting the range mask selection with a brush or gradient selection. Now you know. 🙂
I find that in the new implementation it’s often easier to start with the range mask, click Subtract, and Brush away the areas you don’t want.
P.P.S. Here’s a link to a blog post from Josh Bury, one of the Adobe engineers behind the new Masking panel. He explains some of the technical challenges of creating this new feature, and some of the thinking behind its creation.
P.P.P.S. By the way, I think it’s interesting that Adobe added this new Masking feature to both Lightroom (including iPhone and Android versions) and Lightroom Classic. This is a very powerful feature to have on your phone (though a bit hard to operate with your fingers on a small screen!), showing that Adobe is serious about adding sophisticated features to this version of Lightroom. But on the other hand, it also shows that Adobe is still committed to upgrading Lightroom Classic. I don’t have any inside knowledge about Adobe’s marketing strategies, but it doesn’t look like Lightroom Classic is going to disappear anytime soon. Thankfully!
Related Posts: Lightroom’s New Color Grading Panel; Image-Adaptive Behavior in Lightroom’s Tone Controls
Michael Frye is a professional photographer specializing in landscapes and nature. He is the author or principal photographer of The Photographer’s Guide to Yosemite, Yosemite Meditations, Yosemite Meditations for Women, Yosemite Meditations for Adventurers, and Digital Landscape Photography: In the Footsteps of Ansel Adams and the Great Masters. He has also written three eBooks: Light & Land: Landscapes in the Digital Darkroom, Exposure for Outdoor Photography, and Landscapes in Lightroom: The Essential Step-by-Step Guide. Michael has written numerous magazine articles on the art and technique of photography, and his images have been published in over thirty countries around the world. Michael has lived either in or near Yosemite National Park since 1983, currently residing just outside the park in Mariposa, California.


I am beyond excited as well as amazed
Glad you’re excited John – me too!
Michael:
I am a subscriber to Adobe Photoshop CC monthly plan and my Camera Raw Version is 13.4 and the app says it is up to date. How do I get to Camera Raw 14.0?
Thanks.
PR.
Try launching the Creative Cloud app, then look on the left-hand side and click on the second item down (Updates). You should see it there. If not, click where it says “Check for Updates” in the upper-right corner.
Thank you for this detailed and incredible helpful tutorial. I live in nearby Oakhurst and am learning landscape photography and you have been a long time inspiration of mine. I am looking forward to exploring your Lightroom course.
You’re welcome Daniel! I hope you enjoy the course.
Thanks for the detailed update Michael…
You’re welcome David!
Thanks, Michael. I’m looking forward to your tutorial and exploring these new features!
You’re welcome Rob; should be done soon!
Hi Michael,
Thanks for your valiant (and successful) attempt at explaining the power and the complexities of the new implementation of Adobe’s masking tools.
I am still much more of a Photoshop person than a Lightroom person — perhaps largely as a result of habits that are hard to break. However, I realized some time back that the ACR editor in Bridge provides basically the same tools that you write about in Lightroom, and this profoundlly changed my workflow. In most cases now I think I do more of my editing in ACR than in Photoshop.
I learned to love the ACR masks, but I was always less than thrilled with the implementation — for example the inability to clearly identify what each mask was used for in an image. The good news is that the new masking tools now are in ACR, too!
Dan
Thanks Dan. Yes, I’m glad to see that the new Masking tools and layout are available across all versions of Lightroom and Camera Raw. They all now have essentially the same image-processing tools, except that there might be one or two things still missing from the “cloud” version of Lightroom. I agree with you about the new layout – it’s much easier to see what mask does what. One of my feature requests is to have the ability to roll your mouse over a mask thumbnail (maybe while holding the Option key for something?), and, rather than seeing the mask overlay, see the actual adjustment. In other words, an even quicker way to see a before-and-after for a particular mask than turning the eyeball off and on. We’ll see!
Michael—Thanks for this wonderful post! Lots to learn here and I just upgraded my LR to 11.0 today.
For some reason, I haven’t been receiving your blog for a while—it’s one of my favorites and I miss it. I resubscribed, however, and hopefully that will fix it. I’m looking forward to seeing future posts! (I’ve gone back and read those that I’ve missed). All best, Bob
You’re welcome Bob. I’m not sure what happened with your subscription, but I hope that fixed the problem.
Michael. I am enjoying the new masking technique but it has one problem that I can’t seem to resolve. When I put them up on to iCloud the photos appear there okay but all the masking is not there. Say, for instance, I use the sky detector and darken the sky, I get a dark sky in Lightroom but by the time I get to the iCloud all the sky is back where it was.
Is there a flattening technique missing here, or what?
Any clues?
Michael,
The detect sky mask works well with good results, but when I put the end result upon the iCloud, all the masking is not there. The other changes come through, healing, cropping etc. But not the masking changes. Is there something wrong or missing here? Flattening, maybe?
Can you help.
Great overview of these amazing new features, Michael! I’m looking forward to digging into them. I’ve been thinking about getting your landscape photography courses and I’m wondering what version of LR they are currently based on and how often they get updated when significant changes like these latest ones come along.
Thanks!
Thanks Mark! The Lightroom courses keep evolving as Lightroom changes. Basically, if there’s a significant change to something in the Develop Module I’ll update or add to the course(s) as needed.
Michael, I’ve watched your three new videos and really appreciate you taking the time to produce those. Figuring out all of those options and nuances myself would have taken a long time and been a little frustrating! I definitely want to revisit some older images and try out the new tools. Thanks again!
Thanks Rob – I’m glad you found the videos helpful!