Lightroom’s Powerful New Denoise Tool
Adobe released major updates for Lightroom and Camera Raw last week (version 12.3 for Lightroom Classic, 6.3 for the cloud version or Lightroom, and 15.3 for Adobe Camera Raw). Lightroom Classic now has Curves in the Masking Panel, which I’ve been hoping to see for a long time. But I’ll talk about that later, because to me the most exciting news is the new AI-powered Denoise tool.
I’ve used most of the noise-reduction tools out there, but the new Denoise function in Lightroom and Camera Raw has quickly become my favorite. It’s not perfect, and it has limitations, but it’s performed minor miracles on some of my noisiest, most troublesome photos.
Here’s one example, my aurora photograph from Yellowstone last fall. It’s a noisy photograph, captured at 10 seconds, f/1.8, ISO 6400 in very dim light. This is the full image, after running it through the new Denoise tool:
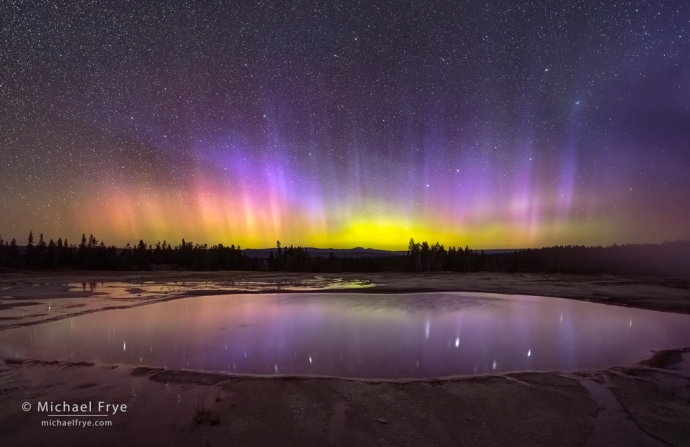
Aurora borealis reflected in a thermal pool, Yellowstone NP, Wyoming. Star-stacking wouldn’t work with such a fast-moving nighttime subject, but Adobe’s new AI-powered Denoise tool did an amazing job of cleaning up the noise in this image captured at ISO 6400.
And here’s a comparison view at 200%, showing showing my best efforts with Lightroom’s manual noise-reduction tools on the left, and the new AI-powered Denoise on the right (you can click on any of these comparison screen shots to view them full size at 200% magnification):
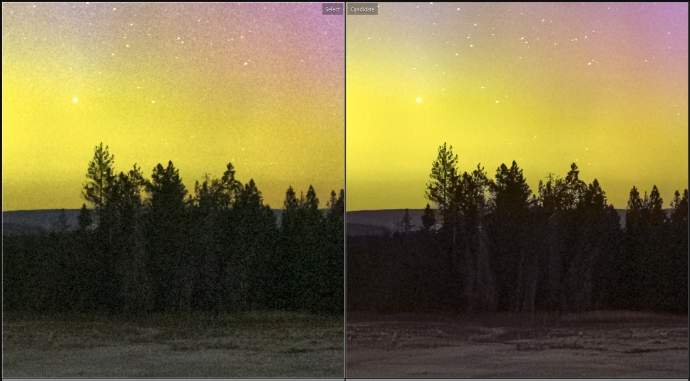
My best efforts with Lightroom’s manual noise reduction on the left, and Adobe’s new AI-powered Denoise on the right, with the Amount set at 40 (click to view full-size screenshot at 200%)
The version on the right is not only less noisy (including less greenish color noise in the shadows), but the details are considerably sharper.
And here’s a comparison with Topaz Denoise AI, also at 200%. Until now Topaz Denoise AI has been usually been my preferred noise-reduction tool for particularly noisy images. It has its issues (which I’ll talk about more below), but in some cases works really well. It’s a valuable tool. But when comparing Topaz Denoise AI to the new Adobe Denoise tool, in nearly every case I liked the results from the Adobe tool better. Often much better. Here’s the same aurora photo with Topaz Denoise AI applied on the left, and Adobe’s new Denoise tool on the right:
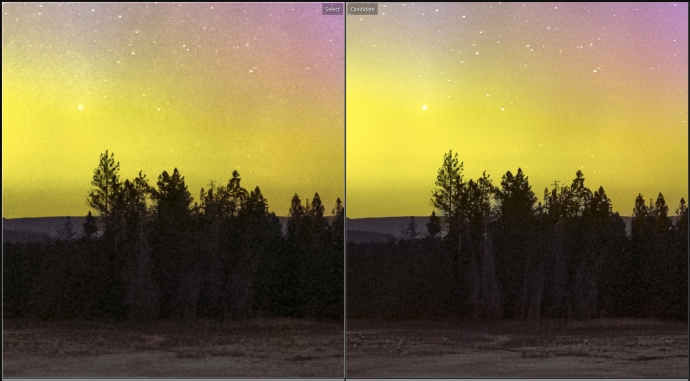
My best efforts with Topaz Denoise AI on the left, Adobe’s new AI-powered Denoise on the right (click to view full-size screenshot at 200%)
The Adobe version is a little less noisy, and also crisper, retaining better detail in the trees, and even in the stars.
This next photograph, of Half Dome with moonbeams, is probably my most troublesome photo. I severely underexposed it to get detail around the moon, and lightening everything else brought out massive amounts of noise (I should have bracketed to get better shadow detail!). I’ve never made a print of it because of those issues. Even at web-viewing sizes the noise is apparent after traditional, manual noise reduction in Lightroom:
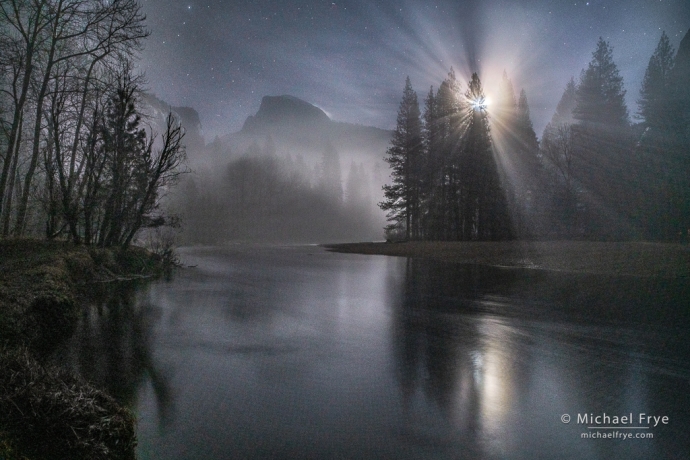
Misty moonrise, Half Dome and the Merced River, Yosemite NP, California, with manual noise reduction in Lightroom
Every time some new noise-reduction software comes out, this is the first image I try it on. And every time I’ve been disappointed. Either it’s still too noisy, or the details turn to mush.
Of course this was the first image I tried with Adobe’s new Denoise tool. And… wow! It’s not perfect, but it gave me better results than any other tool I’ve tried. Here’s a comparison, at 200%, between my best efforts with Adobe’s standard noise-reduction tools on the left, and the new AI-powered Denoise on the right. This is not even close:
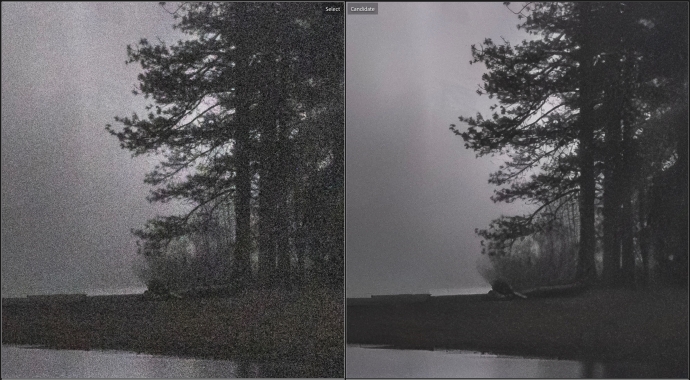
200% comparison using Adobe’s standard, manual noise-reduction tools on the left, and the AI-powered Denoise on the right (Amount 50)
And here’s a comparison with my best efforts using Topaz Denoise AI on the left, and Adobe’s new Denoise on the right:
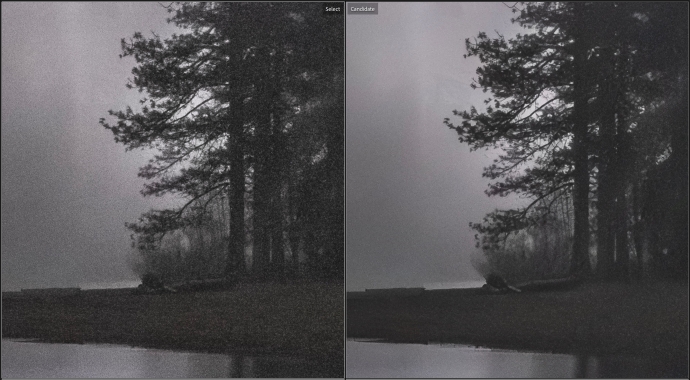
200% comparison with Topaz Denoise AI on the left, and Adobe’s new AI-powered Denoise on the right (Amount 50)
The Adobe version has a bit more fine detail, and it’s much cleaner. (I could crank up the noise reduction in Topaz to smooth out the noise more, but when I try that the details turn to mush.)
This new tool also works with fixed-pattern noise – hot pixels, speckles, and “confetti” noise. This photo, made on a hot night in Death Valley, has some serious confetti noise. It looks okay at a small size here, after doing a lot of manual noise reduction in Lightroom:
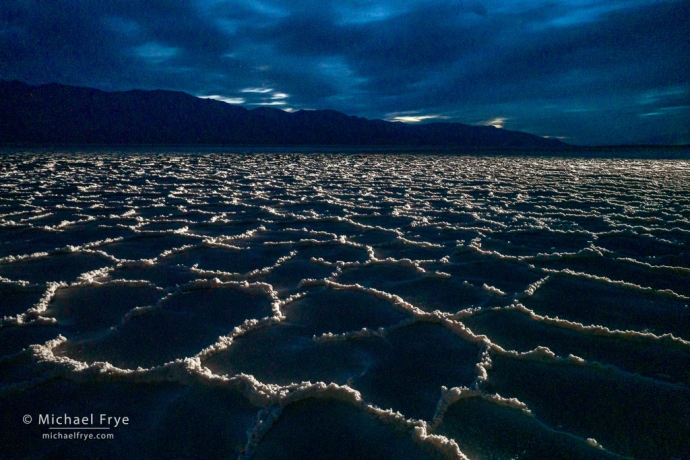
Salt flats at dusk, Death Valley NP, California. After applying a lot of manual noise reduction in Lightroom, this image is barely usable for web viewing.
But here’s a view at 200%, with no noise reduction on the left, and lots of manual noise reduction on the right:
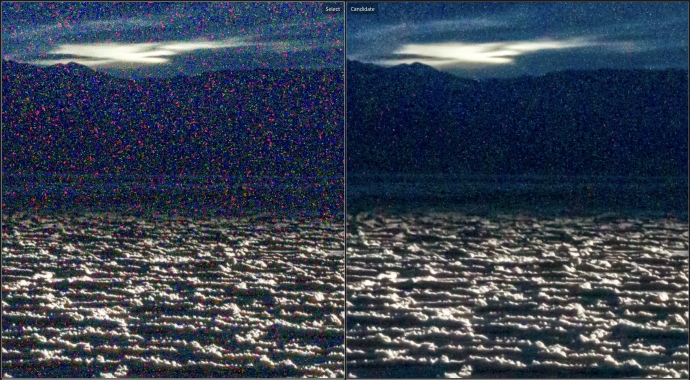
200% view no noise reduction on the left, manual noise reduction in Lightroom on the right.
Yikes! The version on the left is unusable. The version on the right is barely usable at a small size, but I wouldn’t print it.
Now here’s a comparison of the manually-denoised version on the left, with the AI-powered Denoise on the right:
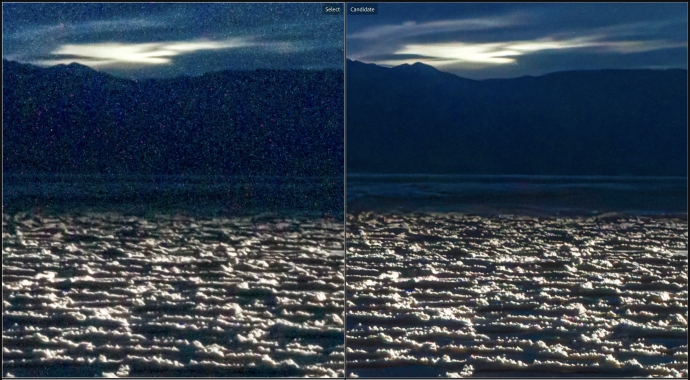
200% view with manual noise reduction on the left, new Denoise (Amount 70) on the right
So much better! I did have to crank up the Denoise Amount to 70 to get rid of most of the hot pixels. (I’ll talk more about how to use this tool below – or you can watch the video at the top of this post.) That’s pretty high, and made the result a bit soft, so I added some extra Sharpening, Texture, and Grain to the resulting file to bring back some detail. But it works, and the result is much better than any other method I’ve tried.
Of course noise isn’t limited to nighttime images. Wildlife, sports, and street photographers often have to use high ISO settings to freeze motion in low light, and Adobe’s new AI-powered Denoise works equally well in those situations (maybe even better, since they’re usually less noisy).
As you can tell, I’m very impressed with this new tool. It’s already significantly improved some of my noisiest photographs, and opens up new possibilities going forward.
It’s Great, But Not Perfect
Of course nothing is perfect. First of all, Adobe’s new AI-powered Denoise tool currently only works with Bayer and X-trans raw files. That means raw files generated by most cameras, even if those have been converted to DNG format. But it doesn’t work with JPEG, HEIC, TIFF, ProRaw, or sRaw files, nor does it work on DNGs created with Lightroom’s HDR Merge or Panorama Merge. Adobe hints that they will be adding support for other file formats in the future, but there’s no concrete timetable yet. (You can run the original raw files through Denoise before merging them with the HDR or Panorama Merge, but with AI you can get slightly different results with each image, so they might not merge seamlessly. In my limited experience with this, the differences are usually minor, and not a problem, but that might not be true in every case.)
And while most of the time Denoise works great, I have run into some problems. The most consistent issue I’ve seen is that it often creates little streaks between stars in nighttime images. Here’s a manually de-noised version of some stars on the left, and AI-powered Denoise on the right:
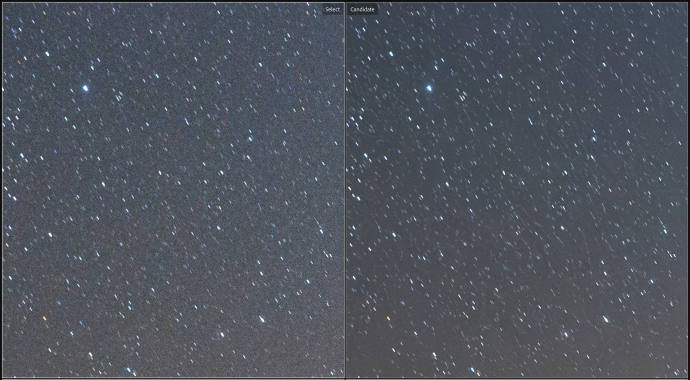
Manual noise reduction on the left, the new AI-powered Denoise on the right. Note the faint little streaks on the right. These streaks are actually present in the version on the left, but less visible, since they’re obscured by noise.
If you look closely you can see that those faint little streaks are also visible in the version on the left – they’re just exacerbated after running Denoise. Or maybe it would be more accurate to say they’ve been clarified with Denoise, so they’ve become more visible.
I know Adobe is working to fix this particular issue, but again, there’s no timetable for when that might happen. However, this is a 200% view, which is a great enlargement. These streaks would be much less visible in a normal-size print. And the results are usually so good otherwise that for me it’s worth taking the time to clone out those little streaks. (It took me 15-20 minutes to do so with an image that had a lot of them.)
One of the issues I’ve run into with Topaz Denoise AI is that the results are often inconsistent across the image. One part of the photo might be nice and smooth, but then another part has considerable noise. Or parts of the image are noticeably sharper than others. These issues have been reduced in recent versions, but it still happens.
I’ve seen less of this inconsistency with Adobe’s new Denoise tool, but I’ve still seen it on occasion. Here’s a 200% view of a nighttime photo of El Capitan in Yosemite that I ran through Adobe’s Denoise tool. If you look carefully you can see that parts of El Cap are noisier than others:
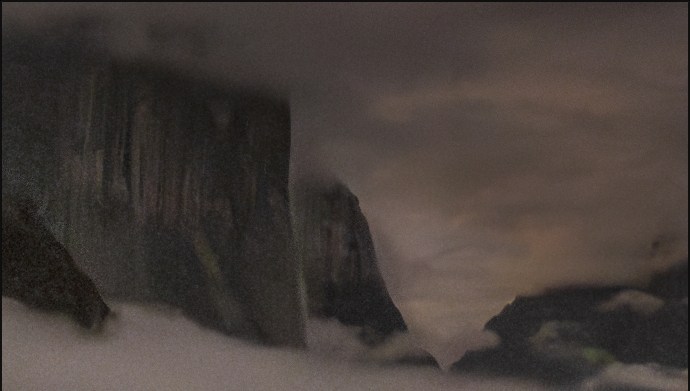
200% view of a Denoised nighttime photo of El Capitan in Yosemite. If you look closely you can see that parts of El Cap are noisier than others.
With any AI-powered tool you should zoom in and look at the results across the entire image to be sure there are no weird inconsistencies or artifacts.
[Edit, 4-29-23] I’ll add one other thing here: In talking with Eric Chan from Adobe’s Camera Raw team, he mentioned that Denoise doesn’t work as well with images that have been underexposed and lightened considerably (more than two or three stops) – like when you’re photographing a high-contrast scene, expose for the highlights, and then lift the shadows a lot. I’ve mostly been working with nighttime, high-ISO images that weren’t underexposed (at least not by much), and the results have been mostly great. But in some instances where I’ve tried Denoise on an image like I just described (where I’ve lifted the shadows a lot on a high-contrast scene), I’ve seen some splotchiness in the shadows. So to get the best results from Denoise, try to avoid underexposing images in the field. It’s better to raise the ISO in camera than to push up the Exposure slider in Lightroom later.
How to Use Adobe’s AI-powered Denoise Tool
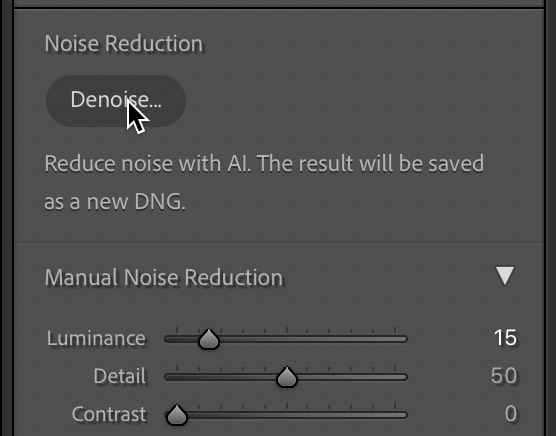
Using this new tool is pretty straightforward. First, of course, you have to install the latest version of Lightroom. Then select the raw photo you want to use, and in the top menu go to Photo > Enhance. Or, in the Develop Module, go to the Details Panel, where you’ll find a new button under the Noise Reduction setting for Denoise. Click on that button:
Either way, you’ll open this dialog box:
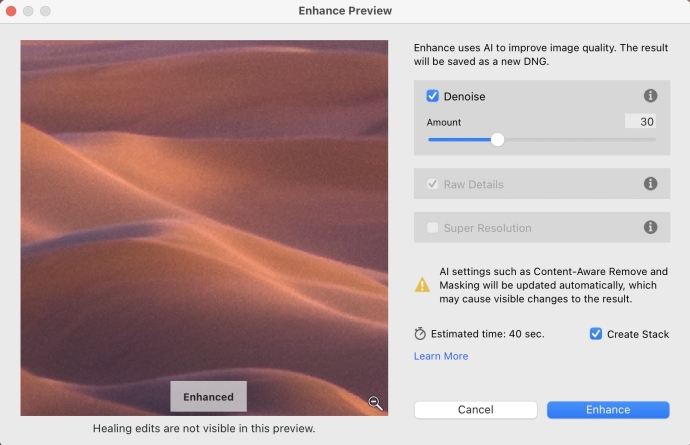
There are three options here: Denoise, Raw Details, and Super Resolution. If Raw Details or Super Resolution is checked, uncheck it, and check the box next to Denoise. (Note that you can’t run Denoise on an image where you’ve previously used Raw Details or Super Resolution. It’s one or the other. But Denoise also applies the Raw Details enhancements, so you get two for the price of one.)
Then adjust the Amount slider. The Amount slider is the only real control over how much noise reduction you’ll apply. You can see a zoomed-in preview of the results in the little preview window, but unfortunately it shows only a small section of the image, and you can’t make the window larger. I’d suggest scrolling around to find a portion of the image that has a lot of fine detail in order to best judge what Amount setting to use. (Tip: instead of scrolling, it’s often faster to click the little magnifying glass symbol in the lower-right corner of the preview window to zoom out, then click on the portion of the image you want to magnify.)
The lower the Amount, the sharper the resulting image will be, so you want to find the lowest Amount necessary to remove most of the noise. I usually find that an Amount of around 20 to 30 is enough for not-too-noisy images. For very noisy photos I’ll push the Amount up to 40 or 50. But speckles or confetti noise might require even higher amounts.
Then click on the Enhance button, wait a bit (the time will vary a lot depending on your computer), and view the results. Lightroom will create a new DNG file, with “Enhanced-NR” added to the original file name, and save the file into the same folder as the original raw file. This new file will retain all the settings from the original except noise reduction settings (though AI-powered tools, like Content-Aware Healing, and Select Sky in Masking, will need to be updated).
Workflow Refinements
By default, the resulting image will have all the manual noise-reduction settings set to zero. But I’d suggest looking at the image closely (zoom in to 200%) and, if necessary, adjusting sharpening, noise reduction, and Texture.
• Color Noise Reduction: The default setting for Color Noise Reduction in Lightroom is 25, but an image enhanced with the new Denoise tool will have Color Noise Reduction automatically set to zero. I often find some remaining color noise with this set to zero, so I’ll reset it back to 25, or sometimes even higher – but this depends on the image, and maybe the camera, so your results may vary.
• Luminance Noise Reduction: If you find that the image is still too noisy you could add a little Luminance Noise Reduction. But you’re probably better off running Denoise again with a higher Amount setting.
• Sharpening, Texture, and Grain: If the resulting image seems a little soft you can try adding a bit more Sharpening, Texture, and/or Grain.
• Local Refinements: It’s common for some parts of an image to be noisier than others. If you’ve lightened shadows more than highlights, for example, the shadows will be noisier. So if necessary, you can use the Masking Panel to apply additional manual noise reduction to noisier parts of the image. (You could use a Luminance Range Mask to select just the shadows, and push up the Noise slider for that selection.) Or add more Sharpening, Texture, or Grain to parts of the image that seem a little soft.
• Blending Images: If parts of an image are noisier than others, you could also run the same original raw file through Denoise twice, with different Amount settings – once for the less-noisy parts of the photo, and again, with a higher Amount setting, for the noisier parts of the photo. Then you could blend those two frames together in Photoshop using a layer mask.
Will This Change My Field Practices?
Yes and no. I think it’s always best to do as much as possible to reduce noise in the field, rather than relying on software to fix the noise later.
No software tool is perfect, and AI-powered tools are, by their nature, somewhat inconsistent, as they have to analyze each image independently, and they don’t always work, or work as well as you’d like. So if you’re counting on Adobe’s Denoise (or any other tool) to deal with noise you might be disappointed.
And the more you can reduce noise in the field, the better your results will be, even if you end up using noise-reduction software later. The less noisy the image, the lower the Amount setting you’ll need to use with Adobe’s Denoise, and the sharper the resulting file will be.
Best practices for reducing noise in the field:
• Use your camera’s base ISO whenever possible.
• Avoid underexposure, as lightening the image later will increase noise.
• Bracket high-contrast scenes so you can blend exposures later, and avoid lightening shadows too much (which brings out noise).
• At night, take a longer exposure for the landscape part of a scene to blend with a shorter exposure of the stars. It’s usually the landscape that’s noisiest, because it’s darker, and often needs to be lightened, bringing out noise. A longer exposure, possibly at a lower ISO setting, will bring in more light and reduce noise.
• At night, take multiple frames to use for star-stacking with Starry Landscape Stacker or Sequator. (Explaining this is beyond the scope of this article, but I’m sure many of you are familiar with this technique.)
New Possibilities
Although I think it’s always best to do as much as you can in the field to reduce noise, it’s not always possible to do the things I’ve listed above. During the day, moving subjects often require higher ISO settings to freeze motion, and bracketing exposures isn’t possible. At night, star-stacking might not work with moving clouds or auroras.
So that’s where a new tool like Adobe’s Denoise can really help, and open up new possibilities – by allowing us to make relatively noise-free images, in low light, with moving subjects. That’s awesome.
— Michael Frye
P.S. Eric Chan, a Senior Principal Scientist on the Camera Raw team, wrote an interesting and informative post on the Adobe blog about Denoise and the technology behind it.
Related Posts: Lightroom Update Could Be a Game-Changer; New Lightroom Tutorials: The Masking Panel
Michael Frye is a professional photographer specializing in landscapes and nature. He is the author or principal photographer of The Photographer’s Guide to Yosemite, Yosemite Meditations, Yosemite Meditations for Women, Yosemite Meditations for Adventurers, and Digital Landscape Photography: In the Footsteps of Ansel Adams and the Great Masters. He has also written three eBooks: Light & Land: Landscapes in the Digital Darkroom, Exposure for Outdoor Photography, and Landscapes in Lightroom: The Essential Step-by-Step Guide. Michael has written numerous magazine articles on the art and technique of photography, and his images have been published in over thirty countries around the world. Michael has lived either in or near Yosemite National Park since 1983, currently residing just outside the park in Mariposa, California.


Thanks, Michael, this is quite a significant enhancement for LR—I appreciate the detail you’ve provided. I’ve used Topaz DeNoise with mixed results, so I look forward to giving Adobe’s Denoise tool a run-through. I lost all my computer equipment in the fire I experienced in March, but a very generous friend has helped me acquire a new Mac Studio and monitor, so I’ve gotten back to using LR again. I lost my hard drives but almost all of my photo library was preserved in Backblaze, as was my LR catalog. Thanks again for the tutorial.
You’re welcome Bob. What you’ve gone through is very tough, but I’m glad to hear that you had all your images backed up, and are getting back up and running with Lightroom.
Thank you, Michael! Always grateful for your quick, helpful responses to new developments like this.
Glad you found this helpful Warren!
Always a pleasure to hear your thoughts and lessons Michael. You go well into the depths and connect the dots so well. Thank you!
Thanks Serdar, and I hope you’re able to make good use of this new tool.
Impressive. Thanks so much for this.
You’re welcome DJ, and thanks!
Great overview Michael. Sincerely appreciate your process and suggestions for using the new AI Denoise in LR. Take care.
Thanks Bill – glad this was helpful to you!
Timely post. I just tried it out on a problem image and am very happy with the results!
Good to hear!
Thanks Michael, your video was very enlightening and informative! One question: Should you use Denoise Ai at the beginning of your workflow or as the last step of your workflow?
Thank you for such a thorough and useful post! I especially appreciated the comparison to Topaz Denoise. Very impressive!
You’re very welcome Sarah – glad you found this helpful!
Interesting and very helpful preview of this new capability in LightRoom Classic. Appreciate your thoughtful review of it and specific application to a Milky Way photo in terms of tuning it in use. Thank you. Some lovely shots on your web page. Luke
Thanks, Michael! As always, you do a brilliant job bringing us all the details on the latest and greatest of Lightroom. I especially like the comparisons between prior denoise attempts with LR and Topaz. Time to dig out my “troublesome” images to see what can be improved! All the Best!
Hello Michael.
Thanks for the excellent intro and tutorial on the new de-noise function in LR Classic. LR denoise runs very slow on my M1 MacBook Pro with 16GB or Ram, especially compared with Topaz. Topaz Denoise AI can finish in seconds. LRC takes a minute or two.
I have my catalog on the Macbook’s internal SSD and the RAW images on a USB-C connected SSD. Perhaps that is the problem
Thanks Bruce. A minute or two sounds about right – that’s what it takes me. I don’t have an M1 chip, but do have 32 GB of RAM. It’s a processor-intensive task. There are some newer machines with processors dedicated specifically to AI that can apparently render Denoise much faster.
I went from a 2017 windows i7 6700/1050gpu machine to a new i7 14700/4070gpu and the time to complete the denoise action went from 8-9 minutes to 7-9 SECONDS. Wow
Thank you for the very informative Lr Denoise AI tool blog and video. For your Milky Way photos, do you at this time prefer to use Starry Landscape Stacker (stack ~20 images) or use Lr Denoise AI ? Is one program better than the other in reducing noise? Now that Starry Landscape Stacker accepts RAW files do you upload TIF or RAW files into it ? Thank you.
That’s a tough question. Lightroom Denoise AI is certainly quicker and easier, and if it produces good results I may not need anything else. But I still prefer to capture multiple frames in the field in case Denoise doesn’t work, or doesn’t work as well as I would like. And there may be instances where you need both – that is, for best results you need to run all the frames of a star-stacking sequence through Denoise, then run them all through Starry Landscape Stacker (or Sequator). I reprocessed my image of dunes and Comet NEOWISE that way, and the new version is super clean – better than either method by itself. But that was an exceptionally noisy photo.
I haven’t tried using SLS with raw files yet.
thank you !
as always 🙂 !
Thanks so much for this article and video; it was most helpful. I do have a question: when using high isos, should I be using the NR in my D750 if I plan on using denoise in LR?
Thanks!
I’m glad you found this helpful Raye. High-ISO noise reduction in the camera only applies to JPEGs; it will have no effect on raw files. So if you’re using raw it doesn’t matter whether it’s on or off. If you’re talking about long-exposure noise reduction, that does work with raw files, but it only affects fixed-pattern noise (hot pixels). And it also makes the exposure times twice as long, since it needs to expose a dark frame after taking the normal exposure. If you find you’re seeing a lot of hot pixels with your camera it might be worth turning long-exposure noise reduction on. But otherwise I think it’s too time-consuming. At least leave it off until you’ve got the focus, exposure, and composition set, then you can turn it on for the “final” image. If you don’t see a lot of hot pixels then I’d just leave it off and clone out whatever hot pixels you find. Lightroom’s Denoise does work with hot pixels, though it requires a pretty high Amount setting to get rid of them, which softens the image a bit.
Very informative. Quick question. I edited a bunch of my daughters volleyball game pictures and once I got them to a place I was happy with I did a batch DENOISE. Now I have 200 pictures that I need to export for the team and wondering if there is an easy way to filter out the Enhanced-NR-DNG from the original. I cant seem to find it but im sure it is right on front of my face. Thanks
This was tremendously helpful, thank you so much. Looking forward to using this.
Daniel Chui
You’re welcome Daniel – glad you found this helpful!
Brilliant! Thanks for the clear and accurate info. Today I shot about 1300 images in a sports hall… Using my old school approach and underexposing 2 stops so I could click at 1/2000 of a second. Tomorrow I will crank the ISO up (from today’s 5000) and under expose a bit less. The AI already has blown my mind on todays shots!
Hello Michael ~ a friend is starting to Denoise for her bird photography. She has also helped me immensely with my business. She is new to it and I’m searching for someone who can give her a consult. I wonder if you do that ~ 30 mins, hour and what type of pricing ~ she’s in the east coast ~ for a virtual moment with you? I have been trying to find a thank you present and I can’t imagine anything else she’d like more at this time. Thank you ~ look forward to hearing if it’s possible.
Thanks Gail – I will reply by email.