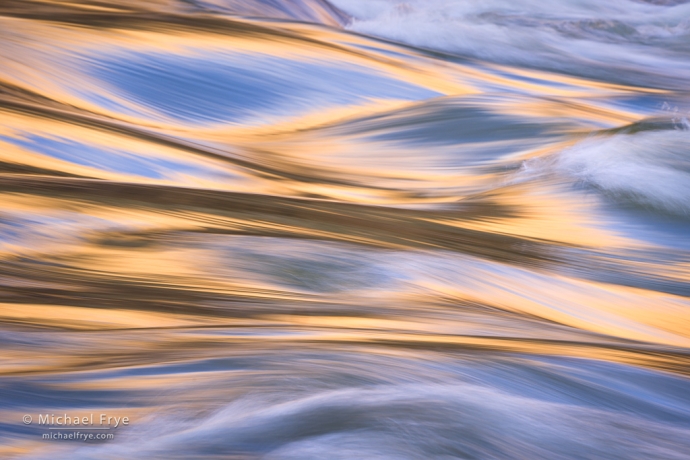
Rapid and reflections in the Colorado River, Grand Canyon NP, Arizona. The lower-right portion of this photograph had a large blemish caused by a water spot on the sensor. This would have been difficult to remove using traditional retouching tools in Lightroom or Photoshop, but took about five seconds with the new Generative-AI mode in Lightroom.
Yesterday Adobe announced significant upgrades to Lightroom, Lightroom Classic, and Camera Raw.
To me, the biggest news is the addition of “Generative AI” for retouching. This uses similar technology to Generative Fill in Photoshop, but isn’t designed to add or create things – only to remove objects. In fact Adobe changed the name of the Healing tool to the Remove tool.
Whatever you call it, Generative AI is a big leap forward in the retouching capabilities of Lightroom. It makes Lightroom almost as powerful as Photoshop for retouching, but unlike Photoshop it works in a completely flexible, non-destructive way. Generative AI does have some limitations, however, which I discuss below.
Adobe has also improved the Lens Blur tool. Its AI algorithms do a better job now of selecting the objects to keep sharp, but I still find this tool to be a bit limited, as I’d often like to blur the background more than this tool allows.
There are some performance enhancements – always welcome – and Adobe has maybe, just maybe, fixed some of the annoying syncing issues in Lightroom Classic. (For me, previously it always showed a number of images to be syncing, even though they were already synced. I eventually learned to ignore this, but now, thankfully, those issues are gone.)
Catalog Upgrade
If you update Lightroom Classic to this new version (13.3), you’ll be required to upgrade your catalog. This shouldn’t be an issue, but it’s always a good idea to back up your catalog first.
Generative AI Remove
The addition of Generative AI to the Remove tool in Lightroom (previously called the Healing tool) has made complex retouching jobs much easier. It can perform convincing object removal with one or two brush strokes that formerly would have taken many strokes, and lots of time – or maybe have been impossible.
Generative AI Remove is labeled “Early Access,” meaning it’s still under development. It should improve over time as the AI models continue learning. But it’s really good already.
There are a few caveats. First, this tool needs an internet connection. It’s also a little slow compared to the other retouching tools, so for simple dust spot removal, or other easy retouching tasks, it’s faster to use the older tools.
But perhaps the biggest limitation is that the areas you retouch with Generative AI are lower in resolution than the surrounding areas. In other words, they’re not as sharp. How much softer these patches are depends on how big a brush stroke you make – the larger your brushstroke, and the larger the area you remove, the lower the resolution. (That all applies to Generative Fill in Photoshop as well.)
For online viewing, or small prints, this lower resolution probably won’t be noticeable at all. And it isn’t a concern with areas that don’t have much texture or detail, like sky or water. For large prints, the lower resolution probably won’t be very noticeable in small patches, but it might be an issue if it affects a significant portion of the photo, or a visual focal point that viewers would notice.
All this is somewhat subjective; what’s acceptably sharp – or noticeably soft – might be different for one person than another. Adding more sharpening to retouched areas can help a little, but only goes so far. You might also be able to add some detail and texture back into retouched areas using other retouching modes, like Healing or Cloning (as I demonstrate in the video below).
But despite those limitations, the Generative AI mode can often perform minor retouching miracles with ease. For example, in the photo from the Grand Canyon at the top of this post there was a large, irregular blemish caused by a water spot on the sensor (how it got there is a long story):

This would be difficult to fix with the traditional retouching tools in Lightroom or Photoshop, as there are many subtle gradations in tone and color that would have to be blended in smoothly and seamlessly. It’s doable, but challenging. With Generative-AI mode, however, I just painted over the blemish with one brush stroke, and it removed the blemish in a realistic way:

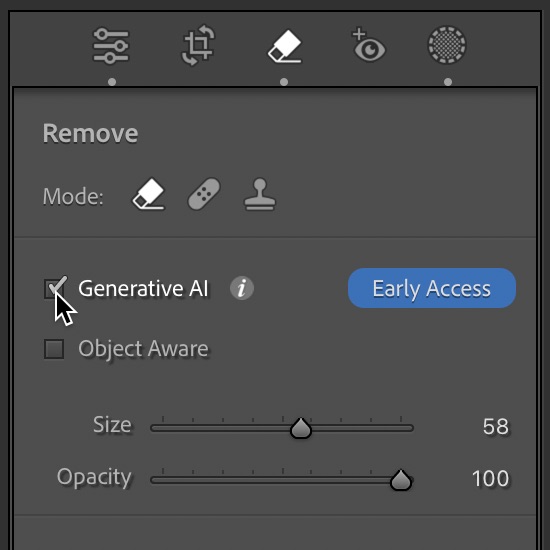
To find the Generative AI mode, select the Remove Tool in Lightroom (formerly the Healing Tool), click on the Remove-mode tab on the far left, then check the Generative AI box:
You can then just brush over the object or region you want to remove and click Apply. Once you do that you can select (in Lightroom Classic, but not other versions of Lightroom) three different variations:
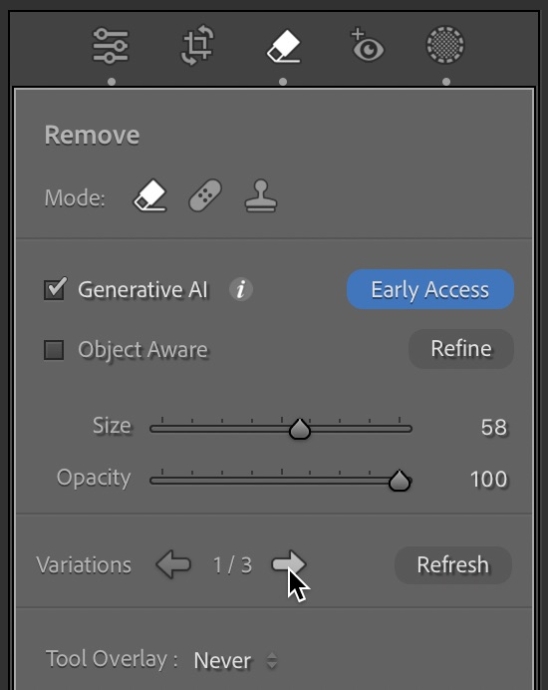
And if you don’t like any of those, click Refresh to generate three more variations.
Those are the basics, but there are many nuances to this new tool, which I discuss in this video:
Flexible Retouching
I’ve long advocated doing as much retouching as possible in Lightroom, rather than Photoshop, because retouching in Lightroom (like every adjustment) is completely flexible and non-destructive. That means if you do the retouching in Lightroom you’ll never have to do it again. Yes, you can do retouching in Photoshop on a separate layer, but that has its limits; if you ever want to go back to the original raw file and make a change, you’ll probably have to do that retouching all over again.
If you do retouching in Lightroom, that retouching adapts to any changes you make to the raw file. So you can do it once, and be done with it forever. With the new Generative-AI mode in Lightroom, I’m having a hard time thinking of a reason to ever do retouching in Photoshop again.
— Michael Frye
Related Posts: Lightroom’s Powerful New Denoise Tool; New Lightroom Tutorials: The Masking Panel
Michael Frye is a professional photographer specializing in landscapes and nature. He lives near Yosemite National Park in California, but travels extensively to photograph natural landscapes in the American West and throughout the world.
Michael uses light, weather, and design to make photographs that capture the mood of the landscape, and convey the beauty, power, and mystery of nature. His work has received numerous awards, and appeared in publications around the world. He’s the author and/or principal photographer of several books, including Digital Landscape Photography: In the Footsteps of Ansel Adams and the Great Masters, and The Photographer’s Guide to Yosemite.
Michael loves to share his knowledge of photography through articles, books, workshops, online courses, and his blog. He’s taught over 200 workshops focused on landscape photography, night photography, digital image processing, and printing.


Thanks, Michael. I really appreciate your straightforward explanations of the new features in LR.
Without further ado, I tried it out on a picture of a person standing on a beach. I wanted to get rid of the person completely, but LR changed it first to a dog walking away, then a dog running towards, then finally into a tiny person about 2’6″ tall! Eventually I realised that I hadn’t brushed the shadow – then it worked perfectly! I had broken my own cardinal rule to always read the manual first!
Thanks again.
You’re welcome Geoff, and thanks. That shadow thing is tricky. Even a subtle shadow can make Generative AI think it should add something.
Thanks for the detailed explanation of this tool and its nuances.
You’re welcome Lawrence, and thanks!
Michael, as always, your tutorial is clearly presented and explained. Thank you for being so generous with your knowledge and time. Greatly appreciated.
Thanks Irene, and you’re very welcome!
Hey Michael, thank you for getting this together, I learned a few things for sure. I have started to use and have found fairly similar to how the Photoshop version works. Using sharpening after you complete is a great tip.
You’re welcome Doug, and I’m glad you found this helpful. Sharpening helps, but only goes so far. If the retouched area is really soft, then sharpening is a bit like putting lipstick on a pig. 🙂 If it’s not too soft (which happens when you only brush over a small area), and not too large an area, then sharpening can help.
Michael, I’ve missed my photography for more than a year (surgery and then a puppy) and now I need to get going on catching up. There is a #1 place I will go to refresh and update my understanding of the fast-track changes in LR. That fot the clear cut explanations in this article. I’m confident that my trip to your website again will bring me back on bosrd
Well surgery sounds rough, but a puppy! A puppy always makes life more fun, even though it takes a lot of time and energy to train.
Super helpful video, Michael. I didn’t realize that you could brush an area inside a larger area by hiding the tool – that’s a great tip! The suggestion to add sharpening and texture if necessary is helpful also. Thanks!
Thanks Lisa! Glad you liked the video.
Hi Michael,
Thanks for your really helpful article and video on using the remove tool. I really like your method of writing a detailed article and then including a descriptive video. It really moves me up the learning curve much faster than one or the other alone.
Thanks again for your generosity in helping us learn no tools.
Thank you, Michael, for a clear and extremely easy-to-understand explanation of this tool and how to work beyond it. I’d not thought about several things that you did and will try them. Thanks, too, for the tip on hiding things. That has always frustrated me and you showed how easy it is to get into those “fixed” places a second time. Fantastic demonstration.
Very helpful, Michael, and you chose challenging images! I hadn’t seen your use of the brush mask with some sharpening and texture. That’s a nice addition!
The Photoshop beta is now using 2048 pixels fir Generative AI vs 1024 for the release version of Photoshop and now LrC. That seems to help but the issue may still remain.
Have you shared any thoughts on Lens Blur? It seems to have improved a lot, albeit for a different use case.
Thanks!
Thanks Chris! I hope we’ll see higher-resolution Generative Remove in Lightroom and the regular version of Photoshop soon. I’m sure that will help, though, as you point out, it might not be high enough resolution for some jobs. I did mention Lens Blur briefly above; it’s better, but I still wish it would allow me to add more blur.
Great video and great refinement tips, especially regarding adding texture and sharpening to the softer areas of gen ai, and the alternative ways of streamlining workflow and minimizing artifacts.
Thanks as always for sharing your knowledge.
Michael:
Will you be adding this video to the Education Center?