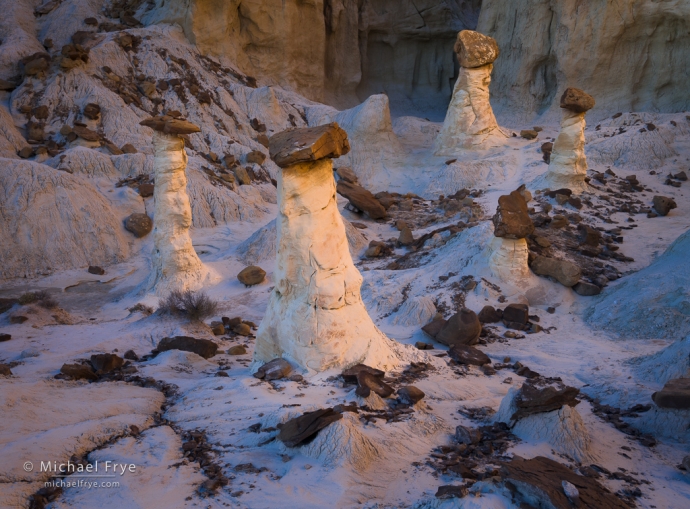
Hoodoos in reflected light, Grand Staircase-Escalante NM, Utah. The new Object selection tool helped me select just the hoodoos, then invert that selection and subtly darken their surroundings.
After coming back from New Zealand I spent a few days at home, then headed up to the Oregon Coast to scout for our upcoming workshop. It’s been a busy month, but before the workshop starts I want to share some thoughts about that latest Lightroom update.
On October 24th Adobe announced major updates to Lightroom, Lightroom Classic, and Adobe Camera Raw. (The new version of Lightroom Classic is 12.0.) And I think it’s a big upgrade. To me, the most exciting new features for landscape photographers are the addition of a Content-Aware mode for the Healing tool (formerly the Spot Removal tool), and the new Object Selection tool in the Masking Panel.
Content-Aware Healing Comes to Lightroom
I’ve been hoping to see Content-Aware retouching capability in Lightroom for a long time, and now it’s finally here!
I think this is a potentially game-changing, workflow-changing addition for a lot of photographers. Many people use Photoshop only for retouching, so adding Content-Aware mode to Lightroom will often allow them to stay in Lightroom, streamlining their workflow and keeping that workflow completely flexible and non-destructive.
That last part is key. Until now there’s been no way to do serious or difficult retouching jobs in a completely flexible, non-destructive way. Yes, you can do retouching in Photoshop on a separate layer, but if you want to modify an underlying layer, or ever go back and modify your original raw file, you’ll still probably have to do the retouching all over again.
But if you do the retouching in Lightroom (or Camera Raw) you’ll never have to do it again. When you make any further changes to the image in Lightroom the retouching will adapt to those changes.
I’ve long advocated that people do as much retouching in Lightroom as possible for that very reason – because you’ll never have to do it again. It’s always been easy to remove dust spots, and perform relatively simple image cleanup in Lightroom. And with some practice you could accomplish more complex retouching in Lightroom too. But now, with Content-Aware mode in the Healing tool, difficult retouching jobs will be easier, and Lightroom should be able to do any retouching job you formerly needed Photoshop for – and again, do it in a completely flexible, non-destructive way, without ever having to do it again.
Accessing the Content-Aware mode with the Healing tool in Lightroom is easy. When you click on the tool, where there were formerly two modes at the top (Heal and Clone), there are now three, and the one on the left is Content-Aware Remove:
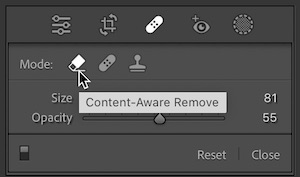
Just select that mode, adjust the brush size, and brush over the object you want to remove. As in Photoshop, Lightroom will use AI to analyze the image content and try to replace the object with pixels that realistically match what that area would have looked like if the object hadn’t been there in the first place.
And as in Photoshop, it’s not perfect. If you don’t like the initial results, try clicking the Refresh button; that will make Lightroom re-analyze the image and try again. You can also Command-drag (Mac) or Control-drag (Windows) an area of the image to tell Lightroom to use that area as the source.
With any retouching tool, including Content-Aware, it often works better to use a series of clicks or smaller brush strokes to remove an object bit-by-bit, rather than trying to remove it all at once. You can also try switching to Heal or Clone mode, as sometimes those work better for certain situations.
Object Selection Tool
Adobe also added several new tools to the Masking Panel. There’s a new People selection mode, and also a Background selection tool, which selects everything but the subject. (This was easily accomplished before by using the Subject selection tool and then clicking the Invert box, so the Background selection tool really just saves you a step.)
Finally, there’s the Object selection tool, which I think is a very helpful addition for landscape photographers. With the Subject selection tool that came out last year you could automatically select anything that Lightroom would recognize as a “subject,” or the main subject. But with the Object selection tool you can paint over any object, even something that’s not the main “subject,” to automatically select it. Then once that object is selected you can lighten it, darken it, add contrast, change its color, etc. – all the things you can do with any of the local adjustments in Lightroom, but to an automatically-selected object in the image, like a tree, rock, building, or animal.
I even find that the Object selection tool sometimes does a better job of selecting the main “subject” than the Subject selection tool. Try both.
And with the Masking panel you can select multiple objects, make them all part of the same overall mask, and adjust them all together. (You might want to do this with, say, several separate sea stacks, or several trees.) Just make a selection for one object, then click Add, choose Objects, brush over a second object, and repeat as many times as necessary. And of course you can select an object, or group of objects, and invert the selection to adjust everything but that object (or objects).
The image of hoodoos from southern Utah (at the top of this post) shows how you can select multiple objects, and how useful this can be. I was attracted to the glowing, golden light bouncing off a sunlit cliff to the right (out of frame) and onto the hoodoos. After some searching I found a composition with good spacing and separation between those hoodoos. But when processing the image later, I found that the tones and colors of the hoodoos were too similar to their surroundings, so it was difficult to make them stand out. They were almost camouflaged. And if the hoodoos blended into their surrounding the photograph didn’t really work.
Since the tones and colors of the hoodoos were so similar to their surroundings, none of the previously-available tools in Lightroom like the Color Range or Luminance Range worked to select just the hoodoos, or everything but the hoodoos. I tried the Subject selection tool, and it selected the larger, foreground pillar, but also some of its surroundings, and none of the other pillars. I had to resort to some careful (and painstaking) brushing to make any kind of selection for the hoodoos that allowed them to stand out even a little bit.
But the new Object selection tool made selecting the hoodoos – and just the hoodoos – easy. First, in the Masking panel, I chose Objects, and with a fairly big brush painted over the larger foreground pillar. Lightroom made a nearly perfect selection for that. Here’s what the mask looked like:

The mask created by the new Object selection tool for the main hoodoo
Then I clicked Add, chose Objects again, and brushed over another pillar to select it. I repeated that three more time to select all five pillars. Here’s the mask at that point:
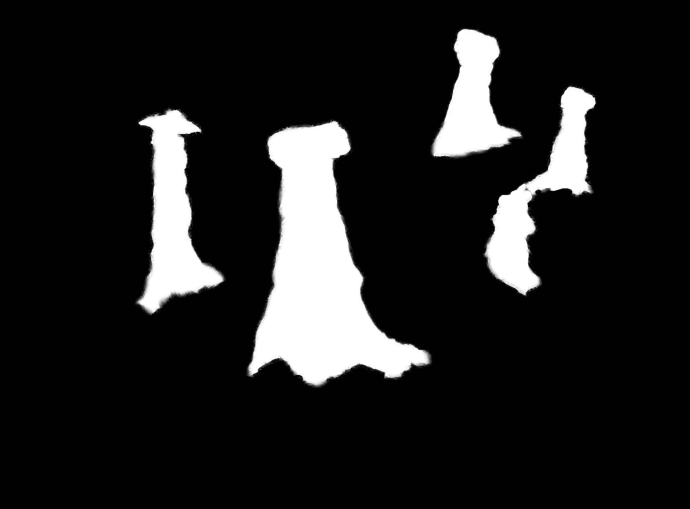
The overall mask after selecting each of the hoodoos with the Object selection tool
I think this is an impressive performance in selecting objects that are rather subtly differentiated from their surroundings. Sometimes the hype around AI-powered software tools has been greater than their performance, but this Object selection tool seems to work really well.
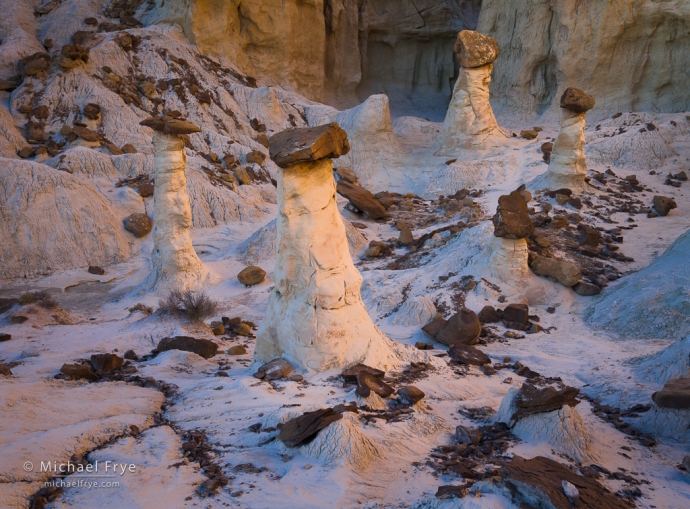
Next, I clicked on the Invert button to select everything but the hoodoos, and nudged the Exposure slider down a bit to darken the surroundings and make the hoodoos stand out more. For good measure I also cooled the color temperature for this selection, reduced the Saturation, and lowered the Clarity. These are subtle changes, as more dramatic shifts would look unnatural, but they help de-emphasize the surroundings and make the hoodoos stand out a little bit better. Here’s a before-and-after comparison:
Before darkening the area around the hoodoos
After selecting the hoodoos with the Object selection tool, inverting that selection, then lowering the Exposure, color temperature, Saturation, and Clarity.
Content-Aware retouching and the Object selection tool are big additions that I’m sure I’ll be using a lot. And as I said, I think Content-Aware retouching is a game-changer that can seriously improve many people’s workflows.
— Michael Frye
P.S. There’s not enough room here to go into all the details about how to combine and invert selections with the Masking Panel, but luckily I have a course all about that! It’s called Lightroom’s Masking Panel: In Depth, and it’s only $20.
Related Posts: Major Lightroom Update: the New Masking Panel; New Lightroom Tutorials: The Masking Panel


Michael: I’ve been impressed by a number of the new tools, though I use them in ACR rather than in Lightroom. The masking tools are quite useful, and that object masking tool is really powerful when it works correctly, which so far is most of the time.
I’ve had mixed results with content-aware healing in ACR. When it works it really is great, quickly accomplishing things that might otherwise have me taking many steps with the clone and heal options and turning on the overlay in order to manually reposition the sources.
Unfortunately, it has failed for me in some surprising situations, too — forcing me back to the old methods. If I’m correct, it seems to be especially challenged (as is the heal tool) when the area is right on the edge of the frame. For that I often have to first use the clone tool to get things close, and then touch up using heal.
That being said, the world isn’t perfect, and these tools can make some tasks a lot easier and better.
Dan
Dan, I too have had mixed results with Content-Aware healing. It’s not perfect, but it does give us another option, and combined with Heal and Clone you can usually get the job done. And I have the same issue with objects along the edge of the frame, and use the same technique – clone to get it close, then smooth out the imperfections with heal. It would be nice if Adobe could somehow improve that edge “awareness;” maybe use different algorithms along the edge of the frame? I’m sure it’s complicated…
Michael, thanks for the great overview of the new masking features. I’ve been impressed with the accuracy of the object selection tool, but, as Dan indicated, the content-aware healing brush has been hit-or-miss for me as well. Overall, the masking improvements during the past year or so really have been game changers for Lightroom users! I hope you have a great time in Oregon.
You’re welcome Rob, and I’m glad you’ve had success with the Object selection tool. I don’t know if there will ever be a magic bullet that will make difficult retouching jobs easy, but at least Content-Aware is one more tool in the arsenal – and now a non-destructive one, without having to go to Photoshop.
I haven’t played around with the content aware fill too much yet, but object based selections have been super helpful.
What I most often have to travel to PS for is doing image composition for manual “HDR” type stuff, or focus stacking. I keep hoping a workflow within LR for that will show up sometime. Maybe with all the recent masking power they’ve added that time has come?
There’s still no focus-stacking merge in Lightroom, but then I’ve never been crazy about Photoshop’s implementation of this, so I use Helicon Focus. You can’t do exposure blending in Lightroom manually, but there is of course the HDR Merge – which I use frequently.
Hi, Michael – I found your blog through Nic Stover and was wondering if I could get permission to include this article in the December digital issue of my photo club newsletter. I will, of course, give you credit and include links to your blog and website. You can check out our newsletter, The Focus, at: http://www.spsphoto.org. Thank you for your consideration!