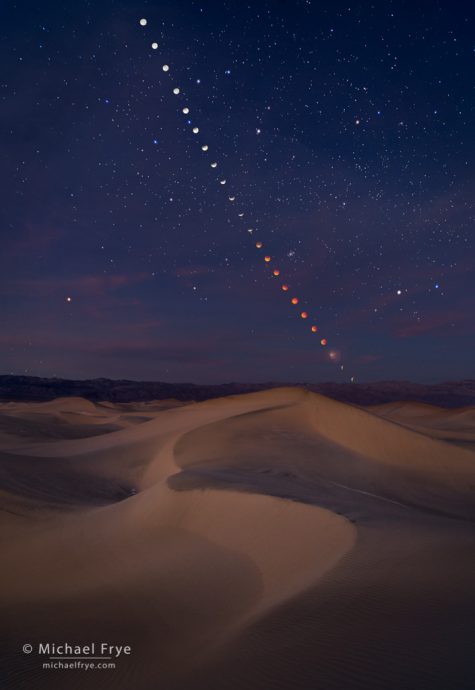
Lunar eclipse sequence over the Mesquite Flat Dunes, January 31st, 2018, Death Valley NP, CA, USA
In case you haven’t heard, there will be a total lunar eclipse on the night of January 20th and 21st, 2019. The totally eclipsed moon will be visible in all of North and South America, most of Europe, and western Africa. This page shows where the eclipse will be visible, as well as the timing of the event.
Here in the western U.S. the eclipse will take place on Sunday evening, January 20th. The peak eclipse occurs at 9:12 p.m. on the west coast, and the moon will be high overhead to the east-southeast. In Yosemite, for example, at peak eclipse the moon will be 47 degrees above the horizon with an azimuth of 102 degrees (just south of due east). In the eastern U.S. the peak eclipse occurs at 12:12 a.m. on the 21st, and the moon will be even higher in the sky – 69 degrees above the horizon in New York City, with an azimuth of 183 degrees (almost due south).
Having the moon so high will make it difficult to juxtapose the moon with a foreground. For this eclipse it will be easier for us North Americans to use a telephoto lens and take some closeups of the moon, but you could include a foreground with a tall object, like a large building, a tree, a steep mountain, etc.
In Europe, on the other hand, the eclipsed moon will be low in the sky to the west in the early-morning hours of the 21st. In Paris, for example, the peak eclipse occurs at 6:12 a.m., and the moon will be only 22 degrees above the horizon, at an azimuth of 275 degrees (almost due west). This is a great opportunity to juxtapose the moon with an interesting foreground. How many photographers will capture the eclipsed moon next to the Eiffel Tower? What’s the over/under on that – 100? More?
Planning Eclipse Photos
So how did I figure out where the moon would be for each of those locations? Well there’s an app for that. Actually several apps – and I’m sure most of my readers are familiar with some of them. To me the most useful are The Photographer’s Ephemeris, The Photographer’s Ephemeris 3D and PhotoPills. Both The Photographer’s Ephemeris and PhotoPills include information about solar and lunar eclipses. The Photographer’s Ephemeris 3D is especially helpful for visualizing exactly where the moon (or sun) will be positioned in relation to a mountain (though it’s not as good with buildings).
To plan your eclipse photos you’ll also need to know the timing of the eclipse, so here are the important moments:
Partial eclipse begins: January 21st at 3:34 UT, January 20th at 19:34 PST
Total eclipse begins: January 21st at 4:41 UT, January 20th at 20:41 PST
Maximum eclipse: January 21st at 5:12 UT, January 20th at 21:12 PST
Total eclipse ends: January 21st at 5:43 UT, January 20th at 21:43 PST
Partial eclipse ends: January 21st at 6:51 UT, January 20th at 22:51 PST
When the partial eclipse begins the moon will become a smaller and smaller crescent as the earth’s shadow seems to take a bite out of the moon. During the total eclipse the moon will look much dimmer, and turn orange or even red-orange in color. The sky will be full of stars, as if on a moonless night. Just after the total eclipse the moon will return to a slender crescent and then get larger and larger, until the eclipse ends and the moon becomes completely full again. (You won’t be able to see this last partial phase in eastern Europe during this eclipse.)
Of course weather always plays a big role in eclipse photography. The long-term forecast shows plentiful clouds in the western U.S. on Sunday evening, and rain along the east coast. The Midwest looks more promising, but we’re still six days away from the eclipse, so the forecasts may change.
Equipment for Photographing a Lunar Eclipse
Focusing
Since most modern lenses focus past infinity, you can’t just crank the focusing ring all the way to the end and expect to get sharp photographs. The most accurate way to focus in the dark, by far, is to use live view, magnify the image to zoom in on the moon, and focus manually. Autofocusing on the moon should also work if the moon is bright enough (like before the total eclipse begins) – but be sure to then turn autofocus off so that the camera doesn’t accidentally focus on something else when you press the shutter button.
Exposure
Light meters are useless for getting good exposures of the moon, because even a one-degree spot meter can’t read just the moon, but will also include some of the surrounding black sky. So here are some suggestions based on past experience, including making the accompanying photographs. You’ll need to use manual-exposure mode, and check your camera’s highlight alert (the blinkies) to make sure you’re not overexposing the moon:
Full moon, or moon more than half visible: 1/60 sec. at f/11, 200 ISO
Half to one-quarter of the moon visible: 1/30 sec. at f/11, 200 ISO
Less than one-quarter of the moon visible: 1/15 sec. at f/11, 200 ISO
Just the edge of the moon lit: 1 sec. at f/11, 200 ISO
Fully eclipsed at the beginning and end of totality: 4 sec. at f/8, 800 ISO
Fully eclipsed, deepest totality: 4 sec. at f/8, 1600 ISO
In these examples I’ve kept the aperture constant at f/11 except during totality, but if you need more depth of field you could use f/16 and either double the ISO or the length of the exposure. But you want to keep the exposures relatively short, otherwise the moon will move and blur. You can get away with eight seconds with a wide-angle lens, but with a telephoto lens you need to use shutter speeds of four seconds or less. To find the maximum exposure time for your lens before movement appears, divide the focal length into 200 (with a full-frame camera). So 200 ÷ 25mm = 8 seconds, or 200 ÷ 100mm = 2 seconds. Bracketing exposures is a good idea.
Strategies for Photographing a Lunar Eclipse
Trying to include a foreground makes things more complicated, so the simplest way to photograph a lunar eclipse is to take a long lens and zoom in on the moon. If you photograph the eclipse from beginning to end you can even use Photoshop to assemble your images into a montage showing the whole sequence.
A more evocative approach – but a more complicated one – is to use a wide-angle lens and capture the eclipse sequence with a foreground, as I did in the accompanying images. To do this you’ll first need to figure out the exact path the moon will take so you can compose your photograph accordingly. The apps I mentioned above, PhotoPills, The Photographer’s Ephemeris, and The Photographer’s Ephemeris 3D, are invaluable for this. And you’ll want to get to your chosen spot early enough to capture the entire eclipse sequence, from full, to partially eclipsed, to fully eclipsed, and (if possible from your location) back through the partially-eclipsed stages.
Once you’ve composed, make sure your tripod is solidly planted and locked tightly. If your composition includes a foreground you’ll want to focus at the hyperfocal distance, which will be somewhere between the closest object to the camera and infinity, but closer to the foreground. (If you don’t know how to find the hyperfocal distance, just focus on the foreground.) Then use a small enough aperture to get both foreground and moon in focus. (A bright flashlight and live view are helpful for focusing on the foreground.)
Then make a series of exposures to capture the eclipse sequence. In the photographs here the interval was ten minutes between each moon capture, but you could make it fifteen or twenty minutes if you want to space the moons farther apart. Just make sure you keep the interval the same throughout the sequence. You can use an interval timer for this, or just use a watch and trip the shutter manually (using a remote or cable release, of course). You’ll need to adjust the exposure times (and possibly the aperture or ISO as well) as the moon dims and brightens.
In the accompanying photographs I used electronic flash or a flashlight to light-paint the foreground in between making exposures of the moon. Light painting is a complex subject that I won’t get into here, and if this is the first time you’ve ever tried photographing an eclipse I’d suggest you keep it simple, and don’t try light painting. Just try to capture single images of the moon itself, or perhaps a sequence with silhouetted trees or other objects in the foreground.
You might also capture a frame, or several frames, to use as the base (background) layer in Photoshop. For example, in the sequence from Yosemite (below), I made an exposure for the stars during the total eclipse, and used that starry sky as the background for the eclipse sequence. For the sequence from Death Valley (top) the background consists of two exposures, one made during the total eclipse, showing the stars, and another made as the sky was beginning to lighten and turn blue at dawn.

Lunar Eclipse Sequence, 1:23 a.m. to 4:49 a.m., August 28, 2007, Yosemite NP, CA
Assembling a Sequence
If you get ambitious and try a sequence, the final step is to assemble the images in Photoshop. From Lightroom you can select the images and choose Photo > Edit In > Open as Layers in Photoshop, and Photoshop will stack the images into one document as separate layers. Or you can do this by hand using the Move tool to drag one image on top of another; just make sure you hold down the shift key while dragging so that the images align properly.
Drag your background layer to the bottom of the stack in the Layers Panel. Then change the blending mode of every layer except the bottom one to Lighten. This makes light areas override dark areas, so the moon from one frame will override dark sky from another frame. As you do this you’ll see all the moons magically appear and complete your sequence. If you light-painted a tree or other object, that too will appear when you change the blending mode for that layer. And if you used a telephoto lens to capture the whole eclipse sequence, you can use the Move tool to drag each layer around and arrange the moons on your canvas.
The next total lunar eclipse will occur on May 26th, 2021 – more than two years from now. So this will be your last chance to photograph a total lunar eclipse for awhile! Good luck!
— Michael Frye
Related Posts: Lunar Eclipse over Death Valley; Eclipse Journey
Michael Frye is a professional photographer specializing in landscapes and nature. He is the author or principal photographer of The Photographer’s Guide to Yosemite, Yosemite Meditations, Yosemite Meditations for Women, Yosemite Meditations for Adventurers, and Digital Landscape Photography: In the Footsteps of Ansel Adams and the Great Masters. He has also written three eBooks: Light & Land: Landscapes in the Digital Darkroom, Exposure for Outdoor Photography, and Landscapes in Lightroom: The Essential Step-by-Step Guide. Michael has written numerous magazine articles on the art and technique of photography, and his images have been published in over thirty countries around the world. Michael has lived either i


Michael, I’ve used your settings for the last two lunar eclipses. They are spot on. Thanks for sharing.
Thanks for the confirmation Hadley!
Well done as always my friend! Thank you for your Precision AND Accuracy!❤️
Thank you Gena!
Thanks, Michael, for reviewing this again. I’d hoped to practice capturing and processing the phases but, here in western Nevada, we were blessed with nice blizzard conditions for the duration. Bookmarked for 2021!
Sorry you didn’t get to see the eclipse, but maybe next time.
Michael,
Thank you so much for your suggestions. I was able to get some very good results shooting the lunar sequence at Trona Pinnacles.
You’re welcome Hong. I was at Trona too, but then there were a lot of photographers there. I’m glad you were able to capture some eclipse images you’re happy with.
Thank you Michael for this very clear instruction, along with the reasoning for each step. I was photographing near Chicago, and my camera was set up on a tripod at the end of my driveway. I would pop out every 15 minutes, realign the camera (shooting at 200mm on a cropped format), and had to replace the battery twice due to the severe cold.
I noticed that the later shots were out of focus, I think because the cold had shrunk the lens to be out of focus. Is that possible?
You’re welcome Harry. A change in temp can certainly change focus with modern lenses containing ED glass. It’s always a good idea to periodically recheck focus when doing a long sequence like that. Another possibility is that you inadvertently knocked the lens out of focus focus somehow. Or perhaps the later shots were of the total eclipse, with a longer shutter speed, and look blurry because the moon moved a bit.