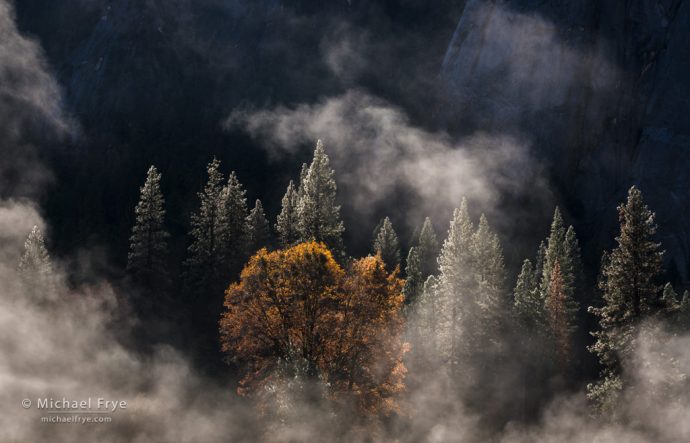
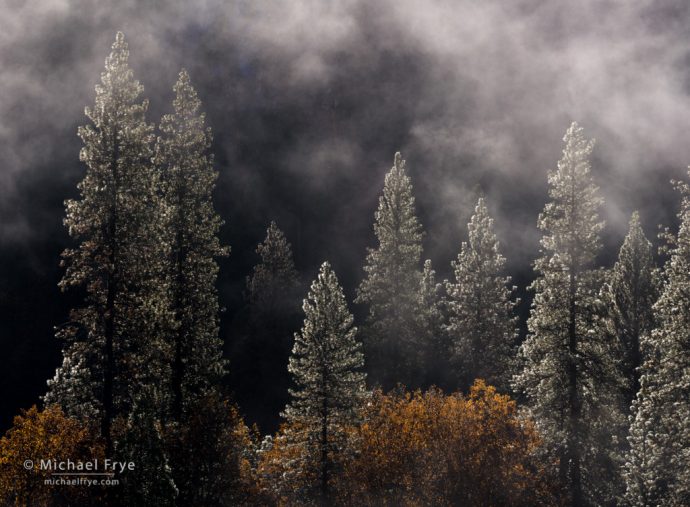
Pines, oak, and mist, Yosemite, Thanksgiving weekend. 70mm, 1/45th of a second at f/16, ISO 100.
Over Thanksgiving weekend I photographed a beautiful, misty morning in Yosemite Valley (see this previous post). Looking through my photographs later I realized that almost every one was backlit. And that made sense, as mist looks wonderful with backlight. So do other translucent objects like clouds, leaves, grasses, flowers, raindrops, and so forth.
Translucent, backlit objects stand out best against a dark background. And that’s one of the great, overlooked features about photographing in Yosemite Valley: you can often use the cliffs as a dark backdrop. It’s like draping a giant black cloth behind your subject.
In the photograph above, made on that Thanksgiving weekend, the cliffs are visible, but just barely. They’re dark because they’re in the shade, and I exposed for the sunlit trees and mist. The translucent oak leaves, mist, and water-laden pines almost seem to glow against that dark background, as if lit from within.
I stood far from the trees, across El Capitan Meadow, and used a telephoto lens (70mm) to narrow the field of view and make sure that only the dark cliffs filled the background. (I also excluded the meadow, which was just below the bottom of the frame, as the meadow would have created a distracting, bright strip along the bottom of the frame. There’s no law that says you have to always include the base of a tree in your photographs! And, as you’ll see in the next photo, you don’t always have to include the top of a tree either.)
Here’s another photograph from that same morning:
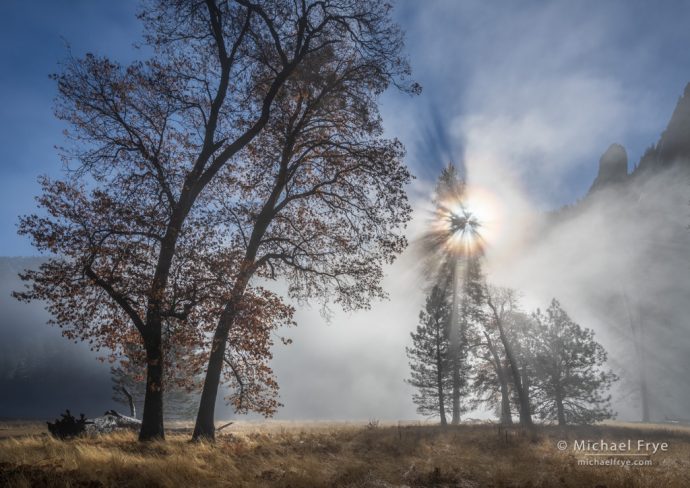
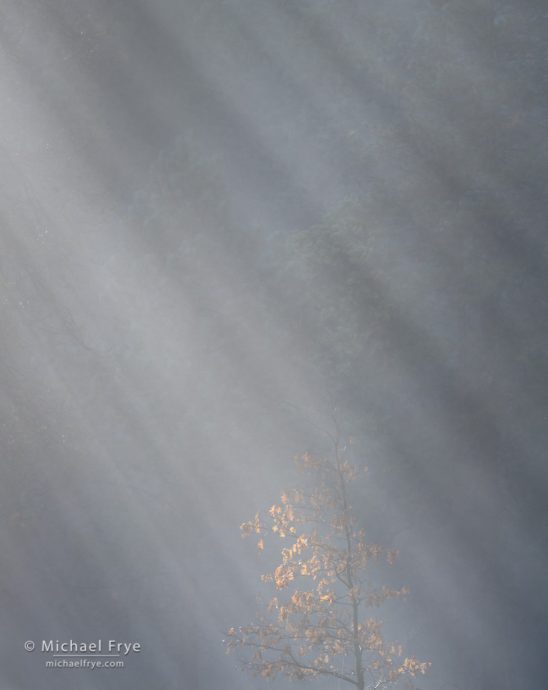
Mist, sunbeams, and corona, Yosemite, Thanksgiving weekend. 21mm, five bracketed exposures two stops apart at f/11, ISO 100. Blended with Lightroom’s HDR Merge.
With this image I used a wide-angle lens (21mm) and pointed the camera up, against the sky and mist. You don’t see the translucent effect on the leaves because the background is brighter. But there is some translucence in the mist, and especially the corona around the sun.
You also see clear silhouettes of the oak trees on the left. Backlight often creates strong silhouettes, so it’s a perfect way to highlight interesting shapes. I put the sun behind a tree, which helped to avoid lens flare, and also made the corona and sunbeams more visible.
I’ve included a couple more backlit images from that Thanksgiving weekend below. And over the years many of my favorite images have been made while looking toward the sun. Remember this one?
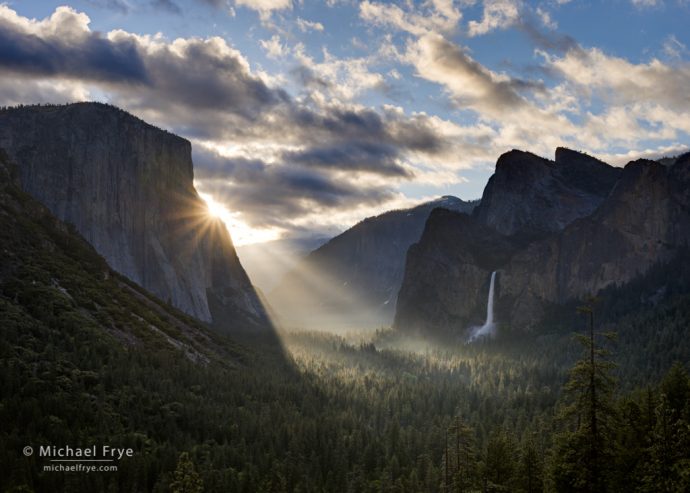
Sunbeams from Tunnel View, spring, Yosemite, May 2011. 40mm, three bracketed exposures two stops apart at f/16, ISO 100. Blended with LR/Enfuse.
Or how about this?
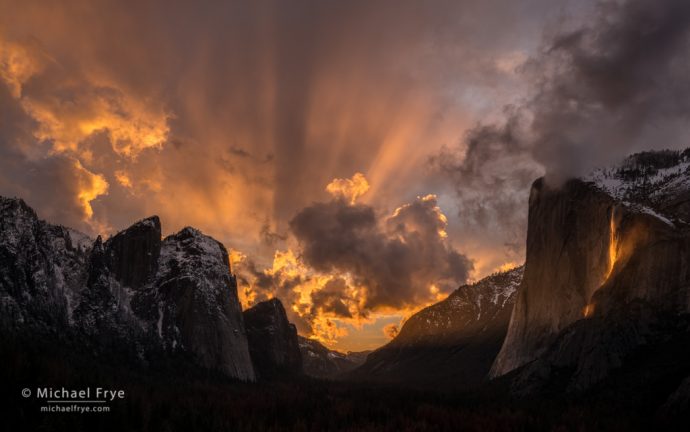
Sunset over Yosemite Valley with Cathedral Rocks, El Capitan, and Horsetail Fall, Yosemite, February 2017. 32mm, five bracketed exposures two stops apart at f/9.5, ISO 100. Blended with Lightroom’s HDR Merge.
Now I love all forms of light, and some of my favorite photographs were made with sidelight, or soft light, or even frontlight. Any light can work with the right subject in the right conditions. But day in, day out, night in, night out, backlight consistently creates some of the most interesting lighting. Even a clear, sunny day can look dramatic with backlight:
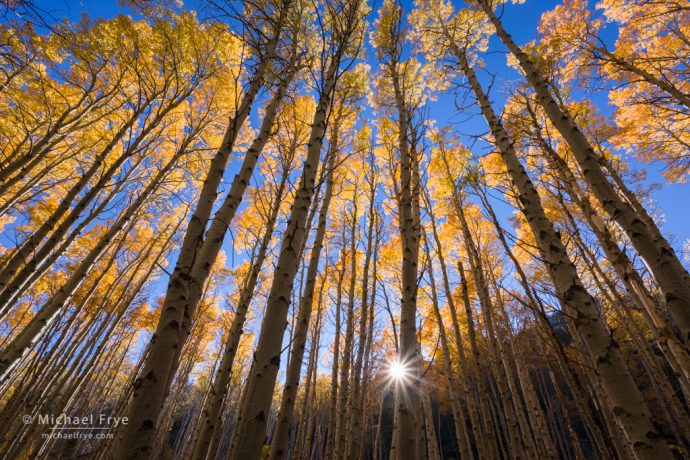
Aspen grove, late afternoon, Lee Vining Canyon, eastern Sierra, October 2012. 17mm, 1/90th of a second at f/16, ISO 400.
Can You Handle Backlight?
Do you remember Kodak Instamatic cameras? Kodak sold millions of these little cameras during the ’60s, ’70s, ’80s, and ’90s. One thing I remember about Instamatics is that they came with a little instruction sheet that said, among other things, “Always photograph with the sun at your back.”
That was probably good advice for the kind of snapshots most people used those cameras for. But it’s terrible advice for anyone who wants to make interesting and evocative landscape photographs. You may as well advise photographers to always fill their frames with unnecessary clutter, or be sure to keep their main subject out of focus.
I’m sure Kodak made that suggestion because looking toward the sun is challenging. The contrast makes exposures difficult, it’s easy to get unwanted lens flare, and looking into the sun hurts your eyes. But it’s worth learning how to handle backlight so you can take advantage of all the beauty and drama it can provide.
First, and I know this seems obvious, but don’t stare at the sun! Use live view so you can compose, focus, and adjust your settings without seeing spots, or worse, damaging your eyes. It’s okay to glance at the sun for a split second, but you will see spots, which makes doing everything else more difficult.
The next step toward mastering backlight is to learn how to shade your lens and prevent flare. You can stand behind the camera and use your hat or hand, but when the sun is near the edge of your frame you’re better off stepping around in front of your camera. I show how to do that in this post.
You’ll also want to learn how to make a sunburst by partially hiding the sun behind a tree or mountain. It’s challenging, and takes practice, but you can learn more about capturing sunbursts here.
Of course backlight creates lots of contrast, so exposures can be difficult. Exposure is a complex subject, but here are two posts that cover the basics, the first on reading histograms, and the second about adjusting exposure.
For extreme contrast you’ll need to bracket and blend exposures. One of the first things I ask students in my field workshops is whether they know how to use the auto-bracketing function in their camera. If they don’t, I make sure they learn how before we go out into the field, because some of the most interesting lighting conditions are contrasty, and you never know when you’re going to encounter one of those situations. So I’m going to give you the same advice: learn how to use auto-bracketing, and practice using it so you can act quickly when you encounter a fleeting moment of beautiful, contrasty light.
Yes, backlight can be challenging, but if you can overcome the obstacles you’ll open up endless opportunities to make beautiful, dramatic, evocative photographs. It’s worth it.
— Michael Frye
Pines and oaks after a rainstorm, Yosemite, Thanksgiving weekend. 155mm, 1/45th of a second at f/16, ISO 100.
Sunbeams and a small oak, Yosemite, Thanksgiving weekend. 200mm, 1/45th of a second at f/11, ISO 100.
Related Posts: Misty Morning in Yosemite Valley; How to Shade Your Lens; Photographing Sunbursts; Digital Photography Basics: Reading Histograms; Digital Photography Basics: Adjusting Exposure
Michael Frye is a professional photographer specializing in landscapes and nature. He is the author or principal photographer of The Photographer’s Guide to Yosemite, Yosemite Meditations, Yosemite Meditations for Women, Yosemite Meditations for Adventurers, and Digital Landscape Photography: In the Footsteps of Ansel Adams and the Great Masters. He has also written three eBooks: Light & Land: Landscapes in the Digital Darkroom, Exposure for Outdoor Photography, and Landscapes in Lightroom: The Essential Step-by-Step Guide. Michael has written numerous magazine articles on the art and technique of photography, and his images have been published in over thirty countries around the world. Michael has lived either in or near Yosemite National Park since 1983, currently residing just outside the park in Mariposa, California.


I thought about auto bracketing last week during a shoot and had to resort to manual bracketing. Thanks for the challenge to learn more about my 5D and more importantly get comfortable with this feature.
The photos in this article are stunning.
Thanks Charles, and I’m always happy to give people a nudge. 🙂
Wonderful photography, Micheal and great advices. I love photographing toward the sun too, backlight is indeed one of the most interesting lighting.
Thanks Gabor – backlight is easy to love. 🙂
Hey Michael,
Love that first shot.
This article brings back memories. Some of my favorite backlit shots are from when you had us shooting the mist after a rainstorm in November in the Valley.
Thanks Doug! I went back and looked at my photos from that November day to remind myself, and yes, that was a beautiful morning. I have a couple of keepers from that day.
Many thanks, Michael, for the advice and the beautiful Yosemite photographs. I’ve taken many backlit landscape shots, but as you say, it can be tricky and I can always use more practice. Have a wonderful week!
You’re welcome Bob, and thanks – you too!
Wonderful images, great discussion. I’m energized to do some backlight and auto bracketing. By the way I still have an Instamatic in my collection, good family memories.
Best wishes.
Thanks Barry. Do you still have the little instruction sheet for the Instamatic? I’d be curious to know whether I’ve actually quoted it correctly. 🙂
I actually have the 1968 Instamatic 124. The original was the 100 beginning around 1963.
For outdoor pictures my manual states: “Have the sun behind you. The subject must be in bright or hazy sunlight.”
Nice. Did they say that because the camera had fixed shutter speed and aperture, so it was set for sunlight?
Not exactly, but I believe the camera has a 1/90 sec. shutter speed (1/40 w flash) @ F11 using film speeds around asa 80-100 so it clearly needs lots of light.
Well that sounds like a fixed shutter speed and aperture. It’s fairly close to the sunny-f/16 rule, which would inidicate around 1/90th of a second at f/16 for sunlight. I could see why they’d set it to expose a stop lighter than that to try to accommodate a wider range of conditions, like hazy sun or thin clouds. Plus it uses negative film, which has a pretty wide latitude, and it’s better to overexpose negative film than underexpose it.
Backlight or sidelight in full sun would need about the same exposure, so I think the advice about putting the sun at your back was more about getting light on people’s faces (though making them squint!), avoiding flare, and avoiding excessive contrast, than about any potential exposure problems.
Wow. Great article.
Thanks for this.
Thanks Eddie! Glad you liked this.