(Click here if you have trouble viewing this video)
Can you create HDR images in Lightroom? Yes! Well, sort of. Lightroom only works with one photograph at a time, so you can’t blend different exposures of a scene together. But you can handle some high-contrast scenes in Lightroom, without HDR software or Photoshop, by using Lightroom’s tools to exploit your camera’s full dynamic range. I explain how in this latest video.
Like many inventions, this technique was born out of laziness. I wanted to avoid the sometimes tedious process of blending exposures manually in Photoshop, with HDR software, or my favorite plugin, LR/Enfuse. I also try to keep my adjustments flexible by using Lightroom’s non-destructive workflow whenever possible.
This technique only works with Raw images, and scenes where the contrast isn’t extreme, but I keep finding more and more situations where it does work. If you try it, let me know how you make out!
As always, be sure to view this in high definition (720p) to see the tools and sliders clearly.
Michael Frye is a professional photographer specializing in landscapes and nature. He is the author and photographer of The Photographer’s Guide to Yosemite, Yosemite Meditations, and Digital Landscape Photography: In the Footsteps of Ansel Adams and the Great Masters, plus the eBook Light & Land: Landscapes in the Digital Darkroom. He has written numerous magazine articles on the art and technique of photography, and his images have been published in over thirty countries around the world. Michael has lived either in or near Yosemite National Park since 1983, currently residing just outside the park in Mariposa, California.
Lightroom has grown up. I’ve made 30×40 inch prints from this image using only Lightroom (except for the final print sharpening). Yet Photoshop can still do things that Lightroom can’t.
“Should I get Lightroom or Photoshop?” This is a question I get asked a lot, usually by people who own Photoshop Elements and are thinking of upgrading to either Lightroom or the full version of Photoshop.
Six years ago this was an easy decision, because Lightroom didn’t exist. If you wanted to upgrade from Elements, the full version of Photoshop was the only real choice. But then Apple launched Aperture, Adobe countered with Lightroom, Nikon and Canon upgraded their software, and a host of other companies added even more options.
For now I’m going to keep this simple and just talk about Lightroom and Photoshop—mainly because these are the two most popular choices, but also because they’re the two applications I’m most familiar with, and they’re natural choices for people wishing to graduate from Adobe’s other photo-editing program, Elements.
As promised, I’ve posted another tutorial on YouTube about Curves in Lightroom and Adobe Camera Raw. In this video I examine the default settings in these applications, and why you should avoid using them—at least sometimes. These defaults actually apply three curves to your image before you even start processing it. Watch the video to see what’s really going on “under the hood” with the settings in Lightroom and Camera Raw.
Again I had to break this into two parts; here are the links:
I hope you enjoy these—comments are always welcome! To see everything clearly you need to view in high resolution—click on where it says 240p or 360p in the lower-right corner and choose 480p. Also, if you click on the little double-sided arrow you’ll see the video larger.
Everyone has heard of Photoshop. It’s permeated our culture deeply enough to become both a noun and a verb, as in, “She Photoshopped a telephone pole out of the picture.” So when photographers first dive into the digital world they naturally think of Photoshop or it’s baby sister, Photoshop Elements, for their image-editing software.
Until recently there wasn’t much choice. But in the last few years the landscape has changed, and photographers have many other options. One of the best of these new tools is Lightroom. Actually the full name is Adobe Photoshop Lightroom—it’s made by the same people who make Photoshop. Yet despite the name Lightroom seems to be off the radar screens of most photographers.
In the Spring Yosemite Digital Camera Workshop I’m leading for the Ansel Adams Gallery this week I teach both Photoshop and Lightroom. One of my students asked me recently why she should learn Lightroom when she has Photoshop CS3. What can Lightroom do that Photoshop can’t?
My answer was: very little. Photoshop is the most powerful image-manipulating tool in existence, and can do anything to a photograph that Lightroom can, and much more. But Lightroom has two main advantages over Photoshop: It’s a much better editing, sorting, keywording, and cataloging tool than Photoshop combined with Bridge, and it’s easier to use. And while it’s not as powerful at manipulating photographs as Photoshop, for most images it’s all I need. The image of Mono Lake above, for example, was processed entirely in Lightroom. Having one program that elegantly integrates all these functions takes a lot of friction out of my workflow.
I should point out that I’ve used Photoshop since 1998 and know it inside and out. So I don’t use Lightroom because Photoshop is too complicated for me. But for many people Photoshop is difficult to learn, and Lightroom is a friendlier alternative. I should also add that Lightroom is not for snapshooters. It’s for serious photographers who want an easier, more integrated solution than Photoshop.
There’s one more advantage to Lightroom: It’s a non-destructive editor. Adjustments you make in Lightroom never modify the original Raw or JPEG file. The adjustments are just a set of instructions describing how you want the image to look, and these instructions are only applied when you export the image out of Lightroom. While Photoshop can be tricked into behaving in a non-destructive way, that’s not the way it was designed.
Photoshop is still essential to me for things that Lightroom can’t do. But I’d never want to go back to using only Photoshop and Bridge. And I think Lightroom is a better tool for many photographers than Photoshop. It’s probably time it appeared on more photographer’s radar screens.
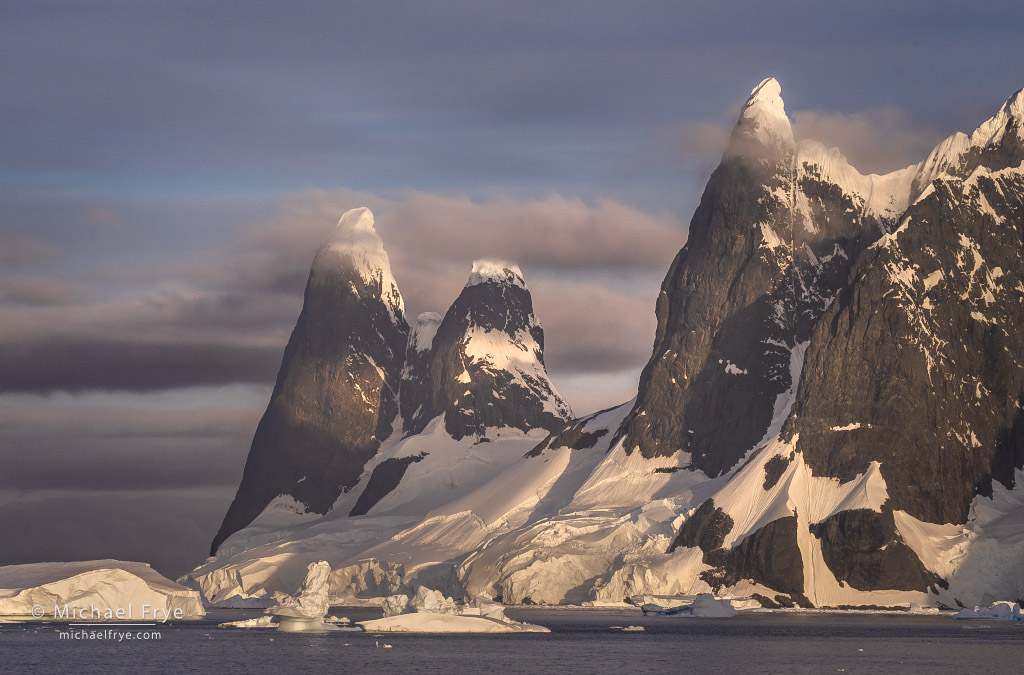
Snow-capped spires, Antarctica. 158mm, 1/500 sec. at f/11, ISO 500.
It’s taken me a long time to go through all my photos from our January trip to Antarctica – all 41,000 of them! I previously posted images of natural ice sculptures, and penguins. But this time I thought I’d focus on wider landscapes, and the beautiful Antarctic light.
Antarctic light is special. When we arrived in early January the sun rose at 2:45 a.m., and at an azimuth of about 160 degrees. That’s just a tad to the east of due south (180 degrees). Then the sun carved a low path through the sky to the east, north, and west, finally setting (at midnight) just a little bit west of where it rose, at an azimuth of about 200 degrees. It never got truly dark.
I’ve been using Lightroom since Adobe released the beta version in 2006. Over the years I’ve learned many shortcuts, and in this video I share some of my favorite tips – things I use all the time to streamline my workflow:
We will never sell or share your email address with anyone. Read our complete Privacy Policy.
Subscribe to My Blog:
Success! Now check your email to confirm your subscription.