by Michael Frye | Aug 25, 2025 | Digital Darkroom

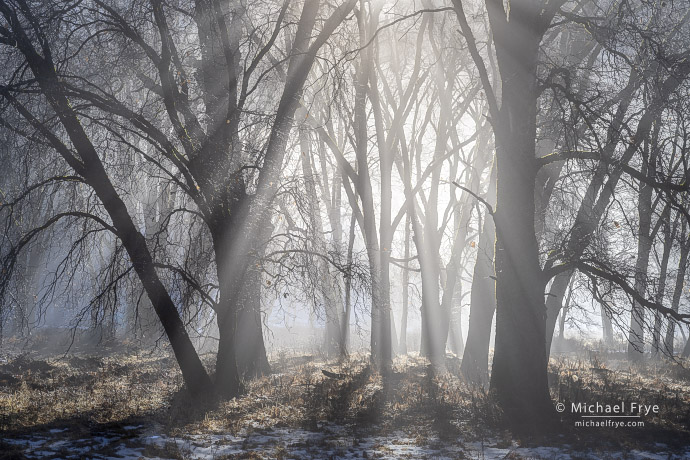
Oaks and mist, Yosemite NP, California. I love the light and fog in this scene, but couldn’t avoid including a distracting wire-mesh enclosure in the composition (see below).
Thanks to everyone who joined us for my Lightroom Webinar: Advanced Retouching on Saturday. It was an engaging, fun, and, I hope, educational session, and it was great to see so many familiar names among the attendees. I appreciate all the thoughtful questions, as they helped broaden the discussion and clarify many points.
One of the things we covered on Saturday was the pros and cons of AI-powered retouching in Lightroom – and how to work around the limitations. Generative Remove in Lightroom and Camera Raw, along with Generative Fill in Photoshop, have certainly made many retouching jobs a lot easier. But one thing that many people don’t realize is that these AI-powered tools can create low-resolution results. So when you remove an object with Generative Remove, that patch, that area where you replaced the object with AI-generated content, might look softer than its surroundings. That’s probably fine for posting an image online, because no one will notice that softness at a small viewing size. But it can be a significant problem when making prints.
(more…)
by Michael Frye | Aug 17, 2025 | Digital Darkroom, Photography Tips

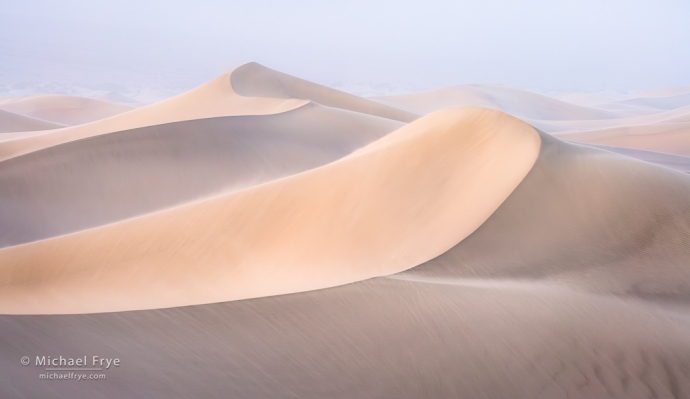
Dunes at sunrise in a sandstorm, Death Valley NP, California. During a dust storm, as you might expect, my sensor accumulated plenty of dust spots (see the next image below).
Removing dust spots from an image can be a tedious chore. Do you want to do that tiresome job twice? I certainly don’t – which is why I remove dust spots in Lightroom, rather than Photoshop.
There’s no way to do retouching in Photoshop in a completely flexible, non-destructive way that adapts to any further changes you make to the underlying layers. But when you remove a spot or object in Lightroom (or Camera Raw), the retouching will always adapt, no matter what you do to the image in the future. Even if you make a drastic change, like lightening the photo by two stops, making a big adjustment to the white balance, or converting it to black and white, the retouching in Lightroom will adapt and blend in seamlessly. And that means you’ll never, ever, have to do it again – which, for me, is a big advantage.

Before retouching this image you can see several dust spots, even zoomed out like this. But I found many more after zooming in, going systematically through the image, and using the Visualize Spots mode.
Removing dust spots in Lightroom can be just as fast as in Photoshop. Maybe even faster, with practice – and with some shortcuts. Here are two simple tips that can speed up spot removal in Lightroom:
Using Page Down to Move Systematically Through the Image

Starting in the upper-left corner of the photo, I hit Page Down (fn+down-arrow on a Mac laptop) to move one screen-width down and systematically search for dust spots.

Here's the next section of the image down from the upper-left corner. I can continue to hit Page Down to scroll through the entire image.
First, when you’re trying to remove dust spots, it helps to move systematically through the image to find all of them. Start by zooming in (I recommend 200% or 2:1 with modern high-res displays). Next, scroll to the upper-left corner. Use the Remove tool to eliminate spots in that upper-left corner, then hit Page Down. That will take you one screen-width down (with a little overlap). Remove all the spots in that area, hit Page Down again, and so on. When you get to the bottom of the first row, hitting Page Down again will take you to the top of the next row to the right. Keep hitting Page Down and removing spots until you get all the way to the bottom-right corner.
Wait, I don’t see a Page Down key on my Mac laptop’s keyboard! No worries: hold down the Function (fn) key on the lower-left corner of the keyboard, then tap the down-arrow key. Holding down that fn key turns the up and down arrows into Page Up and Page Down keys. (Holding down fn also turns the left-arrow key into Home, and the right-arrow key into End. When zoomed in to an image, Home takes you to the upper-left corner, and End takes you to the lower-right corner.)
Visualizing Spots
Some dust spots are hard to see, even when you’re zoomed in and looking closely. Well, they’re hard to see until you hold up your beautiful new 30×40-inch print and notice a spot you missed. Or three spots you missed. Which can lead to using a string of four-letter words.
Fortunately, Lightroom has a “Visualize Spots” function that makes it easier to find those pesky dust spots. Again, I recommend zooming in to 200%. Then, after selecting the Remove tool, click the Visualize Spots checkbox:

The Visualize Spots checkbox
Next to the checkbox is a slider to adjust the strength of this feature. The default, with the slider in the middle, is usually fine, but sometimes a stronger setting works better.
Visualize Spots creates a black-and-white overlay that makes faint dust spots jump out clearly – especially in smooth areas like sky and water. Then you can just click on those spots to remove them. (I usually prefer the Remove mode for this, without “Use generative AI” checked. But sometimes the Heal or Clone modes work better.)

Can you see the dust spot in this part of the sky? It’s awfully faint, even with this zoomed-in view – yet spots like this can become glaringly obvious in a print.

Turning on Visualize Spots makes this faint spot much more obvious (and reveals an even fainter spot.)
With textured areas, like rocks or trees, it’s often easier to see dust spots with Visualize Spots turned off. To quickly toggle between the two modes (Visualize Spots on or off), just press the A key. I know keyboard shortcuts can be hard to remember, but this one is worth learning, because if you’re like me you’ll be constantly toggling between the two modes to find those annoyingly hard-to-see dust spots.
Advanced Retouching Webinar
Of course Lightroom can do far more than remove simple dust spots. With the addition of Content-Aware and Generative AI retouching tools, Lightroom can now perform most retouching tasks – even the most complex ones. And, of course, if you do the retouching in Lightroom it’s completely flexible and non-destructive, and you’ll never have to do it again.
In my upcoming Lightroom Webinar: Advanced Retouching, I’ll show you how to stay in Lightroom to perform sophisticated retouching, streamlining your workflow and saving time by never having to repeat these tiresome retouching chores. Here are some of the things you’ll learn:
• Essential tips for using Lightroom’s Remove Tool
• Key shortcuts for making any retouching job faster and easier
• Doing retouching on top of other retouching – the secret to advanced tasks
• Shortcuts for quickly removing linear objects like jet trails and telephone wires
• How to make the most of the sophisticated Content-Aware and Generative-AI tools
Click the link below to learn more or sign up. I hope to see you there!
Lightroom Webinar: Advanced Retouching
$27
The live webinar will take place this Saturday, August 23rd, 2025, at 10:00 a.m. Pacific Time (1:00 p.m. Eastern Time). We expect it to last 90 to 120 minutes. And if you can’t attend live, the webinar will be recorded so you can watch it later.
— Michael Frye
P.S. One more tip: before removing dust spots, clean your computer screen! I can’t tell you how many times I’ve tried to remove a dust spot, only to realize it was a speck of dirt on my monitor.
Related Posts: The Power of Masking; Generative Remove Comes to Lightroom
Michael Frye is a professional photographer specializing in landscapes and nature. He lives near Yosemite National Park in California, but travels extensively to photograph natural landscapes in the American West and throughout the world.
Michael uses light, weather, and design to make photographs that capture the mood of the landscape, and convey the beauty, power, and mystery of nature. His work has received numerous awards, including the North American Nature Photography Association’s 2023 award for Fine Art in Nature Photography. Michael’s photographs have appeared in publications around the world, and he’s the author and/or principal photographer of several books, including Digital Landscape Photography: In the Footsteps of Ansel Adams and the Great Masters, and The Photographer’s Guide to Yosemite.
Michael loves to share his knowledge of photography through articles, books, workshops, online courses, and his blog. He’s taught over 200 workshops focused on landscape photography, night photography, digital image processing, and printing.
by Michael Frye | Jul 11, 2025 | Announcements, Digital Darkroom

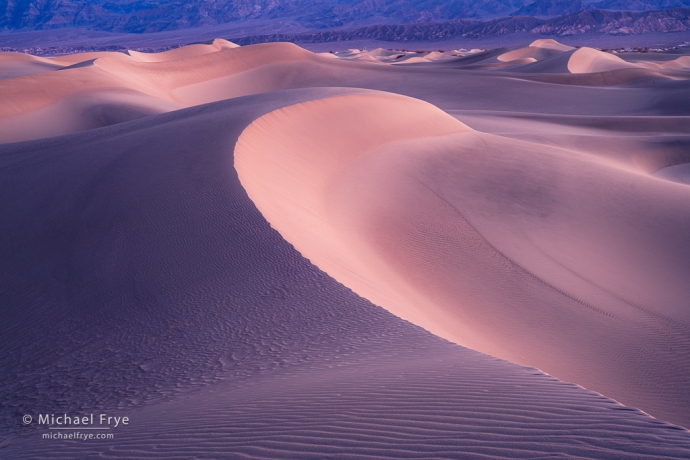
Make Your Workflow Faster and More Efficient By Mastering Lightroom’s Powerful Retouching Tools
Retouching can be a tedious chore. Even removing simple dust spots can be time-consuming, and more complex tasks take even longer. So the last thing you want is to do it over again! But unfortunately that’s always a possibility when you do retouching in Photoshop, even if you do it on a separate layer. What if you need to go back and modify the original raw file settings in Lightroom? Or what if Adobe adds a new feature for Lightroom (like a fantastic new Denoise tool) that you want to take advantage of? Now your cloning layer won’t match the new raw-file settings, and you’ll have to do the retouching over again.
But if you do the retouching in Lightroom you’ll NEVER have to do it again, because the retouching will always adapt seamlessly to any changes you make to the raw file – plus you can simplify your workflow by avoiding the roundtrip to Photoshop and back. This Lightroom-only workflow has become much easier in recent years as Adobe has added powerful new retouching tools to Lightroom, making it possible to do even complex jobs with relative ease. Because of Lightroom’s power and flexibility, I never do retouching in Photoshop anymore if I can possibly help it.
(more…)
by Michael Frye | Mar 4, 2025 | Digital Darkroom

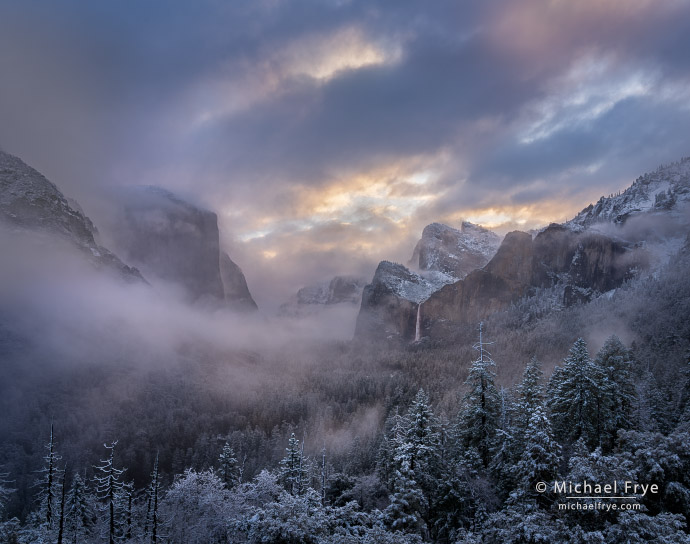
Winter sunrise from Tunnel View, Yosemite NP, California
After all our travels, Claudia and I are back home. Yesterday I drove up to Yosemite Valley before sunrise, as a small storm was clearing.
Looking at the weather models the night before, I didn’t have high hopes for this sunrise. Although I thought there could be a light dusting of snow, it appeared the storm would clear in the middle of the night, which usually means the fog and mist will dissipate by morning. But I set my alarm for 4:00 a.m. just in case. And when I awoke I could see that clouds and scattered showers had lingered all night, so there should still be some mist. And it also looked like skies would start clearing shortly after sunrise. So no going back to bed – time to go!
(more…)
by Michael Frye | May 22, 2024 | Digital Darkroom, Video Tutorials

Rapid and reflections in the Colorado River, Grand Canyon NP, Arizona. The lower-right portion of this photograph had a large blemish caused by a water spot on the sensor. This would have been difficult to remove using traditional retouching tools in Lightroom or Photoshop, but took about five seconds with the new Generative-AI mode in Lightroom.
Yesterday Adobe announced significant upgrades to Lightroom, Lightroom Classic, and Camera Raw.
To me, the biggest news is the addition of “Generative AI” for retouching. This uses similar technology to Generative Fill in Photoshop, but isn’t designed to add or create things – only to remove objects. In fact Adobe changed the name of the Healing tool to the Remove tool.
Whatever you call it, Generative AI is a big leap forward in the retouching capabilities of Lightroom. It makes Lightroom almost as powerful as Photoshop for retouching, but unlike Photoshop it works in a completely flexible, non-destructive way. Generative AI does have some limitations, however, which I discuss below.
(more…)
by Michael Frye | Oct 19, 2023 | Digital Darkroom

Aspens and bigtooth maples, northern Utah. I used the new Point Color tool to tweak the originally dull-looking greens and yellows in this photo and make them more vibrant.
Last week Adobe launched major updates to Lightroom Classic (13.0), Lightroom Desktop (7.0), and Lightroom Mobile (9.0). The biggest new features are HDR editing, Point Color, and Lens Blur.
All of these new tools deserve their own post, but we just finished a workshop, and we’re still traveling, so for now I’m just going to explain a few of the salient features, and steer you to some more in-depth information.
(more…)