In the Moment:
Michael Frye's Landscape Photography Blog
by Michael Frye | Nov 4, 2010 | Night Photography
Day of the Dead procession, Hornitos, California
Last year Claudia and I attended theDay of the Dead (All Soul’s Day) celebration in Hornitos for the first time. Hornitos is a tiny town in the Sierra foothills near my home in Mariposa. During the 1850s over 15,000 people lived there; now the residents number less than a hundred. But every November 2nd the town’s population swells, and several hundred people form a silent, candlelit procession from the town up a hill to the old church and graveyard, where they participate in a ceremony honoring the departed.
As I wrote last year, Claudia and I both found the ceremony moving and inspiring, and knew we had to return. Tuesday night we attended the event for the second time. We loved it, again; in our noisy world it’s wonderful to see hundreds of people holding candles and walking silently, solemnly through the night to an old graveyard. Although neither of us are practicing Catholics, we can appreciate rituals that help connect us with some of the more essential and elemental aspects of life and death.
About the Photograph
Last year I made some good images, but it’s difficult to photograph something like this when you’ve never seen it before, don’t know what to expect, and only have one chance at it. This time I had a plan. I positioned myself where I could see the curving line of the procession walking up the hill toward the church. With the camera locked on a tripod I made an exposure at dusk to capture some of the ambient light, then made a further series of long exposures as the procession passed by. The pieces were assembled in Photoshop. The squiggly lines were made by candles that people held as they walked up the hill. The blue streak is actually the viewing screen of a video camera dangling from a man’s shoulder as he walked up the hill—a nice touch of color, and the line helps fill in an otherwise empty space in the composition.
Some photographs are created spontaneously; others require planning. This is obviously an example of planning, as is my photograph of Horsetail Fall by moonlight. But most of my best images were made by simply reacting to what I saw around me—fleeting light or weather, or maybe just aninteresting arrangement of elements that could make a compelling composition. Planning and flexibility are both essential tools in a photographer’s kit.
Next November 2nd I may leave the camera at home and actually join the procession. Then again, I might not be able to resist trying to capture an event with such rich photographic potential. Either way, I’ll be there.
by Michael Frye | Oct 27, 2010 | Yosemite Photo Conditions

Big-leaf maple… from a few years ago
Fall Color in Yosemite Valley is late—really late. I reported last week that about 50 percent of the maple leaves had turned, 20 percent of the cottonwoods, 20 percent of the dogwoods, and 5 percent of the oaks. Well it’s nearly a week later and I’d say the percentages are the same! Hardly anything has changed. There is some good color in spots: as before, the best places are around Pohono Bridge and underneath Cathedral Rocks along Southside Drive. I heard a reliable report that the dogwoods along Highway 120 are about half turned.
At this point don’t want to even try to predict when the color will peak, or what kind of autumn it might be, as this season is progressing more slowly than any fall I can remember. I’ll let you know if things suddenly start to turn.
by Michael Frye | Oct 26, 2010 | Critiques

Star Trails and Cathedral Peak by Rick Whitacre
This week’s photograph was made by Rick Whitacre at Upper Cathedral Lake in Yosemite. By having his image chosen for this critique Rick will receive a free 16×20 matted print from Aspen Creek Photo. If you’d like your images considered for future critiques you can upload them to the Flickr group I created for this purpose.
When I saw this image among the submissions for this series, it occurred to me that I hadn’t critiqued a nighttime photograph before, and that doing so might help provide some lessons and insights into night photography.
(more…)
by Michael Frye | Oct 25, 2010 | Vision and Creativity
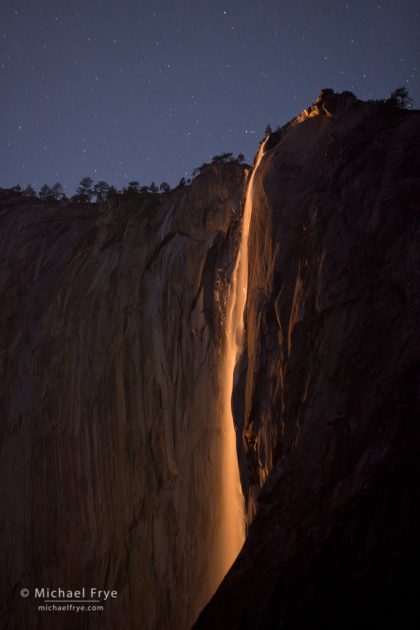
Horsetail Fall by moonlight, Yosemite NP, CA, USA
Horsetail Fall has become a celebrity, attracting more lenses than Brangelina. In February hundreds of photographers try to catch the fleeting sunset light on this little waterfall. Suitable vantage points are limited, so it’s hard to find new and different ways to portray this iconic subject. But it occurred to me that if I could catch the moon setting at just the right angle I might be able to photograph it at night.
It turns out that the right conditions for moonset light on Horsetail Fall are quite rare. The moon’s path varies greatly as it waxes and wanes. It has to set at the right angle while close to full (to provide enough light), before sunrise (so the dawn light doesn’t wash out sky), and there has to be water in the fall. Such conditions may occur only once every other year, at most.
Fortunately I found perfect conditions last spring. As I walked up to one of my favorite Horsetail Fall viewing locations at about 4 a.m., I saw an amazing sight: that beautiful, low-angle backlight on the waterfall, with the cliff behind it in the shade. It looked exactly like it does at sunset in February, only with stars in the sky above it.
Our eyes can’t see color in the dark, but cameras can, so as soon as I made my first test exposure I could see that now-classic orange glow on my LCD screen. I used both short and long shutter speeds, but ended up liking the short ones, with pinpoint stars, best.
This photograph was selected to be part of the Best of Nature show at the Ordover Gallery in the San Diego Natural History Museum. Two more of my images, Winter Sunrise From Tunnel View, and Winter Morning Along the Merced River, were also chosen. The opening reception is November 13th, 11 a.m. to 1 p.m., and will be on view until January 30, 2011. Hope to see some of you at the reception!
Speaking of Horsetail Fall, right now is it’s mirror season. The light is identical to February, and the only reason hundreds of photographers don’t try to photograph it in October is because there’s usually no water in the fall. But Yosemite Valley received almost four inches of rain in the last 48 hours, so there should be plenty of water in Horsetail Fall for the next day or two.
by Michael Frye | Oct 22, 2010 | Announcements, Workshops
Spotlight on Bridalveil Fall, Yosemite National Park
The Ansel Adams Gallery posted their 2011 workshops on their web site today, and they’re open for registration. I’m very happy to announce that I’ll be teaching five classes with the Gallery next year, including a Photoshop and Digital Printing Workshop in January, the Spring Yosemite Digital Camera Workshop in April, and my Hidden Yosemite workshop in July. You can see the complete list on myworkshop page.
There are a few errors on the Gallery’s site, which we’re working to fix. The descriptions on my site are correct, so please refer to these for now, and email me if you have any questions. But I wanted to let you all know that the registration is open, since these classes often fill up quickly.
As you probably know from reading this blog, I love teaching. It’s immensely satisfying to help people find their photographic vision and master the craft of photography. So I’m really looking forward to these workshops next year! Hope to see you in one of them.
by Michael Frye | Oct 21, 2010 | Yosemite Photo Conditions

I spent the last two days in Yosemite Valley doing a private workshop. The weather was fantastic—we got to photograph lots of interesting clouds and chiaroscuro light patterns. More potentially photogenic stormy conditions are predicted through the weekend.
The autumn color in the valley is improving every day, but it’s still not quite there yet. There are four main types of deciduous trees in the valley: big-leaf maples, dogwoods, cottonwoods, and black oaks. The maples usually change color first, and this year is no exception. You can find nice displays already near Pohono Bridge and along Southside Drive underneath Cathedral Rocks. I’d say about 50 percent of the maple leaves in the valley have turned as of today.
The other trees are a bit further behind. Perhaps 20 percent of the dogwood and cottonwood leaves have changed so far, and perhaps only 5 percent of the oak leaves. The dogwoods and cottonwoods need at least another week, and the oaks maybe two weeks.
But while the show consists mostly of maples so far, these trees produce the most consistently vibrant and beautiful color in the valley, and they are changing rapidly. I saw a noticeable increase in yellow leaves in just the last 36 hours. So they may peak soon—maybe even this weekend.
by Michael Frye | Oct 19, 2010 | Yosemite Photo Conditions
Claudia and I made it over Tioga Pass on Sunday, and spent the last two days around Lee Vining photographing aspens. It rained off and on, so we had to wait out a few showers, but the moisture intensified the colors, and gave us some interesting clouds and weather to photograph. I made hundreds of exposures, drained two robust batteries in one day, and got thoroughly soaked, but we had a great time—it was just beautiful. I have a lot of images to process, but here are a couple of early favorites.
A lot has changed in the last week, and autumn has finally bloomed in the eastside canyons. Some of the middle and upper elevation areas are at peak, and the lower groves around June Lake and Lee Vining Canyon are getting there. We found some beautiful orange aspens along the Virginia Lakes Road, just above Conway Summit. The Dunderberg Meadow area was gorgeous. Of course the spots that are good now will probably be past peak soon, but I expect June Lake, Lee Vining Canyon, and Lundy Canyon will all be beautiful this weekend.
As for Yosemite Valley, I’ve heard that the color has really started to come out recently, and I’ll be up there the next two days to check first hand.
I have a busy workshop upcoming workshop schedule, and of course I have to get out and photograph the fall color! So I won’t be doing a critique this week, but will post one early next week. Stay tuned—and let us know about autumn color that you find.
Multi-colored aspen leaves
by Michael Frye | Oct 15, 2010 | Yosemite Photo Conditions

Aspens and snow in the Bishop Creek area, October 5th—Photograph by Evan Russel
After Tioga Pass closed last week I was stuck on the west side of the Sierra, but my friend Evan Russel, Ansel Adams Gallery staff photographer and one of my workshop assistants, made it over there a day earlier, and captured some some great images of snowy aspens after the storm on October 3rd and 4th. Here are a couple of examples. You can see more of Evan’s work on the Gallery’s Facebook page.
Meanwhile in Yosemite Valley autumn is progressing slowly. After some color suddenly appeared last week I thought that the leaves might turn quickly, but apparently the warm weather has slowed things down. I spent the last two days in the valley, and saw some trees that have partially changed, but none fully clothed in their fall colors. Claudia checked out the dogwoods along Highway 120 between the entrance station and Crane Flat and saw mostly green leaves, so it seems that even the higher-elevation trees haven’t changed yet.

Aspens and snow in the Bishop Creek area, October 5th—Photograph by Evan Russel
While we may have to wait a bit for more color in the valley, this could also mean that all the deciduous trees will change at the same time. Usually the dogwoods and big-leaf maples turn earlier than the oaks and cottonwoods, and the color is spread out over several weeks. But occasionally all the trees turn together, creating some exceptional conditions.
On the eastern side of the mountains the color is not yet at its peak in the middle and lower elevations, but things are starting to change quickly, and color can be found in many of the medium-to-high-elevation aspen groves. I described some of the progress in my last two posts, but will add that on Tuesday I found some nice orange trees in the upper reaches of Lee Vining Canyon, along Highway 120. These aspens had shown very little color only three days earlier. The next two weeks could be great in places like Lundy Canyon, Lee Vining Canyon, June Lake Loop, and Conway Summit.
by Michael Frye | Oct 11, 2010 | Yosemite Photo Conditions

Mono Lake, Sunday evening
Claudia and I finally made it over reopened Tioga Pass on Saturday, and visited the Bishop Creek area, Rock Creek, Convict Lake, June Lake Loop, Lee Vining Canyon, and Lundy Canyon. Most of the aspens in those areas are still green—in fact, many are dark green. I saw more green aspens than I’ve ever seen along the eastern side of the Sierra this time of year. Autumn is very late on this side of the mountains.
The good news is that those green trees appear to be in good shape, and we’re having a spell of warm days and cool, but not freezing, nights—perfect conditions for creating colorful leaves. So when the aspens do finally turn we might see some great color—maybe in another week or two, but these things are always hard to predict.
Now on to some specifics. There is some decent color high up in the Bishop Creek area (west of Bishop) near North Lake and Lake Sabrina. By most accounts North Lake was better a week ago, but there is a band of aspens along the northwest shore that hasn’t completely turned yet. It’s mostly yellow with some green, so it may be better in a couple of days.

North Lake, Sunday morning
There is some nice color on a hillside above the road in Rock Creek Canyon, but this seems like a hard place to find good compositions. Further north, Convict Lake on Saturday was almost entirely green, as were the June Lake Loop and Lee Vining Canyon yesterday.
Lundy Canyon had probably the best color we found, although it’s not close to peak yet. The lower part of the canyon was about half yellow, half green yesterday. Further up, below Lundy Lake, everything was green. Beyond the “resort,” along the dirt road, there was a nice patch of color on the south side of the canyon near one of the beaver ponds. We hiked up to the highest beaver pond, and found mostly lime-green aspens, but we always enjoy visiting this area.
We’ll be scouting Conway Summit, Virginia Lakes Road, Dunderberg, and other spots between Lee Vining and Bridgeport this afternoon, and I’ll let you know what we find.
I haven’t been to Yosemite Valley since last Wednesday, but I’ll be there in two days and will give you an update. On my last visit it looked like the maples and dogwoods were starting to turn, so I’m anxious to see if they’ve progressed.
Good luck to all you fall foliage photographers! Let me know if you find anything I missed.

Creek below Lake Sabrina, Sunday morning

Reflections in a Lundy Canyon beaver pond, Sunday afternoon
by Michael Frye | Oct 11, 2010 | Yosemite Photo Conditions

Stormy afternoon over Conway Summit
Claudia and I went up to Conway Summit, Virginia Lakes Road, and Dunderberg this afternoon. This area had the best color we’ve found yet. Conway Summit is still mostly green, as you can see from the photo, but getting there. There are some nice patches of yellow and orange above Conway Summit on the road to Virginia Lakes. Most of the Dunderberg Meadow area (between Virginia Lakes and Green Creek) is still green, but should be good in another week or so. We did find a small patch of red-orange trees nearby. Alas, darkness arrived before we made it to Green Creek—too much to photograph along the way!

Yellow and orange leaves near Dunderberg


