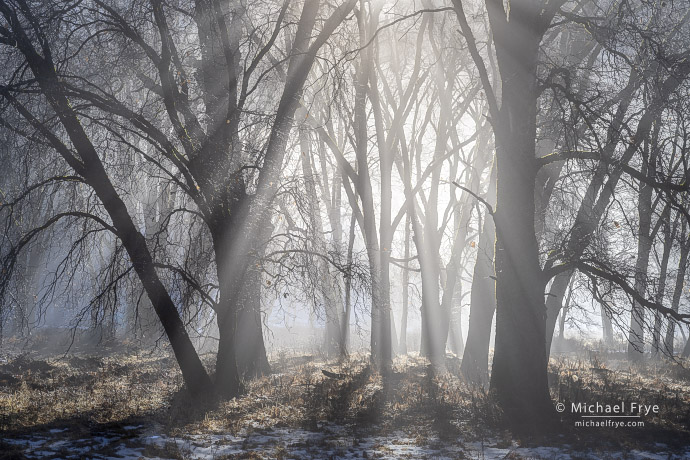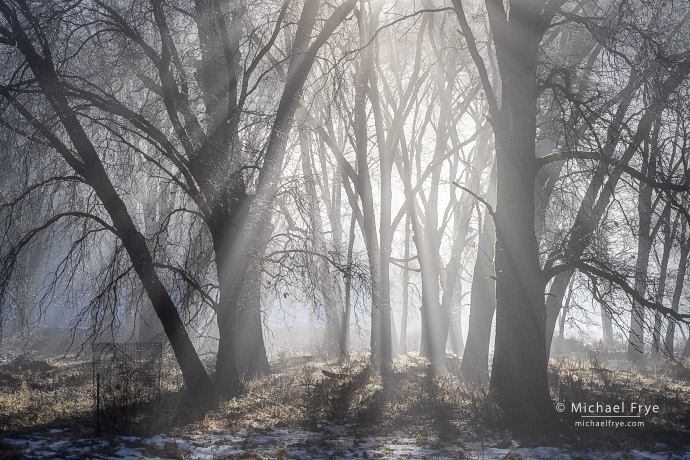
Oaks and mist, Yosemite NP, California. I love the light and fog in this scene, but couldn’t avoid including a distracting wire-mesh enclosure in the composition (see below).
Thanks to everyone who joined us for my Lightroom Webinar: Advanced Retouching on Saturday. It was an engaging, fun, and, I hope, educational session, and it was great to see so many familiar names among the attendees. I appreciate all the thoughtful questions, as they helped broaden the discussion and clarify many points.
One of the things we covered on Saturday was the pros and cons of AI-powered retouching in Lightroom – and how to work around the limitations. Generative Remove in Lightroom and Camera Raw, along with Generative Fill in Photoshop, have certainly made many retouching jobs a lot easier. But one thing that many people don’t realize is that these AI-powered tools can create low-resolution results. So when you remove an object with Generative Remove, that patch, that area where you replaced the object with AI-generated content, might look softer than its surroundings. That’s probably fine for posting an image online, because no one will notice that softness at a small viewing size. But it can be a significant problem when making prints.
I said that patch might look softer than its surroundings, because it depends on the size of the patch. The smaller the patch, the greater the resolution. When you use Generative Remove or Generative Fill, they essentially put the same amount of processing time into each spot or patch you remove. If it’s a small patch, some of that processing time can be devoted to generating more fine detail. If it’s a large patch, there’s not enough time and processing power to generate much detail, so the results look soft.
To get around that, it’s best to apply Generative Remove or Generative Fill in small patches, rather than trying to remove a large area all at once. (Unless that large area is sky, or maybe water, where there’s not much detail anyway.) But there’s a catch: If you attempt to remove a small part of a large object with these AI-powered tools, they just try to replace the object with something similar, rather than removing it.
During the webinar I discussed some solutions for this. They’re all too involved to get into here in detail, but the basic idea is to make a crude replacement for a large area, then do retouching on top of other retouching to fix problems and add in more detail.
I used a variation of this approach with the image of oaks at the top of this post. I loved the light and fog in the scene, but I couldn’t find a composition I liked that didn’t include a distracting wire-mesh enclosure, which you can see in the lower-left part of this un-retouched version:
These enclosures in El Capitan Meadow protect oak seedlings and saplings from browsing deer, helping to ensure that this grove won’t disappear when the older oaks die off. But those enclosures often become major distractions when trying to photograph this beautiful grove of oaks. In this case I decided to include the enclosure in the composition and determine later whether it was worth trying to remove that enclosure.
In the end, I liked the image enough to try to remove that enclosure, but it was difficult and time-consuming to do a convincing job with traditional tools. I tried Generative Remove when it became available, and that worked pretty well – if I didn’t look closely. Because I replaced a large area all at once, the results were mushy, and looked terrible when I zoomed in. If I tried to remove the enclosure with Generative Remove bit by bit, to improve the resolution, it just replaced wire mesh with more wire mesh.
In the end I used a combination of traditional and AI-powered tools, with retouching patches over other patches, and only using small areas of Generative Remove. (Of course I went into more detail about how to do this during the webinar using several different images as examples.) I think the end result looks pretty convincing, and has better detail than the AI-only version.

There’s a noticeable difference in sharpness between the un-retouched branches on the left side of this zoomed-in view, and the branches on the right side, where I used Generative Remove to replace the wire mesh. Adobe’s AI-powered retouching tools often generate low-resolution results.

To replace the mesh with higher-resolution pixels, I used a combination of traditional and AI-powered tools, with retouching patches over other patches, and only using small areas of Generative Remove. While the results don’t exactly duplicate what would have been there without the mesh in the way, I think they look convincing enough, and these areas look much sharper than when only using Generative Remove.
So AI-powered retouching tools can be great time savers, and sometimes can make a nearly-impossible job possible, but they do have some limitations. Over time I expect these tools will produce higher-resolution results, or maybe Adobe will at least give us the option of choosing whether to tolerate longer processing times to get sharper details. In the meantime, we have to work around those limitations as best we can.
— Michael Frye
P.S. If you missed the webinar, you can still watch the recording. Click here to learn more or sign up.
Related Posts: Two Simple Tips for Removing Dust Spots in Lightroom; Generative Remove Comes to Lightroom


