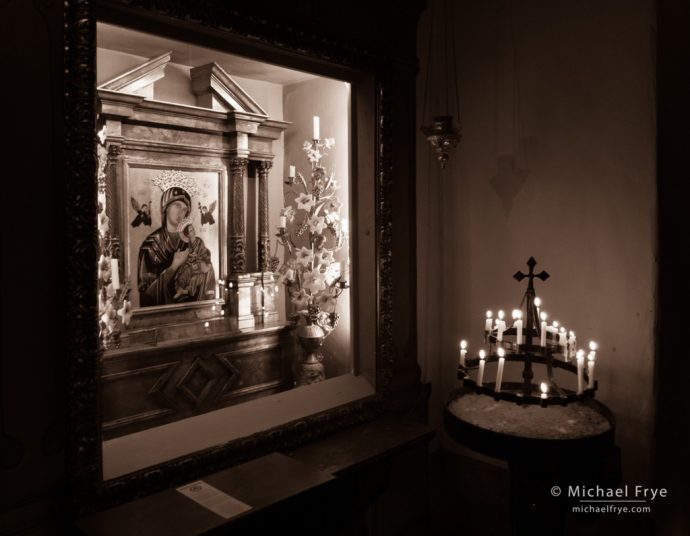
Carmel Mission, Carmel-by-the-Sea, California. Even when a church or museum allows photography (as was the case here), a smartphone camera is less obtrusive than a big SLR.
Last month Claudia and I went to Carmel to assist our good friend Robert Eckhardt’s iPhone photography workshop. Robert is a highly creative photographer, a great instructor, and knows more about iPhone photography than anyone I’ve ever met. This is the second time we’ve done this workshop, and both editions have been really fun. Everyone (including me) learned a lot, and we had a great time photographing around Carmel and processing the images right on our phones.
Participating in this workshop made me reflect on how much smartphone photography has progressed in just a few years. Smartphone cameras have gone from novelty items to highly-capable devices, and a plethora of apps allow you to do just about anything imaginable to the photographs you take on your phone. (And some things that you would never imagine until someone makes an app for it.)
Professional photographers and filmmakers are using smartphones for all kinds of things these days – weddings, photojournalism, street and travel photography, fine art, fashion, television ads, documentaries, and on and on. Although smartphones are still rarely used by professionals for landscape, sports, and wildlife photography, it’s probably only a matter of time.
Perhaps most importantly, smartphone cameras have made photography accessible to almost everyone. Yes, this accessibility creates endless streams of people taking selfies at popular tourist spots. But it has also allowed many people to discover a wonderful new creative outlet. My wife Claudia, for example, never had much interest in using an SLR and tripod. But she took her iPhone, and an eye for composition developed through 25 years of working at The Ansel Adams Gallery, and started creating some wonderfully imaginative photographs.
(And if your spouse or partner gets impatient with your photography, try introducing him or her to a few interesting photo apps. Soon you may be the one waiting around while your partner says, “I’ll be right there – just one more.”)
For me, one of the biggest leaps in the evolution of smartphone photography took place a couple of years ago when both Apple and Android phones became capable of shooting raw images. That meant higher-quality images, and the potential for my iPhone to become more than just a snapshot camera. It’s not likely to replace my big camera for “serious” landscape work anytime soon, but I can now leave my Sony at home for most other situations, and know that if an interesting photo opportunity presents itself I can still make a high-quality image with my phone. The resolution is more than enough for screens, and sufficient to make a reasonably-sharp 16×20 print.

Truck stop restrooms, Fallon, Nevada. An irresistible photo, but I wasn’t about to go back to the car, get my big camera, and set up my tripod in the hallway of the truck stop!
I can easily handhold my iPhone, even when the light gets fairly low, allowing me to quickly capture images that I wouldn’t have time to take with my big camera on a tripod, even if I had the big camera with me. I’ll use my iPhone to photograph anything that catches my eye, and find myself framing a wider array of subjects than with my Sony.
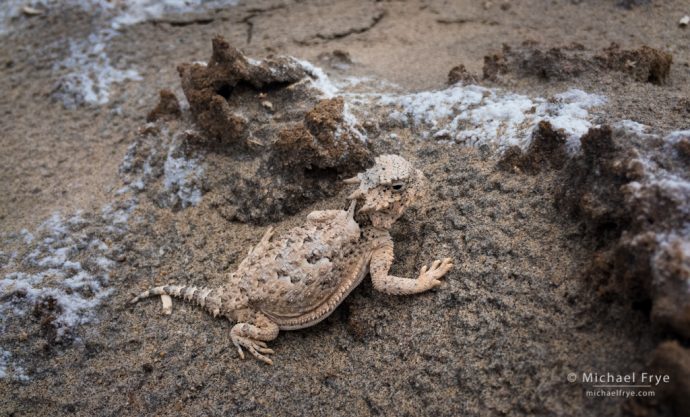
Horned lizard, Death Valley NP, California. We found this lizard during a workshop on our way back from the dunes, and it was quite tolerant of our phone cameras.
Smartphone photography also helps keep my eye sharp between forays with my full-frame equipment. But best of all, the ease of photographing with my phone allows me to be more spontaneous and creative. It’s just a lot of fun. At the bottom of this post you’ll find more iPhone images that I’ve made during workshops or while just playing around.
Capturing Raw Images with an iPhone
If you look for a way to capture raw images with your iPhone’s Camera app, you won’t find it. But there are many third-party apps that will allow you to shoot in raw mode. I usually use Lightroom CC (formerly Lightroom Mobile) for shooting raw, but ProCamera and Halide are also good options. Lightroom CC even allows you to capture HDR images in Raw. ProCamera does HDR as well, and although it outputs the HDR images as JPEGs, you can choose from a number of different looks, or renderings, of the HDR image.
Here are a few quick tips for shooting with Lightroom CC and Pro Camera. Of course I learned most of this stuff from Robert. 🙂
Lightroom CC
Tap on the camera icon in the lower-right corner to access the camera:
If it says JPEG at the top of the screen, tap there and choose DNG if you want to shoot in raw mode:
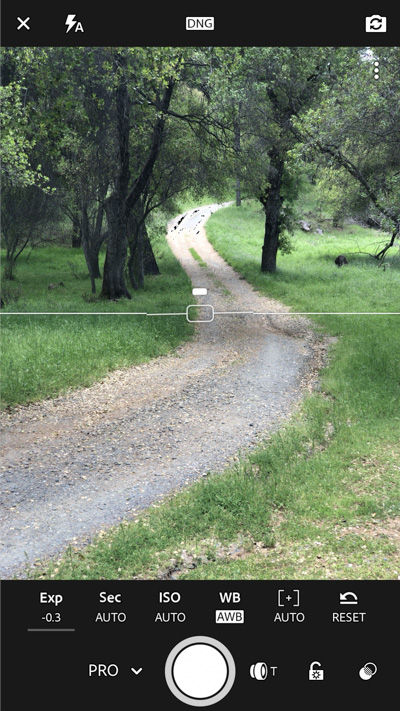
At the bottom, just to the left of the shutter button, it will say Auto by default. Tap there to change to the Professional (Pro) or High Dynamic Range (HDR) shooting modes. Professional gives you more control over focus and exposure, and High Dynamic Range captures two or more images and automatically blends them together to capture an HDR image. (The output for the HDR will be raw if you’ve selected DNG at the top of the screen.)
In any shooting mode, tap and hold down your finger to lock focus. Swipe left or right to adjust exposure compensation.
Tap the three tiny dots near the upper-right corner to open a submenu with more settings, including a grid and level, and highlight clipping (zebras).
ProCamera
Tap on the menu icon in the lower-right corner to change the format from JPEG to RAW, and access other settings:
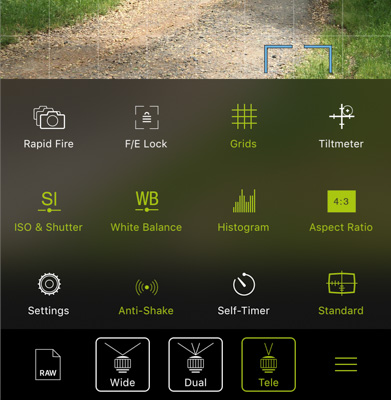
Tap the double arrows to the left of the shutter button to choose the shooting mode: Video, Photo, HDR, etc. Tap once on the screen to show a yellow circle inside a blue square. You can then drag these apart to set exposure (yellow circle) and focus (blue square) separately on different parts of the scene. Tap and hold on the circle or square to lock exposure or focus (respectively):

There are many other little tricks to using these apps — not to mention the zillions of apps designed for processing your images — but we’ll have to leave those for another time.
Of course raw files are three to four times as big as JPEGs, so that can be an issue if space on your phone is limited. And you’ll have to process raw photos, at least initially, with an app designed to work with raw images, like Lightroom CC or Snapseed. You can then export a JPEG from those apps to post the image online or process it further in another app.
— Michael Frye
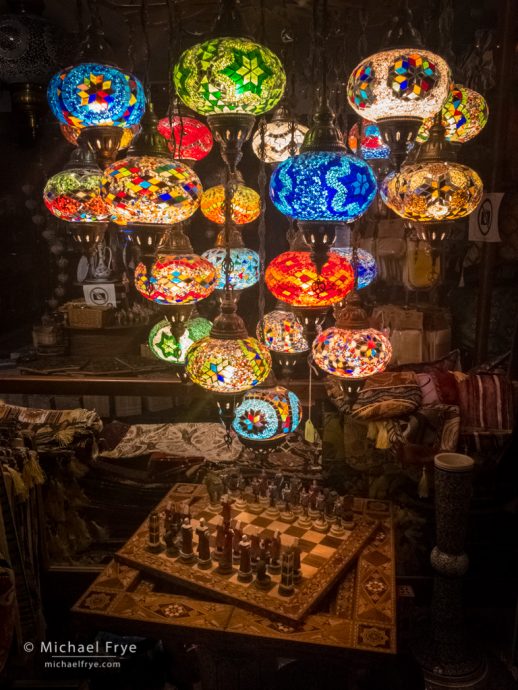
Lanterns in a shop window, Carmel-by-the-Sea, California. Made during one of Robert’s iPhone workshops.

Stairway, Point Pinos Lighthouse, Pacific Grove, California. An impossible place to set up a tripod, but the iPhone’s nearly infinite depth of field allowed me to handhold this and get most of it in focus.
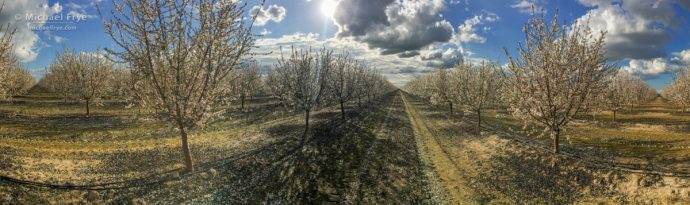
Orchard, San Joaquin Valley, California. Smartphone cameras are great for panoramas. Claudia and I spent an hour in this orchard photographing the blossoms and playing with panoramas.
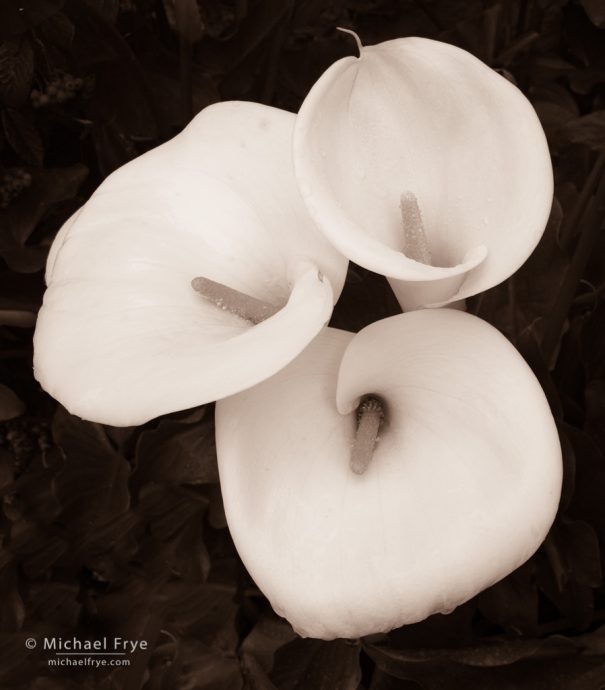
Calla lilies, Carmel-by-the-Sea, California. Smartphones make it easier to get everything in focus with closeups like this, since the focal lengths are so short.
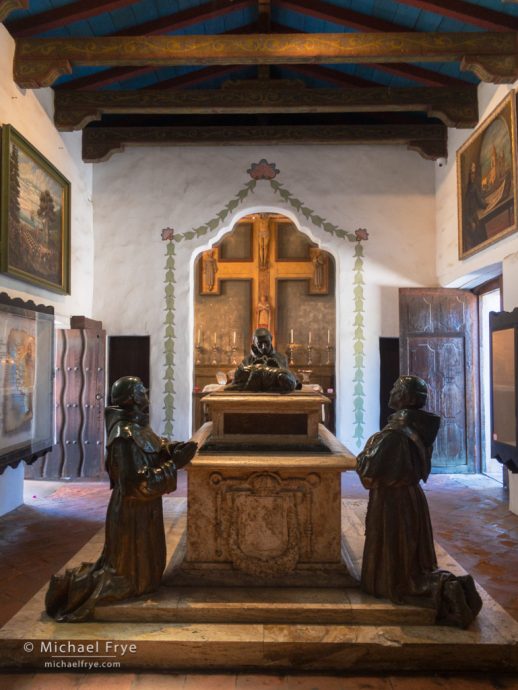
Carmel Mission, Carmel-by-the-Sea, California. A raw HDR capture with Lightroom CC.
Michael Frye is a professional photographer specializing in landscapes and nature. He is the author or principal photographer of The Photographer’s Guide to Yosemite, Yosemite Meditations, Yosemite Meditations for Women, Yosemite Meditations for Adventurers, and Digital Landscape Photography: In the Footsteps of Ansel Adams and the Great Masters. He has also written three eBooks: Light & Land: Landscapes in the Digital Darkroom, Exposure for Outdoor Photography, and Landscapes in Lightroom: The Essential Step-by-Step Guide. Michael has written numerous magazine articles on the art and technique of photography, and his images have been published in over thirty countries around the world. Michael has lived either in or near Yosemite National Park since 1983, currently residing just outside the park in Mariposa, California.


Thanks Michael. Those phone cameras sure keep getting better. But I don’t know how anybody has the patience to try and edit a raw photo on their phone, especially without a mouse. Can you just shoot raw and expert the DNG to your desktop software?
Well processing images on your phone really isn’t bad, especially if you have a newer phone with a bigger screen. A stylus can help. But yes, you can shoot raw on your phone and then transfer the images to your desktop or laptop. It’s easiest to do this wirelessly with some kind of cloud service (Dropbox, iCloud), or (for Macs) use Airdrop. Perhaps the easiest way to get photos from your phone to your desktop/laptop is with Lightroom CC or Classic CC. If I shoot an image (raw or JPEG) on my phone from within Lightroom CC, it shows up automatically on my laptop in Lightroom Classic CC. As long as you’re signed in on both your computer and phone, the images taken on your phone get synced into a Smart Collection on your computer called “From Lr mobile.” They also go into a folder on your hard drive.
Thank you for the detailed feedback. I’m using an iPhone 6 Plus currently but may be upgrading later this year. I may have to look into that in the future.
Thanks for this post. 162 days ago I started a “one a day” photo project with my iPhone. In that intervening time I can feel that the way I look for images has changed. Even using those cheap $10 clip on lenses, and learning to work with the abilities (and inabilities of them). It’s also changed the way I use my “big” camera. It’s been a fun project so far and I don’t see it ending
Sounds like a great project Ian!
Thanks, Michael, for this interesting post. I remember the first time I saw someone taking a photo with their cell phone and thought how strange it looked. Now, ten years or so later, I use my iPhone to take images using Halide and Develop for processing. I also process iphone images with regular LR Classic CC—I’ll have to give Lightroom CC a try. Happy May Day!
Thanks for your comments Bob. Just to clarify, I use Lightroom CC on my phone, Lightroom Classic on my laptop. They sync together beautifully, as I outlined in my comments to JohnC.
Informative article, Michael. I began shooting with Lightroom CC recently and your article helped me along my learning curve. Thanks!
Glad you found that helpful Rad!
I have the ProCamera app on my iPhone 6 but the menu looks different and I don’t see an option to shoot in RAW. I wonder if the RAW feature is only available on the newer iPhone models?
I think you need a 6S or newer to shoot raw.
Great article Michael! I’m an avid fan of Lightroom CC and the intuitive editing options available through it -my iPhone tends to be the camera of choice for those fleeting moments, which would otherwise miss if I were reaching for the DSLR. Thanks for sharing!
Thanks Paul, and I’m glad to hear that you’re using all that iPhone power.
I was very fortunate to be able to attend this excellent workshop with Robert, Michael and Claudia in Carmel. So much is possible now on our iPhones – and Robert introduced us to many of the post-processing applications that continue to evolve on the platform. An all iOS workflow is now very possible – using my iPhone for capture and an iPad for post-processing and sharing. We live in such an amazing time for photography!
An amazing time for photography indeed Scott! I’m glad you enjoyed the workshop.
Hi Michael,
Having just purchased a new iPhone XS, I’m in the process of reviewing a lot of camera apps. Other than LR CC do you have a favorite camera app? Are there others you would consider besides the 3 mentioned here? Any preferred editors (again, other than LR CC)?
I’m sure I may end up buying a few, but would like to go one at a time and start with the one I hope to be the right choice for me to begin with.
Thank you.
Congrats on the new purchase John – I’m sure you’ll have a lot of fun with it.
For me, the two best camera apps are Lightroom CC and ProCamera, and my two favorite editors are Lightroom CC and Snapseed. I’d suggest trying out two basic workflows. The first is using Lightroom CC for both capture and processing. You can do some very sophisticated processing in Lightroom CC, even on your phone – everything you can do in Lightroom CC on the desktop, and almost everything you can do with Lightroom Classic CC. You can then export images out of Lightroom CC if you want to use some other specialized app or apps. The second workflow is using ProCamera for capture, and Snapseed for processing. (Snapseed will work with raw files captured in ProCamera or Lightroom CC or any other app that can shoot in raw). Snapseed is only for the phone, but is also a powerful image processor.
Lightroom CC can do some things that Snapseed can’t, and vice versa, so they both have their pros and cons. Lightroom has more sophisticated raw processing, sharpening controls, retouching tools, and so forth, while Snapseed has more “creative” options – different looks and filters for giving images a more stylized appearance. Of course you can use them in combination too. I might use Lightroom for basic raw editing, and then export the image into Snapseed if I want to experiment with the different tools available there.
Both Lightroom CC and Snapseed are pretty powerful, and with power comes complexity, and a steeper learning curve. If you’re familiar with Lightroom on your desktop that will make it easier to use the phone version, but there are still some significant differences. Anyway, they’re both worth learning.
Hope that helps.
Thanks Michael. Do you have to go the Adobe subscription route to use LR CC? I’ve been avoiding that. My desktop LR is a perpetual license. I’ve briefly tried Snapseed with the Apple camera app so it sounds like I’ll continue learning Snapseed.
Sounds like you prefer ProCamera over Halide. Any special/particular reason(s)?
Thanks much for the feedback. 🙂
You don’t have to have a subscription to use Lightroom CC on your phone or tablet, but you do need a subscription to tsync images between devices, which is one of the main benefits to using Lightroom CC. Without a subscription you can use Lightroom CC on your phone to capture and process images, and as far as I can tell the free version has all the features of the subscription version except syncing.
The main thing Halide is lacking is HDR capture, which ProCamera and Lightroom CC do have. And with Lightroom CC the HDR capture can be raw.
Thank you very much Michael. I greatly appreciate your feedback. That will get me going in the right direction. I think I may just try both LR and ProCamera. And I think I may have to order one of those pocket tripods too! Thank you again. 🙂