In the Moment:
Michael Frye's Landscape Photography Blog
by Michael Frye | Oct 7, 2010 | Critiques
“Meadow of Loosestrife” by J.J. Raia
This week’s photograph was made by J.J. Raia at Troy Meadows, Green Acres, New Jersey. By having his image chosen for this critique J.J. will receive a free 16×20 matted print from Aspen Creek Photo. If you’d like your images considered for future critiques you can upload them to the Flickr group I created for this purpose.
Before I get to the critique, I’d like to once again thank all of you who have submitted photographs for this series. There are many outstanding images in the collection, and I wish I could write about all of them!
(more…)
by Michael Frye | Oct 6, 2010 | Yosemite Photo Conditions

Lightning striking the Sierra foothills near Mariposa on Sunday night
October literally started with a bang, as thunderclaps rang through Yosemite Valley. It poured Saturday afternoon. Near Pohono Bridge the Merced River was brown, filled with silt, something I’ve seen only a few times in the last 27 years.
At about 11 o’clock Sunday night my wife and I got in our outdoor hot tub—a nightly ritual—and immediately noticed flashes behind the ridge to our west. We couldn’t hear anything, but knew it must be distant lightning. The frequency was impressive, a nearly constant flickering.
Even though we planned to head over Tioga Pass to Bishop the next morning, and needed to get up early, we decided to go out and take a look. We drove to a spot on Triangle Road, less than half a mile from our house in Mariposa, with a panoramic view to the south. From there we could see that flickering behind a ridge to the west, but also an even more intense thunderstorm to the south, near Fresno. This second cell put on a great light show, with nearly continuous flashes. It gradually moved closer, then slid by to the east, so we were able to watch it for over two hours.
Of course I tried to photograph the lightning, but unfortunately we saw few bolts hit the ground. Most of the show consisted of cloud-to-cloud lightning, and the streaks were usually hidden within the clouds. But I managed to capture a few good images, including the one at the top of this post.

El Capitan at sunset, Tuesday evening
By the next morning rain had changed to snow at the higher elevations of the Sierra, and Tioga Pass was closed. We started driving north to Sonora Pass, but then learned that had closed too. Reluctantly we turned around rather than face a six or seven hour drive to Bishop.
I had to console myself by photographing a beautiful, seldom-visited location: Yosemite Valley. After receiving almost two inches of rain since Friday, skies cleared over the valley Tuesday, and I was able to photograph El Capitan at sunset surrounded by mist and clouds.
Since I never made it to the other side of the mountains, I can’t tell you first hand about the fall color over there, but Evan Russell, an Ansel Adams Gallery staff photographer and one of my workshop assistants, told me that the color is great west of Bishop around North Lake, South Lake, and Lake Sabrina. Or at least it was Monday. Tuesday it snowed up there, and many aspens lost their leaves. Typically a storm will strip most of the trees that are already turning, so it may be another week or two until the trees that are now green will change and provide another dose of fall color.
News like this—that some of the early season aspen spots may lose their leaves—often elicits anxious comments in forums, with people worried that they may have missed fall, and others adding fuel to the angst by saying that if you don’t go right now, or better still, yesterday, you’ll miss the most fantastic, wondrous, amazing fall color ever!
Let me assure you that fall isn’t over in the Sierra. Most of the aspens in classic eastern Sierra spots like McGee Creek, June Lake Loop, Lee Vining Canyon, and Lundy Canyon are still green, and probably weren’t adversely affected by the recent storms. While there are no guarantees—there are many little-understood factors that affect fall foliage—chances are good that these areas will produce wonderful color later in the month. I’ve made many of my best aspen photographs during the third week of October. Here’s one example.

Aspen Grove, June Lake Loop, October 23rd, 2006
And if the aspens don’t produce more great color this year, there are always maples, dogwoods, oaks, and cottonwoods in Yosemite Valley. Peak fall foliage in the valley doesn’t usually occur until the end of October or beginning of November, but the rain and cold temperatures have set things in motion, and many maples and dogwoods have already started to change color. It looks like autumn might arrive early in the valley this year, but these things are always hard to predict.
I’m hoping to try again to get over to the east side later this week, so I’ll let you know what I find. In the mean time, a good resource for fall color reports is the Calphoto web site. Also, if you’ve been photographing aspens recently, or captured some of the storm activity in Yosemite, please use the comments to tell us what you found, and post links to photos!
by Michael Frye | Sep 29, 2010 | Vision and Creativity

Redwoods in Fog, Del Norte State Park, California
Over the past months I’ve presented tutorials about some of the more technical sides of photography, like curves and camera calibration. These are important tools for realizing your vision, but today I want to turn in a different direction and talk about something less technical, but even more essential—inspiration.
Inspiration in photography can mean several different things. First, there’s the inspiration it takes to make a photograph—the leap of imagination that allows someone to capture a new, different way of seeing a subject, or create an original photographic concept.
Second, you can feel inspired when looking at a photograph. I’ve seen many images that have moved me in some way, perhaps by capturing a moment of great beauty, or a poignant interaction between people.
I’ve also felt inspired by a body of work and thought, “Wow, I want to do that! I want to make photographs that good.” In this case the inspiration is a motivator, something that spurs me to greater heights of creativity and imagination.
Many photographs and photographers have inspired me over the years. Seung Kye Lee lives in Norway, and might be the best landscape photographer you’ve never heard of. One of my favorite photographs of his, Rondane – Whispering Wind, has a great sense of space, depth, and scale—disorienting and surreal. Another favorite, Haiku, just portrays beautiful, magical light.
Next, for something completely different: Jerry Uelsmann. His dreamlike composite images—all done in the darkroom, by the way, not with Photoshop—are well known and widely collected. I had the privilege of meeting Jerry several times when he taught workshops for The Ansel Adams Gallery in the 1980s, and he is extremely nice and has a great sense of humor. He also has a large body of work from Yosemite, since he taught many workshops there. What I like about this image, Untitled, 1992, is the integration of human and natural forms. I wish we could all be this connected with nature.
I hope that some of my photographs might be inspiring to others. But I want to tell you today that everyone can do it. Yes, this means you. Your photographs can move people. Your photographs can inspire people.
How? By being inspired yourself. If you’re not moved by what you’re photographing, then your photographs won’t move others. But if you can see deeply into your subject, if you can feel a connection with a place, a moment, or a person, then you might find that spark of insight or imagination that can help you create a great image.
Ansel Adams said, “I have made thousands of photographs of the natural scene, but only those visualizations that were most intensely felt at the moment of exposure have survived the inevitable winnowing of time.” Ansel was more articulate with a camera than a typewriter, but he meant that his best photographs were made when he felt inspired by the scene in front of him.
That’s been my experience too. It was certainly the case when I made the photograph of redwoods at the top of this post. Walking among those giant trees on that foggy morning I felt awestruck, humbled, and deeply connected with everything around me.
It’s easy to get caught up in our jobs and our day-to-day existence. We think about money, or a difficult in-law, or the latest crisis in the news. I think that’s why we love photography. We can’t often express ourselves at work, but we can with a camera. Photography gives us a creative outlet, a way of keeping in touch with our true, inner selves, the person that often gets forgotten while sitting in meetings or paying the bills. A camera can help you connect, or re-connect, with the things that are really important to you. Find out what those things are, what things matter most to you in the world, and you can make inspiring photographs.
What subjects move you and inspire you? What photographs or photographers have you found inspirational? I’d like to hear your thoughts, and see links to images that have inspired you.
by Michael Frye | Sep 24, 2010 | Critiques
“Winding Road” by Ken Schram
This week’s photograph was made by Ken Schram in Door County, Wisconsin. By having his image chosen for this critique Ken will receive a free 16×20 matted print from Aspen Creek Photo. If you’d like your images considered for future critiques you can upload them to the Flickr group I created for this purpose.
Wednesday was the autumn equinox, so it seems appropriate to show some fall color—in this case from Wisconsin. The photograph depicts the road leading to the Washington Island Ferry.
A twisting road like this is an irresistible subject. Most landscape photographers have probably tried to capture a similar view at one time or another—I certainly have. As you click the shutter you imagine the large checks that your stock agency will soon be sending you for licensing this classic stock photo subject… only to get jolted back to reality when you realize how many other curving road photographs are out there. But I digress…
Ken said that with his 18-55mm lens (the only one he owned at the time) he couldn’t compress the curves. He meant that with a longer lens he could have zoomed in on the curviest section of road in the upper-right part of the image to emphasize the zigzags. So he decided instead to “take the viewer on a journey through the frame.” He cropped the photograph (you can see an uncropped, unprocessed version here) to eliminate the washed-out sky, and decided to “start the double-yellow line at the bottom-left corner so the eye would follow the road up to the upper-right third.”
In the original version, that large bright sky at the top of the frame pulls our attention away from the real stars of the scene, the road and fall color. So that sky either needed to be cropped, as Ken did, or darkened. Ken’s crop emphasizes the strong lines of the road and creates a clean, simple, and compelling composition with a crisp autumn feeling.
While I like the idea of cropping out the sky, I’m not sure about the double-yellow line meeting the corner of the frame, and about where the other lines of the road meet the edges of the photograph. If you’ve tried to capture this kind of subject you probably soon realized that the foreground presents a problem. The edges of the road have to enter the frame somewhere near the bottom, but where exactly? Should those lines touch the sides of the frame? The bottom? The corners? One edge on the side, the other on the bottom? And what about that center line?
While I try not to be dogmatic about any aspect of composition, I usually avoid making prominent lines meet the corner of the frame. I’m not sure why exactly, but a line touching a corner seems to divide the photograph awkwardly. And with a road image like this it usually works best to make the lines symmetrical—that is, have both edges of the road meet the bottom of the frame, both meet the sides, or, possibly, both meet the corners.
If you go to Flickr and search for “road” you’ll find examples of every possible composition: both edges of the road touching the sides of the frame, both meeting the bottom, one touching the side and the other the bottom, or one or more lines reaching the bottom corners. To me the most effective of these have that symmetry I was talking about—both edges of the road meeting the sides of the frame, or both meeting the bottom, and usually at about the same distance from the corner. But there are successful, asymmetrical exceptions. (There are also several photographs of the same stretch of road; see here, here, and here.)
Getting back to Ken’s photograph, to me this is a case where the double-yellow line coming out of the corner of the frame looks awkward. Also, the right edge of the photograph is cropped a bit too tightly. Looking at the original, uncropped version I can see that there was more space on that right edge. I’m guessing that Ken chose to trim that side to eliminate messy leaves and pine needles along the side of the road, but that made the white line almost touch the edge of the frame, and to me that feels too cramped.
Given the short focal length lens he had to work with, I think Ken would have been better off standing closer to the center of the road and making both edges of the road meet the sides of the frame, and having the double-yellow line touch the bottom of the photograph. But with the camera position he chose, is there a better crop? I think so—here’s one example with the yellow line meeting the bottom of the frame. This tight framing highlights another problem though: where the double-yellow line crests the foreground hill it meets the edge of the road in the distance. Again, stepping to the left would have avoided this merger.

There’s also another option. The sky isn’t really washed out. It’s light, but has detail, and could be darkened. I did just that by taking the original, unprocessed version and using the Adjustment Brush in Lightroom with “Auto Mask” checked. I also added a slight overall S-curve to punch up the contrast, and trimmed the bottom edge. Including more of this now-darkened sky gives the image a more expansive feeling, like I’m taking that journey through the frame that Ken talked about.
The original image with the sky darkened, a slight increase in contrast, and the bottom edge trimmed
Even though I like this version with more sky, I still think Ken might have been better off standing in the middle of the road. Well, the photograph might have been better, but his health might not!
This image is technically well-executed. Everything appears to be in focus, and the overall exposure looks just right. I think the contrast is a little too high in the finished image, making it feel a bit harsh. In my re-worked version with the darkened sky I added some contrast, but not as much, as I wanted to keep a bright, crisp, autumn feeling.
As always, I’d like to hear your thoughts. Which crop do you prefer? How do you feel about the contrast? And if you’ve tried photographing road scenes like this, how did you deal with the way the lines met the edges of the frame?
Thanks Ken for sharing your image! You can see more his work on Flickr, and on his web site.
If you like these critiques, share them with a friend! Email this article, or click on one of the buttons below to post it on Facebook or Twitter.
As part of being chosen for this week’s critique Ken will receive a free 16×20 matted print courtesy of the folks at Aspen Creek Photo. If you’d like your images considered for future critiques, just upload them to the Flickr group I created for this purpose. If you’re not a Flickr member yet, joining is free and easy. You’ll have to read and accept the rules for the group before adding images, and please, no more than five photos per person per week. I’ll be posting the next critique in two weeks. Thanks for participating!
by Michael Frye | Sep 23, 2010 | Announcements, Workshops
The Ansel Adams Gallery will be announcing their 2011 workshop schedule soon, but I thought I’d give you a preview of my Photoshop and Digital Printing workshop, since it’s only four months away: January 16-20, 2011.
This is a perfect class for anyone who wants to improve their knowledge and skill with Photoshop. Photoshop is an incredibly powerful program, yet because of that power it’s also complex. This workshop is designed to help you cut through the clutter, and all the conflicting, confusing information out there, and learn simple, powerful techniques for making great digital prints. We’ll have five days—plenty of time to really immerse ourselves in the subject. I guarantee that you’ll leave the class with new skills, confidence, and increased mastery of Photoshop. Click here to read the full workshop description on my web site.
Winter can be a great time to photograph Yosemite Valley. While working on our digital darkroom skills we’ll also keep an eye on the weather and be ready to photograph fresh snow or a clearing storm. Last year we found some great light and clouds one afternoon, as you can see by the accompanying photograph.
As soon as the Gallery makes the announcement I’ll post the full list of workshops here. Or, if you prefer, send me an email letting me know you’re interested and I’ll let you know when the workshops are live and open for registration. And if none of these workshops fit your schedule, I’m available for private workshops for individuals or small groups.
by Michael Frye | Sep 20, 2010 | Yosemite Photo Conditions
Aspens and Juniper, Rock Creek Canyon
Claudia and I went to the Millpond Music Festival in Bishop this weekend. We were trying to figure out how many years we’ve been going to this event. Eleven? Twelve? Regardless, we love this festival. Crowds are small, the camping is great, and we get to spend time with friends. Oh, and the music is wonderful!
On our way home last night we drove up Rock Creek Canyon, as I had read a report by Inge Fernau on Carol Leigh’s Calphoto site about some early color there. We did find some aspens changing. They were mostly small, scrubby ones near the trailhead, but I was able to make this photo of yellow leaves surrounding a juniper.
It’s still very early for fall color, but by the end of the month the high-elevation aspens on the eastern side of the Sierra should turning. I’ll keep you posted on what I see and hear.
by Michael Frye | Sep 16, 2010 | Yosemite Photo Conditions
Late-October aspens, June Lake Loop
As fall approaches, you might be wondering where and when to photograph fall color around Yosemite. Click here to read my post from last September describing some of my favorite autumn locations.
It’s too early to tell what kind of fall we’ll have. Some of the Indian rhubarb in Yosemite Valley has already turned yellow, which is a bit early. I’ll be going to Bishop this weekend for the Millpond Music Festival, so I’ll let you know if I see any high-elevations aspens staring to change color.
Let’s hope for a nice fall!
by Michael Frye | Sep 8, 2010 | Critiques

“Misty Morning” by Richard Valenti
This week’s photograph was made by Richard Valenti at Lake Wildwood in Northern California. By having his image chosen for this critique Richard will receive a free 16×20 matted print from Aspen Creek Photo. If you’d like your images considered for future critiques you can upload them to theFlickr group I created for this purpose.
The best landscape photographs have a strong mood, and this image certainly has that. The mist, calm water, and symmetrical reflections create a beautiful, quiet, peaceful feeling. I can almost feel the morning chill.
Richard said that he was drinking his morning cup of coffee at his house along this lake when he noticed the mist. Since the sun was about to crest the ridge he didn’t have time to get his DSLR, so he grabbed his point-and-shoot (Canon PowerShot SX200IS) and ran down to the dock to compose this photograph. As he put it, “no full frame DSLR, no tripod, not shot in RAW; just a point and shoot set to automatic ‘program’ mode! I did ‘see and pre-visualize’ what I wanted the final image to be and carefully composed this image. I was only able to get two shots off before the sun broke through the tree line and totally changed the mood of the scene before me.”
Timing is everything in landscape photography. It’s better to capture a great moment like this with a point-and-shoot than not capture it at all.
Overall the composition is pretty clean and simple. I like the shapes created by the distant ridge and it’s reflection. There are lots of interesting details, like the two layers of trees on the far hill separated by fog, and the ripples in the water. The horizon is above the center, emphasizing the foreground water more than the sky, which I think was a good choice here, as the subtle textures in the water are more interesting than the smooth sky.
One thing I could quibble with is the patch of dark trees along the left edge. Sometimes a dark area adds needed contrast to an otherwise flat scene, but in this case I think it throws the image off balance; without any other dark areas in the frame the left side of the photograph feels heavily weighted compared with everything else. And although usually our attention is drawn to light areas, since this photograph is predominantly light our eyes get pulled toward that dark mass on the left and away from more interesting areas spots. I think this image has enough contrast and mood without that left side, but what could be done about it?

One solution might have been moving the camera position to the right, but since Richard was standing at the end of a dock that probably wasn’t possible. Perhaps he could have pointed the camera more to the right, but I don’t know what was over there—maybe something distracting. As we see it here, just cropping the left side makes this image feel off balance. But cropping both sides and creating a vertical composition does seem to work—it’s simpler, and emphasizes the most interesting things in the frame: the water, central trees, and mist. However, it’s more abstract, with less sense of place. This is a tough call for me; I think I prefer the cropped version, but I’d have to live with it for awhile.
What do you think of the dark area along the left edge? Do you like the vertical crop, or prefer the original version? As always, I look forward to hearing your thoughts.
Despite the camera, the image quality seems pretty good, although there’s a strange color shift in the sky—purple on the left, cyan on the right—and the same colors are reflected in the water. This could probably be corrected in Photoshop with either a Hue/Saturation or Selective Color Adjustment Layer, possibly in conjunction with a layer mask.
Viewed larger some noise is also apparent among the trees along the far shore. Smaller sensors are more prone to noise, and it’s likely that the original JPEG was oversharpened in the camera, further emphasizing the noise. On most cameras the standard sharpening setting is too high, and it’s almost impossible to fix this later, while it’s easy to add more sharpening in software if necessary, so I always recommend setting the sharpening to its lowest setting if your camera allows it (many point-and-shoots don’t), . These in-camera sharpening settings only affect JPEGs, so if you only shoot in Raw don’t worry about it, but if you ever use JPEG mode it might be a good idea to figure out how to adjust the sharpness and turn it down.
While I have some reservations about the dark area along the left side of this photograph, I love the misty mood, and I’m glad Richard captured it, even with a point-and-shoot camera.
Thanks Richard for sharing your image! You can see more his work on Flickr.
If you like these critiques, share them with a friend! Email this article, or click on one of the buttons below to post it on Facebook or Twitter.
As part of being chosen for this week’s critique Richard will receive a free 16×20 matted print courtesy of the folks at Aspen Creek Photo. If you’d like your images considered for future critiques, just upload them to the Flickr group I created for this purpose. If you’re not a Flickr member yet, joining is free and easy. You’ll have to read and accept the rules for the group before adding images, and please, no more than five photos per person per week. I’ll be posting the next critique in two weeks. Thanks for participating!
by Michael Frye | Sep 7, 2010 | Announcements

Courthouse Towers, Arches National Park
I’m pleased to announce that I’ll be a presenter at the Moab Photography Symposium, May 12-15, 2011. This will be my first time attending this event, but I’ve heard it’s a lot of fun, so I look forward to participating, meeting new people, and visiting the beautiful Utah canyon country.
Other presenters include John Sexton, Tom Till, Bruce Hucko, Joan Myers, and Jeff Vanuga. Hope you can join us
by Michael Frye | Sep 3, 2010 | Vision and Creativity
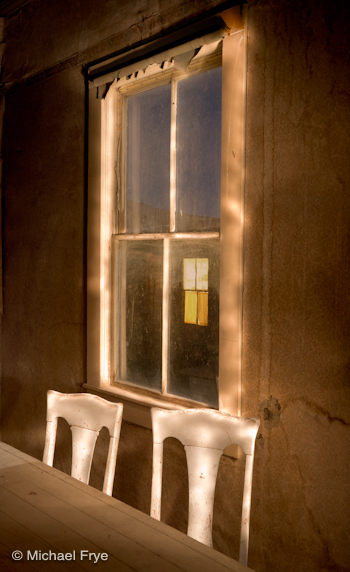
Miller house at night, Bodie State Park, CA, USA
I gave a short presentation to the workshop group in the afternoon, then we headed up to Bodie in the evening, arriving at dusk as the moon was rising. Being in Bodie at night was a great experience. It was a little spooky, but beautiful.
Night photography offers wonderful opportunities to be creative. The low light allows you to use long exposures to record movement, add your own light, or move objects during the exposure—including the camera.
Bodie, of course, has lots of great subjects for doing all these things, but at first I found it difficult to find the right subject and composition. When faced with a new situation it sometimes takes awhile to find your bearings. Eventually I found the composition shown here, in the often-photographed Miller House, and captured an image I’m reasonably happy with. I tried various techniques to light the chairs and interior. This version includes light from two different flashlights, as well as moonlight spilling in through the window, and a lamp illuminating a window in another building. (Some of the park staff actually live in Bodie, so this light came from one of the staff member’s houses.)
We had a great time, but it was too short—the permit lasted only four hours. I could easily have spent four nights there. I hope I’ll get a chance to go back some day.
Lance and Scott have a new book, called Night Photography: Finding Your Way in the Dark. It’s really well done, and I highly recommend it to anyone interested in night photography.


