In the Moment:
Michael Frye's Landscape Photography Blog
by Michael Frye | May 31, 2026 | Light and Weather, Travels and Stories, Uncategorized

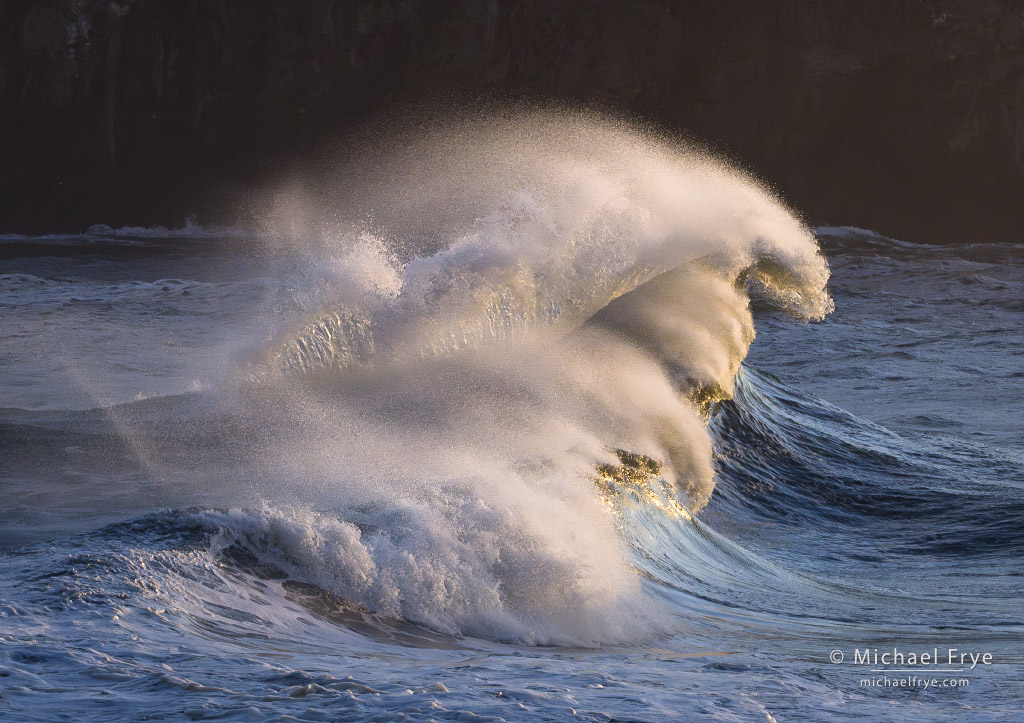
Wave splash at sunset, Pacific Coast. 185mm, 1/500 sec. at f/16, ISO 3200.
Claudia and I are in the northwest corner of California scouting for our upcoming redwoods workshop. I always enjoy coming here, as I love both the forests and the coast in this part of the world.
On a previous visit Claudia had spotted some unusual wave activity at one coastal location while I was off photographing something else. Her description intrigued me, so I kept that spot in the back of my mind in case we got the chance to photograph big waves there. And we got that chance on Tuesday, with waves 16 feet or higher according to the nearest wave buoys. Waves like that are unusual for this time of year, so it seemed like a great opportunity.
(more…)
by Michael Frye | May 17, 2026 | Travels and Stories
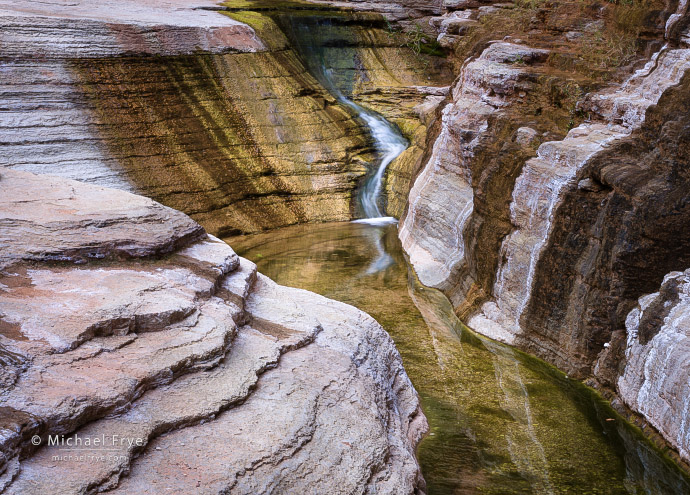
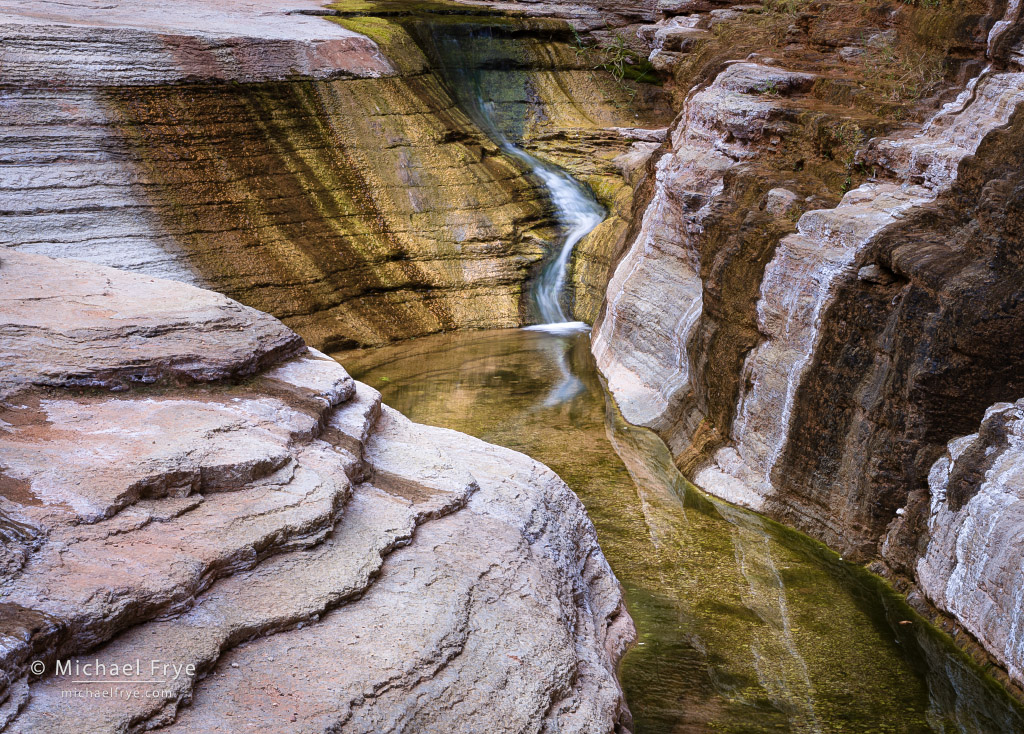
Creek flowing through a limestone side canyon, Grand Canyon NP, Arizona
I just returned from a wonderful 12-day raft trip down the Grand Canyon. This was my fourth time down the canyon, and third with Visionary Wild and my amazing co-instructor, Jerry Dodrill. It’s always so special to raft through the heart of this spectacular, wild, and remote landscape, and it was wonderful to share this adventure with our great group of participants, and with our fantastic AZRA guides: Ed, Tony, Michele, and Boh.
During each of my trips down the Grand Canyon I’ve been struck by the contrast between the grandeur and immensity of the main canyon, and the quiet, subtle beauty of the side canyons. You can be walking beside a roaring rapid along the Colorado River, with cliffs and terraces ascending thousands of feet above you, then turn into a narrow side canyon and be out of earshot of the river within a few minutes. And in these quiet sanctuaries you can find tinkling streams, hanging gardens of ferns or flowers, waterfalls, and beautiful, sculpted, polished rock.
(more…)
by Michael Frye | Apr 26, 2026 | Travels and Stories
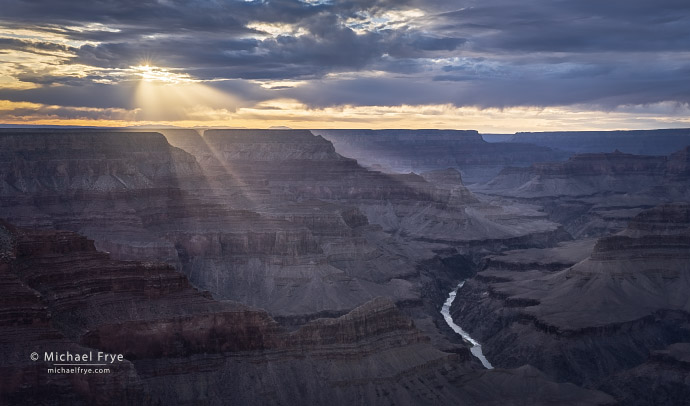
Sunbeams and the Colorado River, Grand Canyon NP, Arizona
Tomorrow I’ll begin another raft trip through the Grand Canyon. This will be my fourth journey down the canyon, and third for Visionary Wild. And once again my co-instructor will be the fabulous Jerry Dodrill – a wonderful photographer and teacher who knows the Grand Canyon intimately.
My previous trips were either eight- or ten-days long. This one will take twelve days, which I’m really excited about. The more time in the canyon the better!
Prior to arriving here in Flagstaff, Claudia and I did a short road trip through Utah and Arizona, finishing at the south rim of the Grand Canyon on Thursday and Friday nights. It’s always fun to see the canyon from the rim before going down into the heart of it. The perspectives from the top and bottom are very different, but all the perspectives on this canyon are beautiful.
(more…)
by Michael Frye | Apr 19, 2026 | Light and Weather
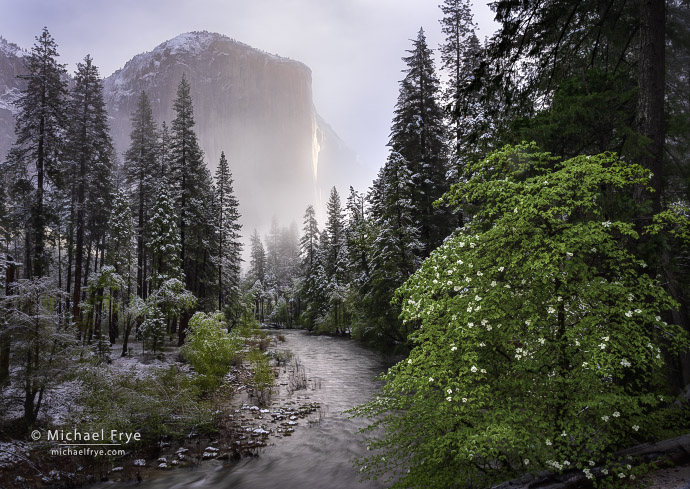
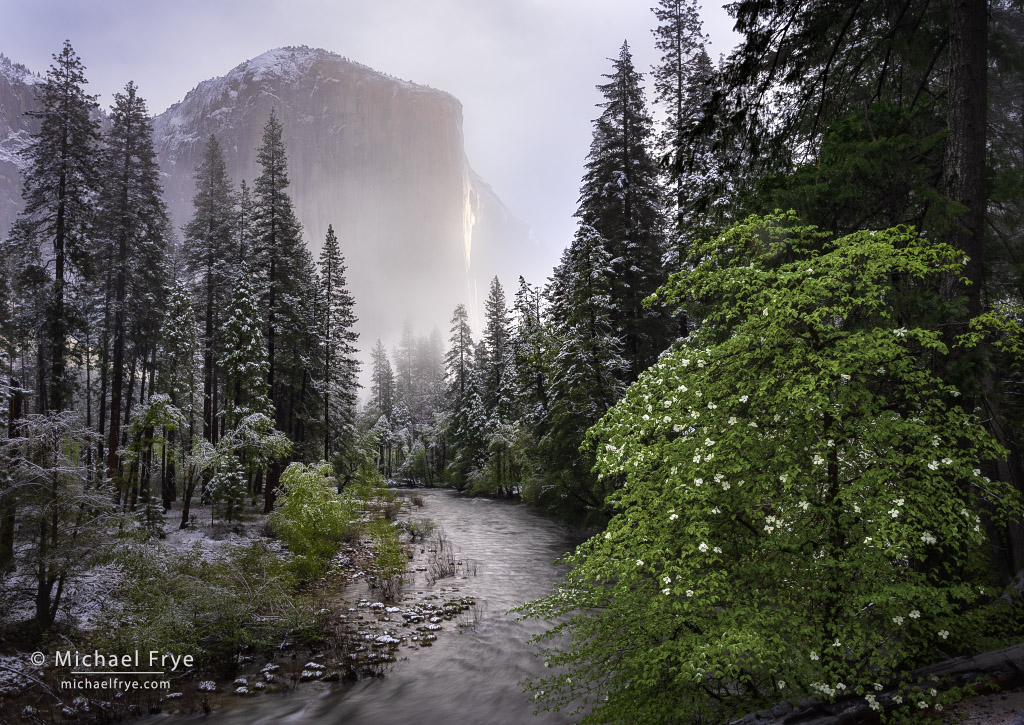
El Capitan and the Merced River after a spring snowfall, Yosemite NP, California
Last Sunday another small weather system came through California. This one was colder – cold enough to turn rain into snow in Yosemite Valley toward the end of the storm. It was wet snow, and melted quickly, but it was enough to briefly etch the tree branches in white.
Seeing snow and mist on the webcams, I drove up early Sunday morning to the valley to see what I could see. One thought was to try and photograph dogwoods with snow. The dogwoods started blooming early this year, no doubt because of the strange, warm weather we had in March.
(more…)
by Michael Frye | Apr 13, 2026 | Announcements
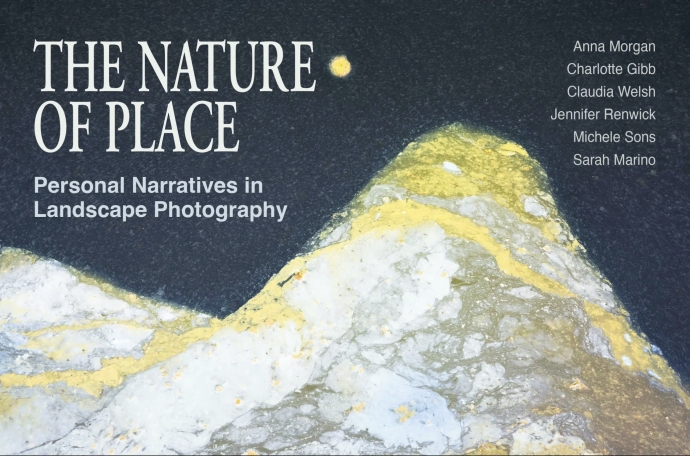
I’m posting today on behalf of my wife, Claudia Welsh, who has something exciting to tell you about.
As some of you may already know, Claudia joined five fellow photography friends (Anna Morgan, Charlotte Gibb, Jennifer Renwick, Michele Sons, and Sarah Marino) to form a collaborative group called Circle of Light. They’ve been working on something special: an ebook called The Nature of Place: Personal Narratives in Landscape Photography.
(more…)
by Michael Frye | Apr 12, 2026 | Announcements, Light and Weather

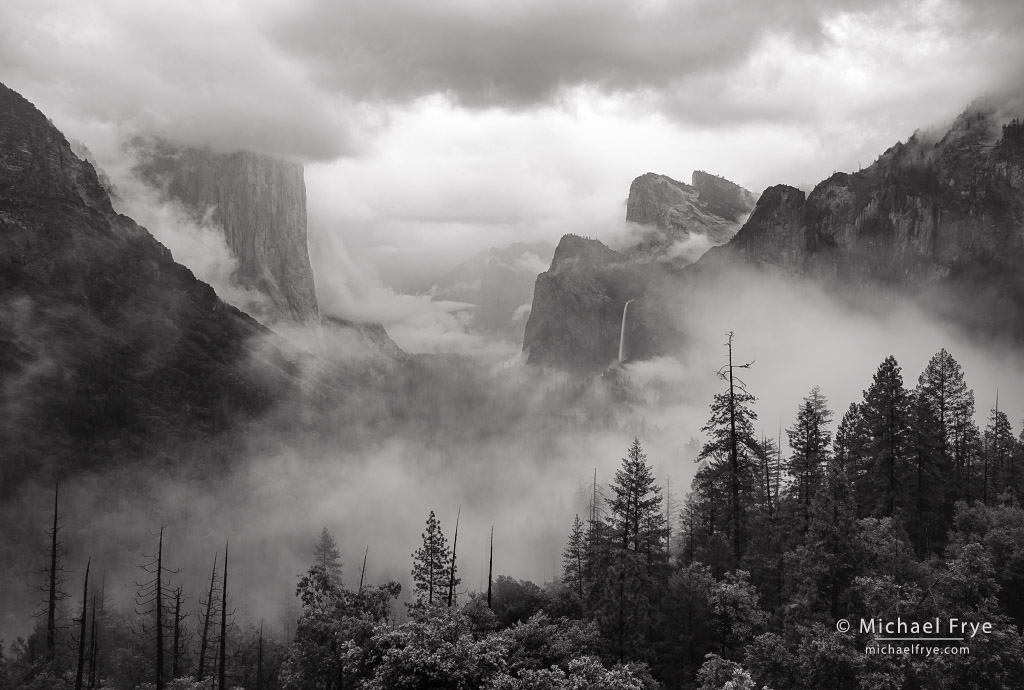
Stormy afternoon at Tunnel View, Yosemite NP, California
The weather is upside down here in central California. Our wettest season, winter, was exceptionally dry. But now that spring has arrived the storms have returned. We’ll take it – we need the rain, and, as the saying goes, it’s better late than never.
And just to make things more interesting, over the last few days unstable air has triggered numerous thunderstorms, with lots of lightning and thunder. That’s quite unusual for this part of the world.
(more…)
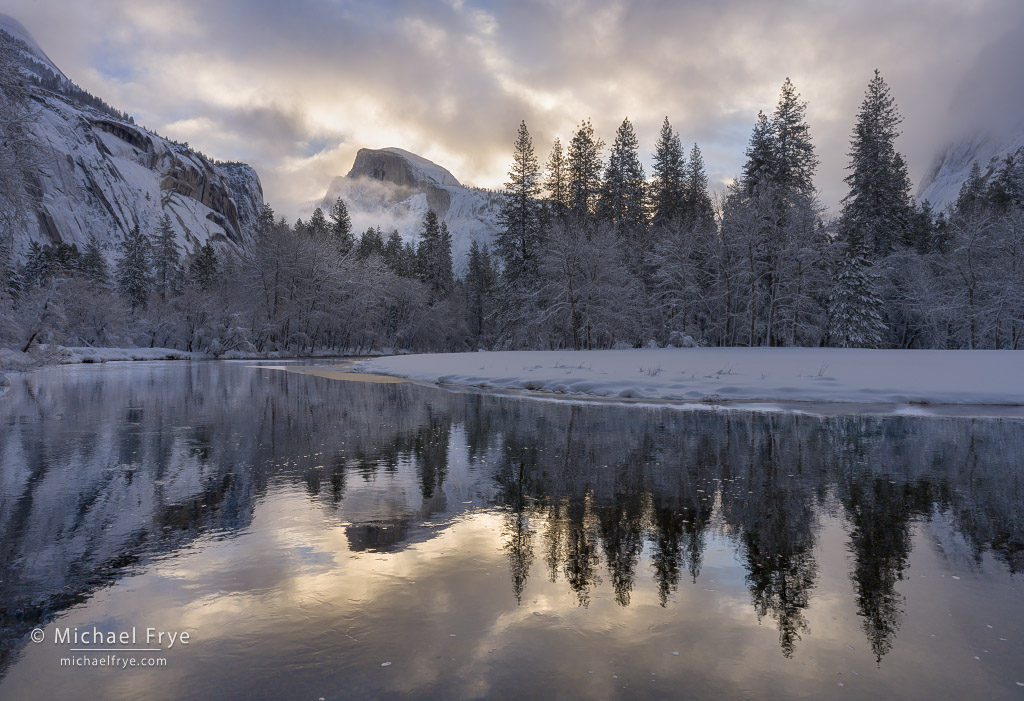
by Michael Frye | Apr 5, 2026 | Light and Weather
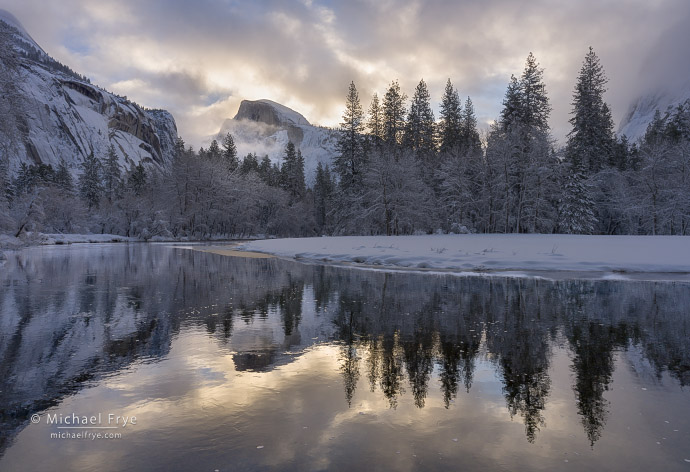
Half Dome and the Merced River at sunrise, Yosemite NP, California
Claudia and I have been home for a couple of weeks, which is a nice break from our travels. I love all the trips we’ve been able to go on, but it feels good to chill out a bit at our own house, and sleep in our own bed.
And we don’t have to travel far from home to be in an exotic location, since we live only an hour away from Yosemite Valley.
(more…)
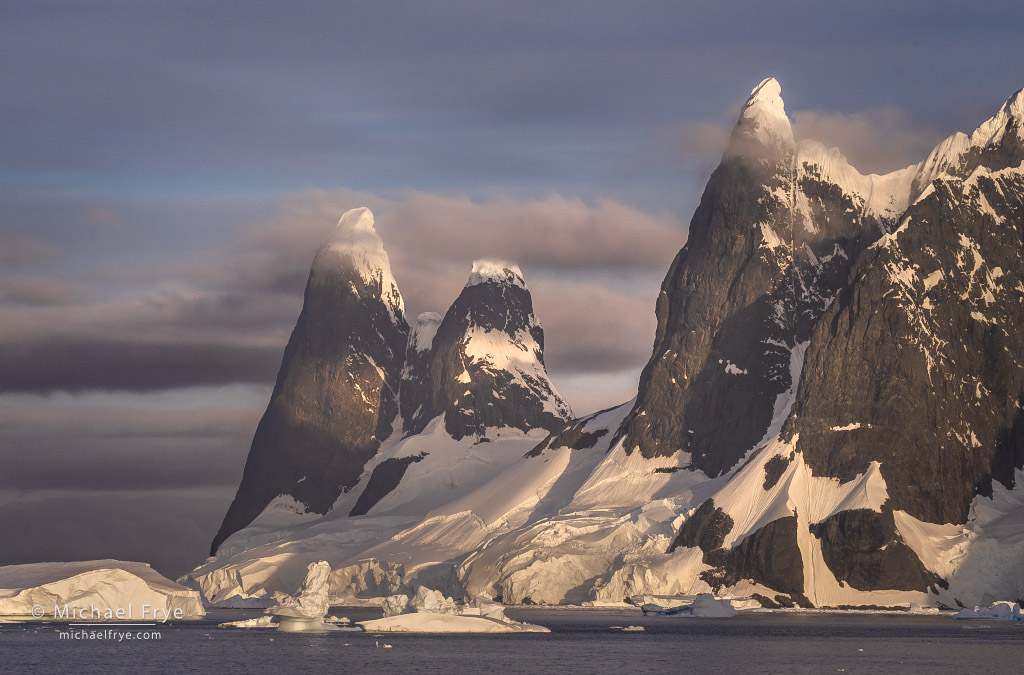
by Michael Frye | Mar 29, 2026 | Light and Weather, Travels and Stories

Snow-capped spires, Antarctica. 158mm, 1/500 sec. at f/11, ISO 500.
It’s taken me a long time to go through all my photos from our January trip to Antarctica – all 41,000 of them! I previously posted images of natural ice sculptures, and penguins. But this time I thought I’d focus on wider landscapes, and the beautiful Antarctic light.
Antarctic light is special. When we arrived in early January the sun rose at 2:45 a.m., and at an azimuth of about 160 degrees. That’s just a tad to the east of due south (180 degrees). Then the sun carved a low path through the sky to the east, north, and west, finally setting (at midnight) just a little bit west of where it rose, at an azimuth of about 200 degrees. It never got truly dark.
(more…)
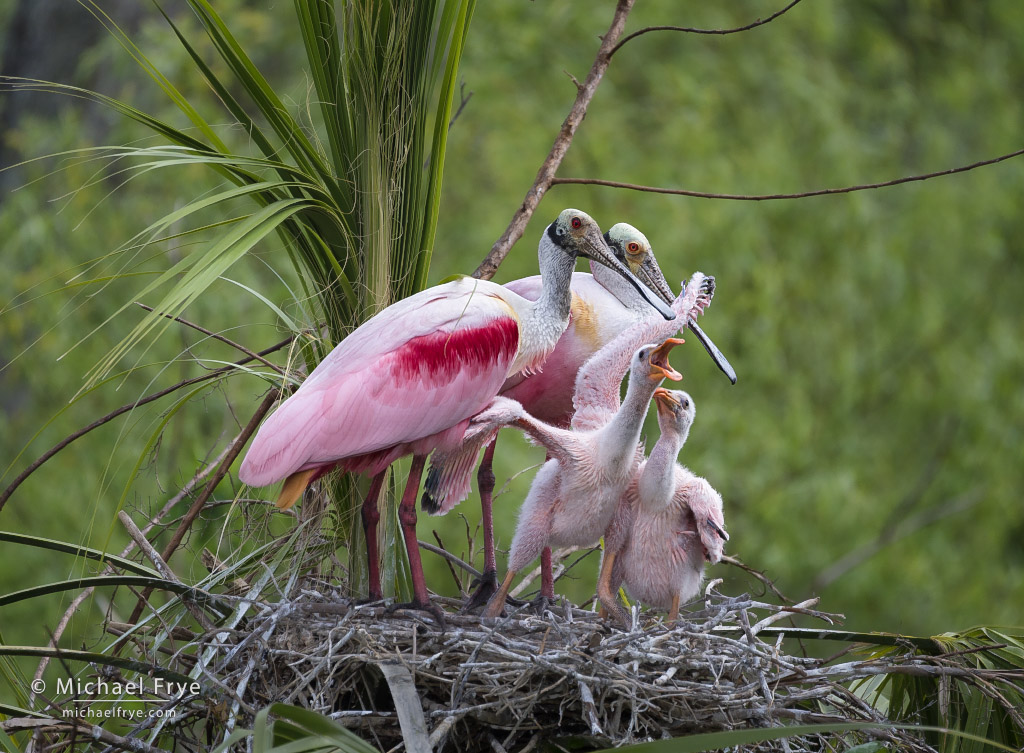
by Michael Frye | Mar 22, 2026 | Wildlife Photography

Roseate spoonbill nest with adults and nestlings, or “teaspoons”. It required patience to get the right light (soft light as a cloud passed over the sun), with all four birds in good positions, and their eyes all visible. Having the one nestling spreading its wings and opening its beak (begging for food) was a bonus. I composed this to include some of the saw palmetto the nest was built around to show the environment. 400mm, 1/1500 sec. at f/5.6, ISO 640.
Claudia and I recently returned from Florida, where I was one of the instructors at the Out of Merritt Island Bird Photography Conference. What a great event! This was the first time the Out of Chicago team has put on a bird-photography conference, and it was a lot of fun. My fellow instructors were all fantastic, the participants were super-nice – and eager to learn – and, as usual, the Out of Chicago team did a great job organizing the conference.
And then, of course, there were the birds. I had photographed birds in Florida briefly in 2002, but this was the first time I’d been back since then, and the first time I’d made a trip to Florida specifically focused on bird photography. And it’s a wonderful place for birds. There’s an incredible variety of species – and photogenic species at that – plus so many of the birds are easily approachable.
(more…)
by Michael Frye | Feb 19, 2026 | Advanced Techniques, Night Photography
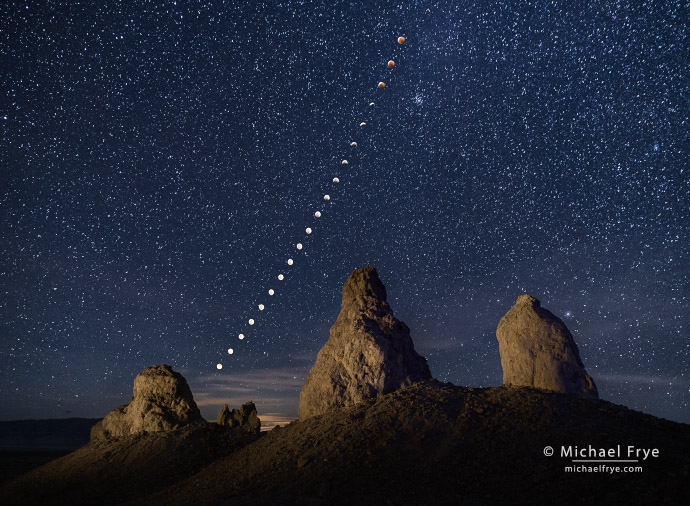
Lunar eclipse sequence, Trona Pinnacles, California, January 20th, 2019
On March 3rd people in many parts of the world (including most of North America, Eastern Asia, Australia, and New Zealand) will be able to see a total lunar eclipse. This page shows where the eclipse will be visible, as well as the timing of the event.
Here in the U.S. the eclipse will occur during the wee hours of the morning on March 3rd. So photographing the eclipse will require losing some sleep, but the fully-eclipsed moon will be fairly low in the sky, making it easier to line up the eclipse with an interesting foreground.
(more…)