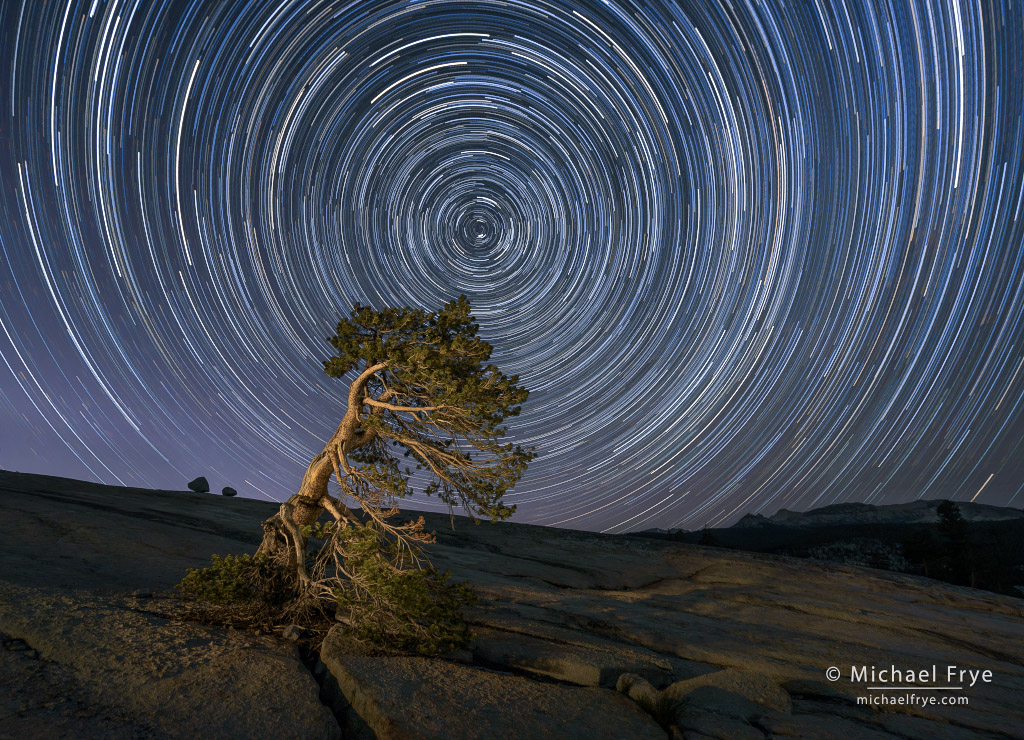
Star trails above a lodgepole pine, Yosemite NP, CA, USA
I think star-trail images have been somewhat neglected in recent years. Most night photographers today concentrate on capturing pinpoint stars and the Milky Way. The Milky Way is certainly beautiful, and modern digital sensors allow virtually anyone to capture the Milky Way without specialized equipment. Even phone cameras can do it. So all that is understandable.
With film you needed a star-tracker to capture the Milky Way, and it was virtually impossible to combine that Milky Way image with a stationary landscape in the foreground. But it was easy to capture star trails by just putting the camera on a tripod and leaving the shutter open for a long time. So star-trail photos became common long before Milky Way images filled up our Instagram feeds.
I’ve certainly taken advantage of modern digital sensors to capture photos of pinpoint stars, the Milky Way, auroras, zodiacal light, and other beautiful nighttime phenomena. But there’s still something about star trails that I find compelling. Showing stars streaking through the sky over the course of a couple of hours suggests the passage of time, and maybe timelessness, in a way that pinpoint stars images don’t. And that sense of timelessness can add to the photograph’s mood and sense of mystery.
During our Starry Skies Adventure workshop last month we had a chance to capture star-trail images over Mono Lake and the Yosemite high country. Star-trail photos require a considerable commitment in time and effort, but also perhaps a greater sense of accomplishment if you can pull them off successfully.
Star-trail photos also require a bit of imagination. You can’t see exactly how the photograph will look until you finish and put everything together. You have to visualize the path of the star trails, and compose accordingly, imagining how those streaks will line up with the foreground.
I usually prefer The Photographer’s Ephemeris 3D or Planit Pro for remote planning. I can be sitting and home and use virtual-reality modes of these apps to see where the sun, moon, stars, or Milky Way will line up with the landscape. But Augmented reality (AR) is even better – if I can be on site. AR uses my phone’s camera to show the scene in front of me, while superimposing the sun, moon, stars, or Milky Way over that scene, and showing where those celestial objects will line up with a foreground tree, rock, or other object.
Many apps have an AR mode, but I’m partial to the AR and Night AR features in PhotoPills. In PhotoPills these modes have a visual calibration feature that helps ensure accuracy. Also, the Night AR mode shows realistic views of the Milky Way and constellations, and also clearly delineates the arcing paths of star trails.
That last feature was essential for making the star-trail photo at the top of this post. Some of our group set up our cameras to capture star trails above this wind-sculpted tree, while others went to another nearby tree. But we needed to start our star-trail sequences before dark so we could get to another spot to photograph the Milky Way. So we couldn’t see any stars, including the North Star, when setting up our compositions. We were completely reliant on the PhotoPills Night AR mode to visualize where the North Star would line up in relation to our foreground trees. Fortunately it was highly accurate; the North Star appeared exactly where I expected it to in my photo.
Nowadays most photographers don’t just leave the shutter open for hours to capture a star-trail image. It usually works better make a series of shorter exposures, then blend those together in Photoshop or another app.
There are two main reasons for this. First, if you just leave the shutter open for a long time with a digital camera the sky will be too light – washed out. That didn’t happen with film because of the reciprocity effect (or reciprocity “failure”). But it’s a real issue with digital cameras. By blending a series of shorter exposures with the Lighten blending mode, light overrides dark. So a star streak from a given frame, because it’s light, will override the darker sky behind it and appear in the final image, but the background sky will never be brighter than it is in the single lightest frame of the sequence. That allows you to keep the background sky dark, yet still show lots of stars and trails.
Second, blending a series of exposures makes it easier to fix problems. The biggest problem in our light-polluted world is stray lights from passing cars, people with headlamps, and so on. With one long exposure the only way to remove those stray lights is through retouching. But if you make a series of exposures, as long as one frame doesn’t have any stray lights you can mask off the lights in the other frames – which is much easier.
(That applies to lights below the horizon. Stray lights above the horizon, like jet trails and satellites, are a different story. You can mask those off individually as well, but that’s pretty tedious. I find Content-Aware and Generative-Remove retouching modes to be quicker. And yes, I’ll be demonstrating those techniques in my upcoming Lightroom Webinar: Advanced Retouching.)
So we started our star-trail sequences before dark, using interval timers to run the cameras and make those exposures. I prefer four-minute exposures for star trails – long enough so that you’re not assembling a hundred images later, but short enough to give yourself a better chance of getting one frame without any stray lights.
With four-minute exposures, and dark skies (no moon or significant light pollution), I usually set my aperture to f/4 and ISO to 800, or any equivalent (like f/2.8 at ISO 400, or f/5.6 at ISO 1600). (In this case, since we were starting our sequences before dark, the first few frames were much too bright, but we just threw those out.)
We returned a couple of hours later and stopped our interval timers. (Many thanks to Claudia for guarding our cameras while we were away!) We then captured a few additional frames as we light-painted our respective trees.
And then we assembled our sequences in Photoshop. There are other apps that can assemble star-trail sequences, but I prefer Photoshop because of that ability to mask off stray lights from particular layers. To me that’s essential. The assembly process is too involved to spell out here, but the key step is using that Lighten blending mode to make light areas override dark areas, and make the whole sequence magically appear.
In the end, I was pleased with the way my star-trail image from that night turned out, and I think everyone else in the group was happy with their photos as well. It was a lot of work, but also very rewarding.
— Michael Frye
Related Posts: Chasing the Aurora; Aurora With Meteors; Planning for the Lunar Eclipse With TPE 3D; Comet Fever
Michael Frye is a professional photographer specializing in landscapes and nature. He lives near Yosemite National Park in California, but travels extensively to photograph natural landscapes in the American West and throughout the world.
Michael uses light, weather, and design to make photographs that capture the mood of the landscape, and convey the beauty, power, and mystery of nature. His work has received numerous awards, including the North American Nature Photography Association’s 2023 award for Fine Art in Nature Photography. Mich
ael’s photographs have appeared in publications around the world, and he’s the author and/or principal photographer of several books, including Digital Landscape Photography: In the Footsteps of Ansel Adams and the Great Masters, and The Photographer’s Guide to Yosemite.
Michael loves to share his knowledge of photography through articles, books, workshops, online courses, and his blog. He’s taught over 200 workshops focused on landscape photography, night photography, digital image processing, and printing.


I agree… about star trails. 🙂
A couple of decades ago when I did my first serious night photography the subject was “industrial landscapes” in the SF Bay Area. Back then we just assumed that exceptionally long exposures were the way to go, and that star trails were a natural component of the photographs.
(We were grateful for the fact that reciprocity failure wasn’t an issue with digital — it saved a lot of time! On the other hand, using dark frame exposures to diminish noise doubled the exposure time. There’s no free lunch!)
Aside from the photographic issues around the very long exposure star trails stuff, there’s another plus that I discovered early on. Because exposures are so long, I got to just… sit there in the dark and enjoy the experience of being in the quiet night landscape! One of my favorite backcountry memories is from a solo pack trip to the Thousand Island Lake area.I brought a bunch of batteries and did some night shots. It as very dark – no moon — so the exposures were very long. I spent most of the evening just sitting on a rock and soaking up the stillness and silence as I waited for those long exposures to complete.
Dan
Thanks for chiming in Dan. That part about just sitting in the dark and enjoying the experience is definitely a plus for long exposures at night. In workshops like this I often encourage people to bring two cameras and two tripods, in case they want to photograph pinpoint stars while also capturing a star-trail sequence. So no sitting around in the dark in that case. But sometimes the situation calls for just doing star trails, and waiting for the sequence to finish. We’ve done that in the dunes in Death Valley with some groups, and often people end up just laying down in the sand and dozing off. It is quite peaceful.
Another elegant way of capturing startrails is to use the “live composite” feature of an OMSYSTEM (ex Olympus) camera. Easy to set up and allows to see the progress of the composition while capturing the star trail. Definitly worth to try …
Yeah, that’s a nice feature. I hope, however, it gives you each frame separately later. That’s important for fixing problems later (like stray lights).