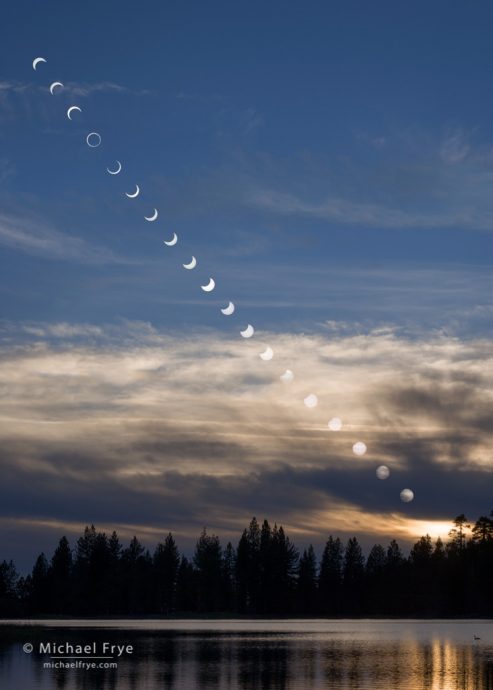
Sequence showing the annular solar eclipse, May 20th, 2012, from Manzanita Lake, Lassen Volcanic NP
The total solar eclipse in the United States is just over a week away (August 21st), and eclipse mania is sweeping the nation. There are many, many articles on the internet describing how to photograph the eclipse (this one by Todd Vorenkamp on the B&H website is the best I’ve found), but I’ll try to cover some topics that haven’t been discussed much elsewhere.
Let me say up front though that I’ve never seen or photographed a total solar eclipse, so there are some definite gaps in my knowledge. However, I did photograph an annular eclipse several years ago, which is, photographically, quite similar in many respects, so I’m drawing heavily on that experience.
But before we dive into the details of photographing the eclipse, I want to remind you that millions of people will be photographing this eclipse. I would bet that more photographs will be taken of this eclipse than of any other prior eclipse – maybe more than all other previous eclipses combined. I know you want to capture your own photos – so do I – but it’s unlikely that your images will be that different from everyone else’s. So try to enjoy the experience. This may be the only total solar eclipse I will ever see, so while I hope to get some good photos, my primary goal is just to experience this spectacular event. I don’t want to spend every precious second of totality fiddling with my camera gear.
Planning
“Seeing a partial eclipse bears the same relation to seeing a total eclipse as kissing a man does to marrying him, or as flying in an airplane does to falling out of an airplane. Although the one experience precedes the other, it in no way prepares you for it.”
— Annie Dillard
The total eclipse will last anywhere from one- to two-and-a-half minutes, depending on your location. That’s not much time, so planning is essential.
First, you’ll need to pick a location. Keep in mind that there is a big, big difference between seeing a total eclipse and a partial one. From everything I’ve heard, a total solar eclipse is the most spectacular celestial event you can see from this planet’s surface. A partial solar eclipse is not in the same league.
But every location along the path of totality will be absolutely overwhelmed with people trying to view the eclipse. Forget about getting a hotel or camping reservation at this point. Food and gas may become scarce. There will be traffic jams. It’s possible that cell towers may get overwhelmed, making internet access impossible. So plan accordingly.
Claudia and I have several locations picked out, but could make a long, last-minute drive to an unplanned location to find clear skies. So we’ll be as self-contained as possible, and will bring paper maps in case we don’t have access to the internet. However, if gas becomes scarce that may throw a big wrench in our plans. We’ll see!
You also need to decide what kind of photographs you want to make. If you plan to take closeup images of the partially- and fully-eclipsed sun with a telephoto lens then any place along the path of totality will work as long as the weather cooperates. But the closer to the center of the eclipse path you are, the longer the total eclipse will last.
If you want to incorporate the eclipsed sun into a broader landscape, things get more complicated. Unfortunately, this eclipse will occur in late morning or early afternoon (depending on the location). And since it’s summer, the sun will be high in the sky. The totally-eclipsed sun will be closest to the horizon in western Oregon, but even there it will be 39 degrees up. Further east the eclipsed sun will be even higher, reaching almost 64 degrees above the horizon in southern Illinois. The direction you’ll be facing to view the total eclipse will range from east-southeast in Oregon to southwest in South Carolina.
Because the sun will be so high, incorporating the fully-eclipsed sun into a broader landscape will be tough. You’ll need to use a wide-angle lens, which will make the sun small (although during the total eclipse you’ll actually be photographing the sun’s corona, which extends well beyond the sun itself, so that will make the eclipsed sun a little bigger part of the scene). It will help to find something tall to put into your foreground, or else be able to get the camera down low in front of a foreground object that lines up with the eclipsed sun.
For planning, you’ll need to look at some maps. You can find many maps of the eclipse path online, but I’ve found this one particularly useful, because you can click on any spot in the eclipse path and find the exact times for all the eclipse phases for that spot, along with the altitude and azimuth of the sun:
http://www.eclipse2017.org/xavier_redirect.htm
Click where it says “Xavier Jubier’s 2017 Total Eclipse Interactive Google Map.” Once the map launches, you can zoom and scroll (or do a search) to find your location. Then click on your location on the map, and a box will pop up showing all the eclipse times for that location. (Subtract four hours from the Universal Time or UT to get Eastern Daylight Time, five hours for Central Time, six hours for Mountain Time, and seven hours for Pacific Time.)
The PhotoPills app has also added a similar feature, allowing you to see the eclipse times for any spot along the eclipse path. But Xavier’s map shows the times down to the second, not just the minute, and seconds matter when the eclipse is so short.
Apps like PhotoPills and The Photographer’s Ephemeris can also help you figure out how the sun will line up with features of the landscape. But a new app, called The Photographer’s Ephemeris 3D, is even better for this. Like Google Earth, TPE 3D will allow you to virtually plant yourself at any spot and see what the landscape will look like from there. But in addition, TPE 3D will show you the location of the sun (or moon) in relation to the landforms. So once you figure out the timing for the eclipse at a particular spot, TPE 3D can show you the sun’s proximity to a mountain or other landscape feature. Pretty cool.
Of course there’s no substitute for on-the-ground scouting. The sun’s path (unlike the moon’s) doesn’t change greatly from day to day. So figure out what time of day the eclipse will occur at a particular spot. Then, if you can, visit that location a day or two in advance, at the same time of day, and you’ll see almost exactly where the sun will be during the eclipse.
Equipment
Solar Glasses
You’ll want solar glasses for viewing the partial eclipse. (You can take them off during the total eclipse.) A recent search showed that they were still available from Amazon, but I suspect stock is running low at many outlets.
Solar and Neutral-Density Filters
You only need a solar filter (or strong neutral-density filter) to photograph the sun when it’s partially eclipsed. During the total eclipse you don’t need any filter (and will want to take off your solar filter if you have one).
Unfortunately solar filters are hard to find at this late date, so I hope you already have yours.
Another alternative is a strong neutral-density filter. I used 12 stops of neutral-density for the annular eclipse in 2012, but 15 or 16 stops is probably better. (You can stack ND filters together, but watch out for vignetting if you’re using a wide-angle lens. And nomenclature for ND filters is weird: a 16X neutral-density filter is only a four-stop filter. A 16-stop filter is usually designated by the number 4.8 – that’s 0.3 x 16.)
I actually prefer neutral-density filters, because solar filters add an orange cast to images of the partially-eclipsed sun, while a neutral-density filter won’t. BUT, a neutral-density filter should be used with caution. It won’t protect your eyes from harmful solar radiation, so don’t look at the partially-eclipsed sun through an optical viewfinder with just a neutral-density filter.
Also, a neutral-density filter will not protect your sensor. If you’re using live view with a neutral-density filter (a good idea to avoid hurting your eyes), turn off live view between exposures so that the sun isn’t shining directly on the sensor for a long period. (Live view will also drain your battery.) If you’re using a mirrorless camera, check to see whether the shutter stays open when you’re not taking an exposure. With my Sony the shutter is open all the time, even with the camera off, so sunlight could be hitting the sensor continuously for a long time if I’m not careful, which could damage the sensor. I plan on putting the lens cap on when not taking exposures.
Having the sun shine on your sensor for relatively short periods of time shouldn’t cause any damage. I’ve included the sun in many of my photographs, with the sensor on my mirrorless camera exposed to the sun for long stretches – at least half an hour on some occasions. And I’ve never had a problem. While it’s prudent to be cautious about such things, I don’t think you need to be overly paranoid either.
Cameras and Tripods
You don’t need any special camera to photograph the eclipse, but you might consider bringing two or even three cameras, plus tripods, so you can capture multiple views of the eclipse – for example, a closeup view with a long lens, plus a wide-angle view that incorporates some of the landscape, or other people watching the eclipse. And it’s always a good idea to have a backup camera body in case your main camera malfunctions.
But using two cameras will make things more complicated, and you might spend all of totality fiddling with your cameras rather than actually watching and experiencing the eclipse. Your call.
Lenses
For closeup images of the sun you’ll need a long lens. The sun itself is actually pretty small, so filling up a good part of the frame with the partially-eclipsed sun requires at least an 800mm lens on a full-frame sensor. But during the total eclipse you’ll see the sun’s corona, which extends far beyond the disc of the sun itself, so a shorter lens can work – especially if you plan to create a composite photograph showing the stages of the partial eclipse along with the total eclipse. In that case each sun in the final image will be fairly small anyway. A 200mm lens might work for such a composite, but 400mm would be better.
With a long lens on an SLR, be sure to use mirror lockup to minimize vibrations.
If you’re trying to incorporate the eclipsed sun into a landscape you’ll need a wide-angle lens, and you’ll probably want to put the camera in a vertical orientation. I can’t tell you exactly what focal length you’ll need, because that depends on your location and foreground. In western Oregon you might be able to use a 24mm lens (on a full-frame sensor). In Idaho or Wyoming you probably need a 20mm or 16mm lens. Further east the sun will be so high that you might need a lens 14mm or wider to incorporate the sun into a landscape. The best way to determine exactly what focal length you’ll need is to scout the location a day or two in advance (at the right time of day) with camera and lenses in hand.
Camera Settings for the Partially-Eclipsed Sun
A partially-eclipsed sun is almost as bright as a normal sun. In other words, it’s really, really bright. Even with a solar filter or strong neutral-density filter you’ll be using fast shutter speeds, a low ISO, and, probably, a middle-to-small aperture.
For the annular eclipse in 2012 I used 12 stops of neutral density filters (an 8-stop filter plus a 4-stop filter), and kept the aperture at f/22, with the ISO at 100. Shutter speeds ranged from 1/4000th of a second when the sun was almost whole to 1/500th of a second for the crescent sun and the “ring” of the annular eclipse.
With a 16-stop neutral-density filter you could increase the exposure by four stops. I’d suggest a middle aperture like f/11, with shutter speeds near 1/1000th sec. at the beginning of the partial eclipse, then decreasing to around 1/125th sec. when the sun becomes a crescent (all this at ISO 100).
But I bracketed like crazy, and I recommend you do the same. Be sure to check your histograms and, especially, the blinkies (or overexposure warning). To avoid overexposure, make sure no part of the sun is blinking at you.
Oh, and you’re going to have to use manual exposure mode for all of this. Any kind of automatic exposure mode is likely to be way off.
Camera Settings for the Fully-Eclipsed Sun
When the sun becomes fully eclipsed you’ll want to take off your solar filter or ND filter. Beyond that, I can’t help much with settings, as I’ve never photographed this event. But the previously-mentioned article by Todd Vorenkamp includes a chart for total-eclipse exposures which you can use as a starting point.
There’s a great difference in brightness between the inner and outer corona. If you’re using a long lens you’ll want to bracket widely to capture detail in the entire corona, giving yourself the option of blending these exposures together later (or at least allow you to pick the best overall exposure later).
With a long lens you need to keep shutter speeds short so that the sun doesn’t move significantly during the exposure. That means 1/2 second or less with a 400mm or 500mm lens. You could probably get away with 1 second using a 200mm lens. You may need to open up the aperture and/or push up the ISO to get a fast enough shutter speed. (Don’t forget to reset the shutter speed, aperture, and ISO when the sun starts to emerge from the eclipse. And put your solar or ND filter back on.)
With a wide-angle lens the corona will be a small part of the picture, so it may not be as critical to capture detail throughout the corona. But the landscape below will be much darker than the corona, and again bracketing will be necessary to capture at least some detail in the corona as well as in the landscape (or, again, to allow you to pick the best overall exposure later). Light levels on the ground during the total eclipse will be similar to dusk, with even a few stars visible.
With a wide-angle lens the shutter speeds can be longer before the sun’s corona starts to blur. With a 24mm lens, for example, you could leave the shutter open for up to 8 seconds. Again, you may need to open up the aperture or raise the ISO to get a fast enough shutter speed. (Again, don’t forget to reset the shutter speed, aperture, and ISO when the sun starts to emerge from the eclipse. And put your solar or ND filter back on.)
Capturing a Sequence
A popular way to photograph an eclipse is to capture a sequence of the sun going from full, to partially eclipsed, to fully eclipsed, and, optionally, back to full again.
With a long lens you’ll have to keep moving the camera to track the sun as it moves through the sky. I recommend making exposures every ten minutes to capture the full progression of the eclipse (and again, bracketing widely). If you’re using a zoom lens, don’t touch that zoom ring after you start. Keep the focal length consistent, otherwise you’ll create headaches for yourself when you try to create a composite image later.
If you’re using a wide-angle lens, trying to incorporate a landscape into your eclipse sequence, then you’ll want to keep the camera locked on a tripod the whole time and show the progression of the sun as it moves through the sky above the scene. This requires, however, that you compose your photograph well before the total eclipse occurs, so you’ll need to anticipate where the sun will move. The best way to do this, again, is to visit your chosen location during the days preceding the eclipse, at the time of day the eclipse will occur. If that’s not possible you can use apps like PhotoPills, The Photographer’s Ephemeris, or The Photographer’s Ephemeris 3D to try and anticipate the sun’s movements.
For a wide-angle sequence above a landscape I again recommend ten-minute intervals between exposures. This interval has worked well for me with lunar eclipses and the annular eclipse in 2012.
Regardless of what lens you’re using, getting an even progression throughout your sequence requires timing the start of your sequence precisely. First figure out when the maximum eclipse will occur at your spot. Then time the start of your sequence so that one of the ten-minute intervals will occur during the maximum eclipse. For instance, in Corvallis, Oregon the maximum eclipse occurs at 10:18 a.m. To make one of your ten-minute intervals fall at 10:18 a.m. you’d need to start your sequence at a time that ends in either :08, :18, :28, :38, :48, or :58. The partial eclipse in Corvallis starts at 9:04 a.m., so in order to capture the entire sequence you’d need to start before that — at the very latest, 8:58 a.m. (I’d recommend starting earlier so you’ll have time to figure out the exposures and work out any kinks.)
You can use an interval timer to trigger these exposures for you every ten minutes. But make sure the timer can trigger an auto-bracketing sequence, and remember that you’ll still need to adjust your exposure as the sun gets reduced to a crescent, and then take off your filter(s) and adjust the exposure again when the sun becomes fully eclipsed.
I won’t be using an interval timer, however, because there’s too much risk of something going wrong with those persnickety devices. I’ll do it all by hand, using my phone’s timer to prompt me every ten minutes.
Assembling a Sequence
A complete tutorial on how to assemble an eclipse sequence would be much too long to include in this post, but I’ll sketch out some basic outlines, and those of you with some Photoshop experience might find this information helpful:
First, before assembling a sequence made with either a wide-angle or telephoto lens, make basic adjustments to your Raw images, being sure to synchronize most of the settings between the images of the partial eclipse (the settings for the fully-eclipsed images might be different). You’ll want the white balance to be the same for all the partial-eclipse images, but you may want to adjust the exposure or brightness for those frames independently to ensure that the sun’s brightness looks consistent throughout your sequence.
To assemble a sequence made with a telephoto lens, create a Photoshop document with a black background. Then add all the sun images to that document as separate layers, change the blending mode for all those sun-image layers to Lighten, and use the Move tool to arrange your sequence on that canvas however you see fit.
To assemble a sequence made with a wide-angle lens (on a tripod) you have to make sure that all the layers align precisely in Photoshop. Probably the easiest way to do this is to start in Lightroom, select all the images you want to use in your sequence, and choose Photo > Edit In > Open as Layers in Photoshop. This will create a Photoshop document with all the images stacked as layers, and aligned correctly (assuming your tripod didn’t move during the sequence).
Next, choose which image you want to use as the base layer, and drag that layer to the bottom of the stack in the Layers panel. I would make the base layer one of the images you captured during the total eclipse, and pick a frame from your bracketed sequence that’s light enough to have decent detail in the foreground. Next, change the blending mode for all the other layers (all but the bottom layer) to Lighten.
With a wide-angle sequence, showing detail in both the corona and the foreground will probably require some kind of exposure blending. One way (there are many) to do this is to first blend the exposures for your total-eclipse bracketed sequence together using an HDR program. (I’d use Lightroom’s HDR Merge for this.) Then use that blended image as the base layer in Photoshop.
Good luck to you all. And remember to experience the eclipse, not just photograph it!
— Michael Frye
Related Posts: Winging It Through the Eclipse; Lunar Eclipse Over the Trona Pinnacles
Michael Frye is a professional photographer specializing in landscapes and nature. He is the author or principal photographer of The Photographer’s Guide to Yosemite, Yosemite Meditations, Yosemite Meditations for Women, Yosemite Meditations for Adventurers, and Digital Landscape Photography: In the Footsteps of Ansel Adams and the Great Masters. He has also written three eBooks: Light & Land: Landscapes in the Digital Darkroom, Exposure for Outdoor Photography, and Landscapes in Lightroom: The Essential Step-by-Step Guide. Michael has written numerous magazine articles on the art and technique of photography, and his images have been published in over thirty countries around the world. Michael has lived either in or near Yosemite National Park since 1983, currently residing just outside the park in Mariposa, California.


Hi Michael,
Once again, thanks for sharing your extensive knowledge!
Cheers,
Alyn
You’re welcome Alyn!
I’ve been inundated with “how to” articles. All saying pretty much the same thing. A highlight that stands out in your article that is new and beneficial is the timing sequence starting peri-totality and creating 10 min. intervals from this point.
When I created my timeline it was off.
So thank you Michael.
Glad you found that tip helpful!
Thank you for practical information based on real experience. After skipping over literally dozens of articles stating that trying to take a shot of the eclipse without a solar filter will burn my sensor, I was about to give up on finding an article that actually makes sense.
I will be a couple hundred miles off the total path, but may get a decent partial, although I’d say it’s 50-50 whether we have cloud cover. Also agree that there will be so many images of the eclipse, quite a few better than what I can do, that I’m not going to invest a lot of energy into getting it, but will use your suggestions to hopefully grab a decent shot.
Thanks again.
You’re welcome Darryl, and I hope you have clear skies for the partial eclipse.
Thanks for the great article – WB set to daylight best?
You’re welcome Craig. White balance doesn’t matter if you’re using Raw, as you can adjust it later. But if you want to pick a white balance in the field, daylight is probably a good choice.
Thanks! Yes just trying to get it right “in camera” One other quick question – I am shooting partial eclipse up to 80% coverage. When calibrating in advance – if I set say f11 and nail a good shutter speed – can I just bracket say 5 exp to assure I nail it? Or should I bracket shutter speed and avoid anything slower than 1/2 sec. Shooting 700mm.
Craig
You’re welcome Craig. I’m not sure I understand the distinction between “bracket say 5 exp to assure I nail it” and “bracket shutter speed and avoid anything slower than 1/2 sec.” If you’re asking about shutter speeds while bracketing, then you’d want to avoid any shutter speed in your bracketed sequence being lower than 1/2 second. But you shouldn’t have a problem with the shutter speeds being too slow since you won’t be photographing the total eclipse.
Thanks again for a super article. Appreciate your time.
Thank you for a great article! This had some information that I hadn’t found elsewhere, and as usual it’s well organized and understandable.
We bought eclipse filters for the cameras months ago. Alas, we moved two weeks ago, and in the move lost them. We know where all the camera gear is, so I’m at a loss to understand why the eclipse filters are gone.
Anyhow–I have a polarizer. If I remember correctly, that will hold back two stops of light. If I couple it with an 8 or 10 stop ND, will it work to decrease the light by those two stops? In a pinch, do you think it will work with my variable stop (which goes to 8 stops) ND? Is there anything I’m missing?
Thank you in advance
Thanks Charlene! Yes, a polarizer will work as a 2-stop ND filter. However, I don’t think 8 stops plus 2 stops is enough. I used 12 stops for the annular eclipse, at 1/8000 sec., f/22, 50 ISO, and that was barely enough neutral density. You’ll need more than 10 stops unless you can use a faster shutter speed, smaller aperture, or lower ISO (all unlikely). It may not be too late to order a 6- or 8-stop ND to add to your 8-stop variable.
Thanks for the great info Michael. Do you keep your focus on infinity for the whole sequence?
You’re welcome Pam. Infinity is hard to find with modern lenses. If you’re using a telephoto lens then just autofocus on the sun. If you’re using a wide-angle lens then you’ll have to find the hyperfocal distance (and possibly use a small aperture) to get both the foreground and sun in focus.
Fantastic article, Michael–lots of great and unique info here. Sonya and I leave for Idaho today, but since my original eclipse plan was to view only (and I too have never photographed a total eclipse), I’m really playing catch-up on the photography research. We viewed the annular eclipse in 2012, but I didn’t photograph it, so thank you for sharing your experience with that one. And I so agree with your advice to take the time to enjoy this once in a lifetime moment–it took me many years to understand how much my camera has detracted from these experiences, and to find balance when photographing them. I’ll take a great memory over a great photo any day. (Given the potential for limited or nonexistent cellular service, it might be a good idea to pre-download Google, Photo Pills, and TPE maps.)
Thanks Gary! And good advice about downloading maps. Good luck to you!
I don’t understand how it is possible to photograph the eclipse with any kind of landscape context. When practicing with my solar filter and photographing the sun, the background is black. Is the example you provided a Composite? What am I missing?
Kristine, yes, the photograph here is a composite; click the links to my original post about this photograph to see a detailed description. But remember, you only need the solar filter for the partial eclipse. During the total eclipse you take the filter off and bracket like crazy. Then you can blend those bracketed frames together with HDR software to get detail in both the sun’s corona and the landscape.
Michael, as a scientist, photographer, and former astronomer, I have to say that I found this post to be horribly irresponsible. You are correct to point out that ND filters do not block all wavelengths of solar radiation, and I’m very happy that you didn’t ruin your eyes or your camera when you used them, but the amount to which you downplay the risks is bordering on negligent.
Scientists developed solar filters for a reason. We tell people not to look at the sun for a reason. It’s dangerous! Neither sensors nor retinas have pain receptors, so there is no way to tell if you are damaging either until it’s too late. Are you really comfortable with encouraging people to risk their gear, and potentially their eyesight, just to avoid dealing with a little yellow tint in post?
Use a proper solar filter. Please.
*former astronomy student. I didn’t mean to overstate my credentials, I was kind of impassioned when I was typing….
As a photographer who has used many different cameras and lenses to photograph directly into the sun on a regular basis for many years with zero consequences, please tell me why an eclipsed sun is more dangerous to my sensor than the unobstructed sun I photographed as recently as Wednesday morning.
When you shoot into the sun, chances are that your lens was stopped pretty far down or you were using a very short exposure. Probably both. Otherwise you risk overexposing your scene. And even then, if the sun was in the frame, I’d bet that the disc of the sun was totally overexposed and had no detail (other than optical effects from your camera). And you’re right, you don’t need any kind of special protection in that case, otherwise we’d all be blind. I’ve shot in the direction of the sun myself on many occasions as well.
But shooting a picture in the direction of the sun is not the same of shooting a picture *of* the sun.
If you want to capture any details of the sun, you need to not overexpose the entire disc, which means drastically reducing the amount of light getting through to your sensor and increasing the exposure time to capture the dim areas. This is where you need to start looking at the entire EM spectrum, not just visible light, because IR and UV radiation can damage glass, sensors, and retinas with these longer exposures if not properly blocked.
That’s what Michael was doing when he described using an ND16 filter, stopping down to f/11, and varying his exposure time. Except for the whole “blocking out the harmful IR and UV radiation” part. Is it possible to do this with ND filters and not harm anything? Obviously. But the risk is there, and sensor/retina damage is permanent.
Ben, I appreciate your thoughts and perspective on all this. I did tell people to not look at the sun through an optical viewfinder with only an ND filter, and to be cautious about leaving the sensor exposed to sunlight for too long. You’re right, shooting in the direction of the sun is not the same as shooting a picture of the sun. When shooting in the direction of the sun the exposure times are longer, because you’re trying to get detail in the landscape rather than the sun itself. You’re also not using a neutral-density filter. So that means the sensor is exposed to much more light than when you’re photographing the sun itself. So, I’m sorry but, like Gary, I fail to see a problem with photographing the partially-eclipsed sun using ND filters. It just doesn’t make sense that this would cause damage to a sensor when photographing the sun in every other situation, with far more light reaching the sensor, doesn’t cause damage.
Hi Michael: upon the advice of a photographer who is a veteran of a dozen eclipses, I chose to leave the camera aside and focus on Just seeing. Everything: the eerie light, the cold wind, the 360-degree sunset, the moment the corona exploded forth……
But as I sat there waiting for the eclipse to bloom, i did realize how much I was looking forward to seeing what you did with that amazing display!
Looking forward to your next post.
Thanks Adair, and I’m glad you got to experience the eclipse! Wasn’t it amazing?