
The Zone System Scale
Here’s how to test your camera’s actual dynamic range. Start by photographing a textured wall, like I did to create the swatches for the eleven zones shown here and in the Zone System article. Use a telephoto lens so you can fill the frame with a relatively small part of the wall. The color and tone of the wall don’t matter, as long as it’s not a highly-saturated color, like a bright blue or red; just make sure the area you photograph is all in the same light – all the shade or all in the sun. Use a tripod to make sure that the framing is consistent.
Make sure your camera is set to capture Raw images. Use manual exposure mode, the camera’s native ISO (usually 100), and set the camera to it’s Standard Picture Style or Mode. Pick a middle aperture, like f/11. Start by testing shadow detail: spot meter the brightest part of the wall (if there’s any variation) and place this on Zone 3 by using a shutter speed two stops faster than the meter indicates, or simply turning the shutter speed dial until your camera’s exposure scale indicates -2.0.
Make your first exposure, then use your shutter speed dial to make an exposure ⅓ of a stop darker (or ½ a stop if you have your camera set to use ½ stop increments), then ⅓ stop darker again, and so on, all the way until you get to Zone 0 – five stops under the meter reading.
Then test highlights: make a Zone 7 exposure at +2.0, or two stops lighter than the meter indicates, then go ⅓ (or ½) stop lighter, ⅓ lighter again, and so on until you get to Zone 10 – five stops lighter than your meter indicates.
Then take those images into your favorite Raw-processing software, but don’t erase the memory card (you’ll want to compare the images on the back of the camera to the images in your Raw-processing software). Then see what you can get out of the highlights and shadows. This part gets a bit tricky, because there are so many programs available, and they all behave differently. There’s also a lot going on under the hood: in every Raw processor, contrast is added to the files by default. Also, in Lightroom 4 and Adobe Camera Raw 7, overexposed highlights are recovered automatically (if possible), and the black point is adjusted automatically to improve shadow detail (if necessary).
To evaluate your camera’s true dynamic range, start by eliminating the extra contrast that the program adds by default. I can’t speak intelligently here about the settings in Aperture, Capture NX, or Capture One, but in Lightroom 3 (or earlier) and Adobe Camera Raw 6 (or earlier), set the Contrast to 0, and the Point Curve to Linear. In Lightroom 4 or Adobe Camera Raw 7, set Contrast to -33. (There’s also extra contrast baked into the “Linear” Point Curve in Lightroom 4 and ACR 7, but that’s too complex to get into here.)
Then, for any images that look washed out (this could be at Zone 7 or higher), use your software’s highlight-recovery tool and try to bring back highlight detail, and note at what point this becomes impossible – Zone 8? 8 ½? 9? (Again, in Lightroom 4 and up or ACR 7 and up, highlight recovery is automatic, but you can use the Highlights or Exposure sliders to darken the frames and get a better look at how much detail there really is.) On the other end of the scale, try lightening the frames that are Zone 2 and darker, and see whether you can bring out shadow detail. (In Lightroom and Camera Raw the Exposure slider works best for this, though using the Blacks slider can also help sometimes.) Be sure to zoom in and check for noise.
Here are three test frames I made of a textured wall. The middle photograph was exposed at Zone 5 (that is, at the camera’s meter reading of 1/180th sec. at f/11), and is shown unprocessed, straight out of the camera at Adobe’s default settings. It looks like it should: a Zone 5 middle tone. The image on the left was was exposed at Zone 1 – that is, four stops below the camera’s meter reading; then in Lightroom I pushed the Exposure slider to +4.00 to bring it up to a Zone 5 value. The right-hand photograph was exposed at Zone 9 (four stops above the camera’s meter reading), then darkened to a Zone 5 value in Lightroom with the Exposure slider.
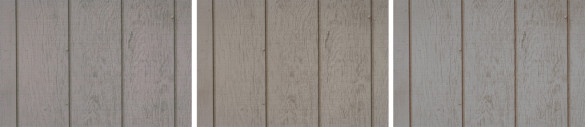
The middle frame was exposed at Zone 5 and is shown straight out of the camera. The left frame was exposed at Zone 1 and lightened four stops using the Exposure slider in Lightroom. The right frame was exposed at Zone 9 and darkened four stops, also using the Exposure slider in Lightroom.
The right and left frames have good detail and texture, despite being underexposed (left) or overexposed (right) by four stops. They do show some color shifting, but remember that you would rarely darken highlights or lighten shadows this much; at most you would might lighten a shadow to Zone 3, or darken a highlight to Zone 7. In either case the color shift would be less noticeable. A zoomed-in look at the left frame does show considerable noise. A close look at the right-hand image reveals that the very brightest areas within the frame are “hot,” but the overall impression is one of texture and detail.
After seeing how much detail you can bring out of your Raw files in seemingly black shadows and washed-out highlights, compare what you see in your Raw-processing software to the same images on the back of your camera. For example, at what point do you see clipping (blinkies, or a spike at the right edge of the histogram) on the camera? Zone 7 ½? Zone 8? How much further beyond that can you recover highlight detail in software? At what point does your histogram show shadow clipping, and how far below that can you bring out useful shadow detail in software?
If you’re really anal about this stuff (I mean, really committed to gathering precise information!), do the same test at higher ISOs. A camera’s dynamic range decreases as the ISO goes up, plus, of course, shadow noise gets worse.
Now, armed with this knowledge of your camera’s true, usable dynamic range, you have a framework for understanding image contrast, and can make informed decisions about exposure in the field. For example, if you know that you can recover highlight detail at Zone 9, when photographing a high-contrast scene you can spot-meter the brightest highlight and place it at Zone 9 (+4.0). By pushing the exposure as light as possible, you’ll get as much noise-free shadow detail as possible, and in most cases be able to work with one frame, rather than using HDR or other exposure-blending methods.
There is, however, a caveat: recovered highlights don’t have as much information as regular highlights that fall within the camera’s normal dynamic range. In order to recover highlight detail, the software may take information from only one or two color channels, rather than all three, and use that incomplete information to reconstruct what should be in the highlights. That sometimes creates problems, especially with colored highlights. I would never push an orange or pink sunset-colored cloud to Zone 9. I keep colored highlights at Zone 8 or even Zone 7. In general, be conservative about pushing highlights too far until you’ve tested your camera in a variety of actual field situations.
Okay, that’s it – have fun testing your camera!


