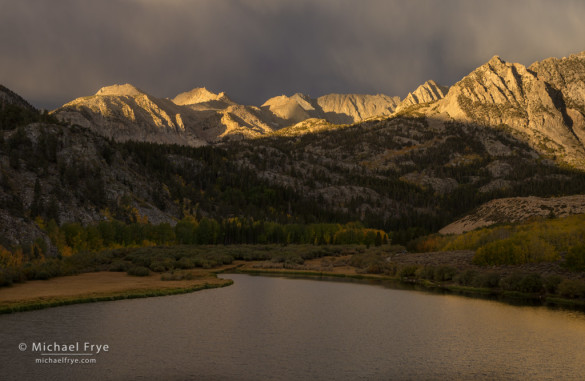
First light on peaks above North Lake, Bishop Creek Canyon, Inyo NF, CA, USA
In my recent post about high-resolution cameras, I stressed the importance of sharp lenses to get the most out of these 36+ megapixel sensors. But lens sharpness is an issue with any camera – at least when you start making larger prints. Even with a 16- or 20-megapixel sensor, lenses make a significant difference in large prints (16×20 inches and up). This is especially true in the corners; most professional-quality lenses are sharp enough in the center (at least with middle apertures like f/8 or f/11) for even a 36-megapixel camera. It’s the corners and edges that separate the decent lenses from the great ones. Those great ones are hard to find, and tend to be expensive.
Wouldn’t it be nice if you could fix imperfect lenses with software? Well yes, of course. But my experience with such fixes hasn’t been good. I’ve seen some great before-and-after examples online showing a blurry photo fixed with software, but when I’ve tried those programs myself I’ve invariably been disappointed. These cures tend to be just more-sophisticated sharpening methods, which may help a little, but if you apply more than a small amount things get really crunchy, or you see other weird artifacts. I can usually do just as well by selectively adding more sharpening to the corners in Lightroom or Adobe Camera Raw.
Piccure+
A few months ago I stumbled across another program that promised to help with fuzzy images, called Piccure+. I decided to download the free trial, and found that it worked surprisingly well. It’s not a magic bullet; there’s really no substitute for sharp lenses. But it can help with those soft corners, or overall softness caused by diffraction. Like any of these tools, it will definitely make the image look too crunchy if you overdo it, but I’ve been able to push the sharpening effect further in Piccure+ than with other software I’ve used, with good results and minimal artifacts.
Here are a couple of examples, both made with my 36-megapixel Sony A7r. The first is a photograph from North Lake in the eastern Sierra, made with my Canon 17-40mm lens at 40mm and f/11. You can see the full image at the top of this post, but here are two 1:1 (100%) views. The first version shows the upper-right corner before using Piccure+, the second shows the same area after applying Piccure+ (click on the images to view at actual size, or 1:1):

Upper-right corner, before using Piccure+
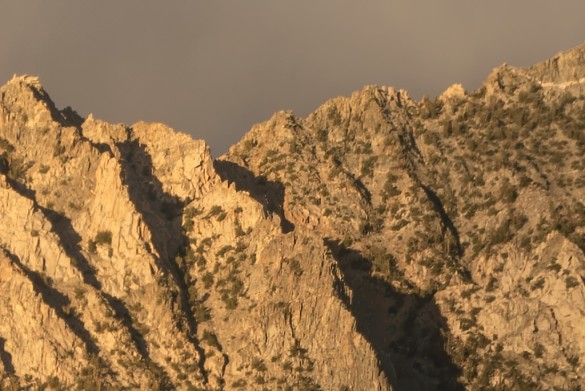
Upper-right corner, after using Piccure+
It’s still not perfectly sharp, and there’s some minor crunchiness, but it’s definitely better. In a 24-inch wide print the corners look as sharp as the center. In a 40-inch wide print you can see a little softness in the corners, but only a pixel-peeper would notice.
I used this next photograph of a dogwood as an example of corner softness in my article about high-resolution cameras. This was also made with my Canon 17-40mm lens at 40mm and f/11 (with this copy of the lens that’s the worst focal length, though f/11 is its sharpest aperture in the corners). Here’s the whole image, and then the upper-left corner before and after using Piccure+:
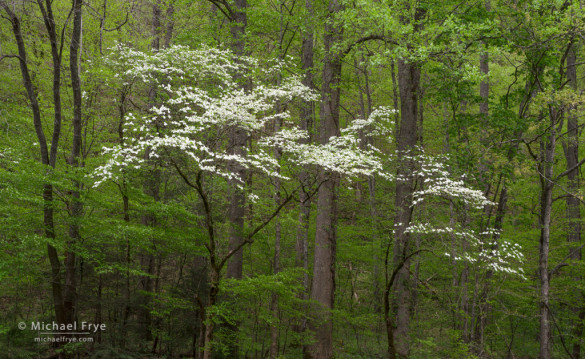
Dogwoods, Great Smoky Mountains NP, NC, USA

Upper-left corner, before using Piccure+
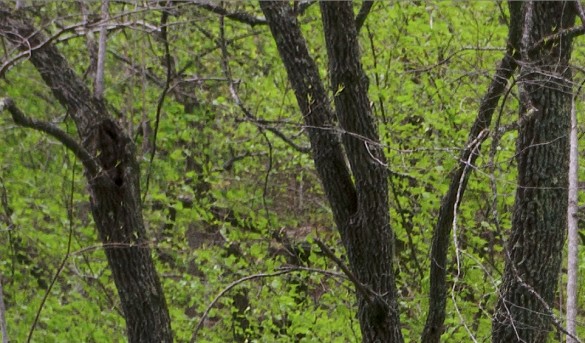
Upper-left corner, after using Piccure+
Again, Piccure+ made a definite improvement. The corners of this one don’t hold up quite as well in prints as the previous example, because they’re softer to begin with. In a 24-inch wide print you can see some corner softness, though not enough for most people to notice. In a 40-inch wide print the soft corners are a bit more obvious, but the result is still quite acceptable – at least to me.
Caveats
Compared with other software fixes I’ve tried, Piccure+ does a great job of correcting for soft lenses. But it’s not perfect, and there are limits to what it can do.
First, It’s slow – really slow. I don’t know how Piccure+ works, but I’m sure all the calculation involved takes a long time. The most recent version is faster, though on my older Mac laptop I still expect to do something else for at least five minutes while it renders. But this isn’t a tool that you’ll need or want to use on every image. I use it selectively, only when I’m ready to make a print that’s at least 16×20 inches – and only if the image needs it because of soft corners or some other issue.
Second, Piccure+ exacerbates noise. It works well with low-ISO images, but the sharpening process that’s designed to accentuate a photograph’s fine details will accentuate noise. There’s a Denoise control in Piccure+, and it helps – I’ll talk more about how to use the software below. But in general Piccure+ works better with low-ISO images.
Third, don’t overdo it! It’s easy to go too far and create a crunchy, over-sharpened look. The right setting for sharpening soft corners will make the center of the image way too crunchy, so I use a layer mask in Photoshop to apply the effect only to the edges and corners. I’ll talk more about that below also.
Fourth, Piccure+ can help with correcting camera shake, but in my experience it works better for correcting soft lenses, or slightly out of focus images, than with blurring caused by camera movement. It can help, and it’s worth a try, but it probably won’t help as much.
Then there’s the $109 price. That’s pretty typical for many software plugins these days, so it’s not out of line, but you’ll have to weigh whether it’s worthwhile for you. For me it is, because I care about making prints that are sharp from corner to corner, and after I’ve spent the time and made the effort to capture an image worth printing, I hate to see it ruined by an imperfect lens.
Using Piccure+
The instructions that come with Piccure+ say that for best results you should apply it to the Raw image. But doing this bypasses the powerful Raw-processing engines in Lightroom, Adobe Camera Raw, Capture One, or whatever you normally use. I’ve had good results using Piccure+ as one of the last steps (as part of my final print sharpening) rather than at the beginning. Doing that allows me to keep a fluid, flexible, non-destructive workflow that takes full advantage of Lightroom’s powerful tools.
You can use Piccure+ as a standalone app, or as a plugin for Lightroom, Photoshop, Capture One, or DxO Optics. If you have Photoshop, I recommend that you use it as a Photoshop plugin so that you can apply the effect selectively with a layer mask. If I’ve processed my Raw file entirely in Lightroom (which I do for 90% of my images these days), I’ll open the completed Raw file in Photoshop as a Smart Object (from Lightroom, go to Photo > Edit In > Open As Smart Object in Photoshop). Once open in Photoshop, I resize the image to my final print size and resolution, then go to Filter > piccure+, Run piccure+. This runs Piccure+ as a Smart Filter, so I can edit its settings later if necessary. It also automatically creates a layer mask for the filter, so if I want to only sharpen edges and corners, I’ll paint with black over the middle of the layer mask so that the filter only affects the edges. (You could also apply Piccure+ selectively to a foreground or background that’s slightly out of focus.) Here’s what the layer mask looks like for the dogwood photograph shown above:

Layer mask for applying Piccure+ to the dogwood image
You could run Piccure+ directly from Lightroom to correct overall softness caused by diffraction, or a slight focusing error. To do this, set up Piccure+ as an external editor by opening your Lightroom preferences and clicking on the External Editing tab. (When you do so, make sure you choose ProPhoto RGB for the color space, otherwise you’ll see a color shift when taking the image from Lightroom to Piccure+.)
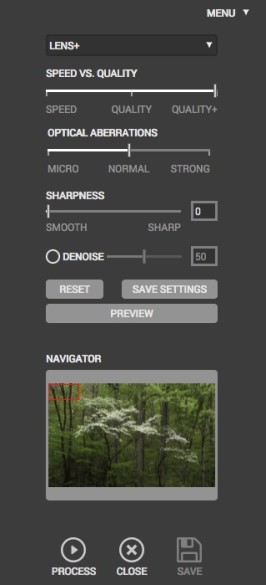
The Piccure+ dialog
Regardless of how you get there, once you’re in Piccure+ the choices are pretty simple. At the top you can choose Lens+ for lens blur, or Motion+ for motion blur. Either way, under “Speed vs. Quality” I recommend using the Quality+ setting for best results. I leave Sharpness at 0, since I don’t want additional sharpening in addition to what I’ve already applied in Lightroom. For low-ISO images, leave Denoise unchecked. For high-ISO images, checking Denoise will help, but you’ll have to experiment with the setting. In my (limited) experience, anything above 50 will make the image too soft.
That leaves one more setting. In the Lens+ mode, under Optical Aberrations, you can choose Micro, Normal, or Strong. I’ve had success with all three settings depending on the image. Fuzzy corners probably need the Normal or Strong setting; I used Strong for the North Lake image above, and Normal for the dogwood photo, where the Strong setting looked a little too crunchy. For slight overall softness you might want to try Micro first.
If you’re in the Motion+ mode, the Optical Aberrations setting changes to Camera Shake Intensity. Under that you can choose five settings from Micro to Large. Just take your best guess to begin with.
Once you’ve chosen your settings, click Preview, wait for it to render, then zoom in to 1:1 to check the results. If necessary, try different settings and click Preview again. Once you’re happy with the settings, click Save in the lower-right corner.
Conclusion
As I said, there’s no substitute for sharp lenses and good technique, and Piccure+ isn’t a magic cure. But it works remarkably well in correcting lens softness – better than any other software fix I’ve tried.
In the interest of full disclosure, I’ve signed up to be an affiliate for Piccure+ because I like the product, and use it regularly as part of my printing workflow. So I’ll get a small commission if you click one of the links on this page and end up buying the product. As always, I really appreciate the support that you and all of my readers have given me over the years!
— Michael Frye
Related Posts: Working With High-Resolution Cameras; Should Your Next Camera Be a Sony?
Did you like this article? Click here to subscribe to this blog and get every new post delivered right to your inbox!
Michael Frye is a professional photographer specializing in landscapes and nature. He is the author or principal photographer of The Photographer’s Guide to Yosemite, Yosemite Meditations, Yosemite Meditations for Women, Yosemite Meditations for Adventurers, and Digital Landscape Photography: In the Footsteps of Ansel Adams and the Great Masters. He has also written three eBooks: Light & Land: Landscapes in the Digital Darkroom, Exposure for Outdoor Photography, and Landscapes in Lightroom 5: The Essential Step-by-Step Guide. Michael has written numerous magazine articles on the art and technique of photography, and his images have been published in over thirty countries around the world. Michael has lived either in or near Yosemite National Park since 1983, currently residing just outside the park in Mariposa, California.


Absolutely love the dogwoods Michael. Was that in Yosemite somewhere?
Thank you John – that was in Great Smokey Mountain NP last year.
How does it compare to the Shake Reduction filter in Photoshop?
Murray, I use Piccure+ mainly to correct lens imperfections, which the Shake Reduction filter in Photoshop doesn’t help with. Piccure+ does have a mode for correcting camera shake, but I don’t have many photos with camera-shake issues, so it’s hard for me to really compare the two. I did try both Piccure+ and the Photoshop Shake Reduction filter on one image where I accidentally left image stabilization on with a tripod, and ended up with a blurry image. Both programs helped a little bit, but I wasn’t really crazy about the results either way. In that one comparison, I’d say I liked the results of the Photoshop Shake Reduction Filter a bit better, but that’s just one example, and as I said, correcting shake is not the main reason I use Piccure+. If you have some images with camera-shake problems, you could always download the free trial of Piccure+ and see if it helps.
I’ve had some success using the Shake Reduction filter to correct missed focus, even though camera shake may not be the cause. I haven’t particularly noticed edge definition problems. I’m not sure whether that’s because I’m not paying attention or because I usually use expensive primes and many of my cameras are not particularly high resolution. I’ll have to pay attention next time I process D800 images.
Well I’ll have to try the Shake Reduction filter for lens softness. Most people don’t look at the corners of their images zoomed in. I always inspect the entire image at 1:1 as I’m looking for dust spots and chromatic aberration.
I suspect that photographers sell prints to non-photographers who view the prints from at least 1.5 times the diagonal dimension of the print. The buyer is probably interested in the artistic value and emotional impact of the print viewed in whole, and does not have any interest or inclination to examine the corners to see if they are perfectly sharp.
Since I am a photographer and somewhat obsessed with such things as sharpness, I shoot almost everything on a tripod, focus carefully, use the appropriate aperture and expose, and shoot at the lowest ISO. When I want more detail, I shoot a panorama so I can achieve practically any amount of megapixels using my Fuji x-e1 and my very sharp Fuji lenses. (I use Fuji because I am no longer able to carry heavy gear.) Obviously my approach is limited for portraits in which individual pores are visible on the face, and for moving subjects, however, the Fuji equipment still gives excellent results for these uses.
Eric, you’re absolutely right that most non-photographers don’t care about such pixel-peeping details – although they may, almost unconsciously, form an impression of print quality if they have the opportunity to view sharp prints vs. not-so-sharp ones. When I worked at The Ansel Adams Gallery many years ago I could see that impression form in some viewers when I showed them prints from 35mm film, and then showed them prints made with large-format cameras. I never mentioned anything about sharpness, nor did the customers say anything about it, but I could tell that they sensed something different about the print quality. But that’s only when they had the opportunity to look at prints that weren’t covered in glass, and see enough work from different photographers, in a relatively short period of time, to start making comparisons.
You’re obviously using good technique to get the sharpest images possible out of your equipment. Stitching images together is a good way to get a lot of resolution out of lower-resolution sensors, but it has it’s limitations. Even with landscapes, sometimes things are changing too quickly to use that technique. Also, it doesn’t work when you want a telephoto perspective, because you’d have to have super long lenses (if you wanted a 200mm angle of view, you’d have to stitch four images with a 400mm lens). But if you overlap the frames enough you should be able to eliminate any issues with corner softness, as you won’t actually use the corners of the individual frames in the final composite, and with such high resolution you will be enlarging each pixel less anyway.
Hi Michael
I greatly appreciate your sharing of your real-life, professional experience on the issue of sharpness.
At this point I do not know if I want a 200mm, or whatever, lens perspective. I just look at the scene and pick the lens that will give me what I think I want. Thank you for this new way of thinking about perspective!
Occasionally, when I am working on a photo at 100%, I notice softness and get concerned about it. However, I realize that when I’m just enjoying looking at my photos, I never see the softness; and certainly no one else notices.
Thank you again for sharing your knowledge through your excellent books, articles, and this very informative blog. Your interview in Photograph Magazine (http://craftandvision.com/collections/photograph) is next up on my reading list.
You’re welcome Eric. I guess I didn’t explain myself very well. I was talking about stitching images together to get more resolution, rather than to make a panorama. If your longest lens is 200mm, and the composition you ultimately want requires that focal length with just one frame, you can’t make multiple images and stitch them together. Well you can, but you won’t get any better resolution, because you’d end up just cropping the stitched image down to the same resolution you’d get if you only made one frame. I hope that makes more sense. 🙂
Hi Michael,
I started playing with Piccure+ a week or so ago when you mentioned it in another post. I wasn’t crazy about the results, but reading your post, I was probably trying the wrong sort of image. I’ll have to give it another go. Thanks for the detailed post.
Doug
Doug, I guess it does take the right image, and you also need to know what caused the blurring – camera shake or lens softness. You probably know this, but for the benefit of others reading this, you can usually identify camera shake as the culprit because you see a slight double image when you zoom in – like two images that don’t quite line up correctly.
Perfect! Must read for amateur photographers. I would also like to add that taking tack sharp photos is all about reducing camera shake to an absolute minimum. There are many different ways you can do this. Some apply to all situations, while others can only be used in certain circumstances, but each one helps reduce the amount of camera shake by a small fraction. The more methods you can use, the sharper your shots will be.
Thanks Wilfried!
Thank you Michael, I try piccure I have lightrom 5 photoshop cc6 and capture One pro 8.3. The software is very slow alone, but you say the true, but worth the wait.
What do you recommend whish software to use. in this moment I try to put into de capture one pro 8.3 I did in photoshop is not bad.
Kind Regards.
Federico F.Moy
Federico, I recommend running Piccure+ as a Smart Filter in Photoshop to you can add a layer mask to the effect, and be able to adjust the settings later if you want. For maximum flexibility open the Raw file as a Smart Object in Photoshop; you’d have to do that from Lightroom or Adobe Camera Raw, rather than Capture One.
Thank You Michael, Today I bought The software piccure + The link I took From You page.
Kind Regards.
Federico F. Moy
Nice post. It may be worth mentioning that Piccure+ can also do a good job with not so great lenses. I use an Olympus Stylus 1 as an ultraportable carry round camera. Its 28-300 equivalent f2.8 lens is highly flexible but softish, especially (but not only) in the corners, particularly at the telephoto end. Piccure sometimes greatly improves its output for on line publication as well as for prints.
Thanks for sharing your experience with Piccure+ Ken – I’m glad you’ve had some success with it.
Hi if i buy Piccure can i get away with this only,or i need phtoshop or others
Emery, I recommend using Piccure+ with Photoshop so that you can apply its effects selectively. But you could use it separately.
Hi, Have been using Piccure+ for a while now and I’m impressed what it brings to my images. I agree it is a subtle improvement rather than an obvious effect when done right causing few artifacts. Just the thing to keep things natural looking and getting just a bit more out of the gear. I would say it does not “rescue”, it improves on what is. However the usability is still not great in my opinion. On my high end desktop system, which is optimised for Photoshop work, I find the resource utilisation rather poor resulting in a considerable wait for large batches. Doing stitched panoramas the pre-processing efficiency of input files to the stitching process is significant. Trying to save time and only process “the favourites” through Piccure, I have also applied Piccure to outputs, but it can at times find stitching seams or run out of memory for large panos. Based on this, to apply Piccure to a processed image is not the best quality option, the initial tiff export out of a RAW converter with CA, de-fringing and lens distortion correction, but without sharpening is indeed best. Getting around the wait times I have looked at all sorts of methods. Running Piccure within a photoshop batch/action is one option. I have played around with masks for selective sharpening, but the Piccure plugin gets confused when applied to a layer with a mask already present. One can add a mask after processing with Piccure. A mask affects transparency, it does not really moderate Piccure calculations. At present there is no option for the user to make selective intensity calculations (can be a creative processing decision), so masking of a layer is only the next best thing. may be good enough.
There are other improvement priorities so, the stand alone Piccure editor could be better. It should deserve attention as it frees up Photoshop by running independently, a work around if processing needs a lot of time, and 43Mp files do when processed with high settings. While batch is running in Photoshop, you cannot do any other work in PS. Piccure stand alone is rather manual, it has no real batching function that works automatically through pre-prepared queued projects. There is no ability to customise program directory handling via user preferences. If you are not happy with the default destination, you need to change it every time. The advancements with the last free upgrade go in the right direction to increase usability while maintaining the same level of image quality improvements. The free trial is a good way to check suitability.
Thanks for your input Ralf. I hadn’t thought of the necessity of applying Piccure+ to images before stitching a panorama, but yes, that does present a problem, since Piccure+ is so slow. I’m doing more panoramas these days, since Lightroom’s new panorama merge makes stitching them so easy, but I haven’t really encountered much of a problem with soft corners of individual images manifesting themselves in the merged image, since I typically use a lot of overlap between frames – at least 50%. I suppose it would be possible to apply Piccure+ to the merged panorama and apply it selectively using a mask, but the mask might have to be rather elaborate to reveal the places where the softer edges of the original images appear in the merged image. In any case, yes, Piccure+ is very slow, and that part of it could definitely use some improvement.
Hi Michael,
I do overlap by as much as 66%, gives you the ability to drop a frame if needed, reduced sweep angle also good for improving on any remaining parallax error. Yes you will get rid of softness along the stitched seems, but you nevertheless still have edges. On a single row horizontal sweep pano in portrait orientation it means the longest edges can improve with Piccure, the lower edge in landscapes providing the foreground interest whre detail is needed. Is Piccure a necessity? If you process to the limits of resolution, it does, if you publish for screen display only, it is indeed irrelevant. Pushing the limits to maintain a competitive edge, every bit helps, optimum aperture, tripod and a good lens in balance to the image sensor. With strategy, vision and creativity and a bit of luck we photographers have a chance for it to come together in the camera. Optimum post processing techniques ensure we get the most out of the capture data, before applying creative finishing creative interpretations. Piccure is for people looking at pixel level sharpness, to work with it means a 100% crop view, zoomed out adding to the overall impression for normal viewing.
Thanks for introducing me to piccure+! They are currently having a 35% off black Friday sale good through November 29 (use coupon code BLKFRI15), making the cost just $64.99. I just downloaded it out using the link in your blog. I tried it on one of my photos (24mp raw image from my Sony a900 shot with my Tamron 28-70mm f/2.8 lens) and am QUITE IMPRESSED! Very well worth the price!
Thanks for letting us know Milton!
Thanks for the meaningful review. I’ve only been trying piccure+ for a day, but I see great potential. I thought that it would be a rescue software, but found it’s great at adding to perfection. I use it with DxO Optics Pro and convert the Raw file to tiff in DxO and apply only DxO’s excellent noise reduction, PRIME, then piccure+ ships the corrected image back to DxO.
You’re welcome David – glad you’re having some success with it!