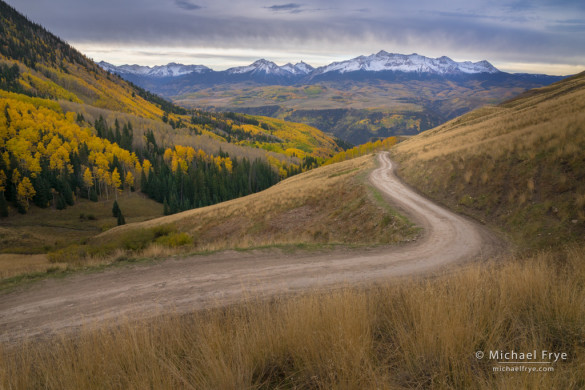
Backcountry road in autumn with the San Miguel Range in the distance, Uncompahgre NF, CO, USA
Varying the focal length of your lens allows you change a composition easily without moving your feet. This is certainly convenient, and sometimes it’s essential: there may be only one suitable camera position, which means changing lenses or zooming is the only way to alter how much of the scene will be visible in your photograph.
But using a wider or longer lens also changes the perspective. Understanding how this works allows you to control the sense of depth in your images.
Wide-Angle Lenses
Wide-angle lenses expand space. Objects look further apart and more distant than normal, and you can take advantage of this by exaggerating the size difference between the foreground and background to create an illusion of depth.
In the photograph above from the Colorado Rockies, made with a 24mm lens, the clumps of grass at the bottom of the frame look bigger than the mountains at the top. But we know that mountains are bigger than grasses, so our brains resolve this discrepancy by concluding that the grasses must be a lot closer than the mountains, which helps give the photograph a 3D effect and a feeling of depth. The road also has converging perspective lines, which add to the illusion.
Of course objects that are closer to the camera will always look bigger, in a relative sense, than objects that are farther away, regardless of what lens you use. A wide-angle lens just exaggerates this difference – but only if you get close to something in the foreground. If there’s nothing near the camera, then the wide lens just makes everything look small and distant. In the Colorado photograph above, the wide-angle lens made the mountains look smaller than normal, but I got close enough to the grasses to make them look relatively large, and that’s what created the size difference and sense of depth.
For comparison, this image of El Capitan was made with an even wider lens (19mm), but has little sense of depth, because there’s nothing close to the camera to create that near-far perspective. Not every photograph needs depth, of course; this image is more about patterns and symmetry:
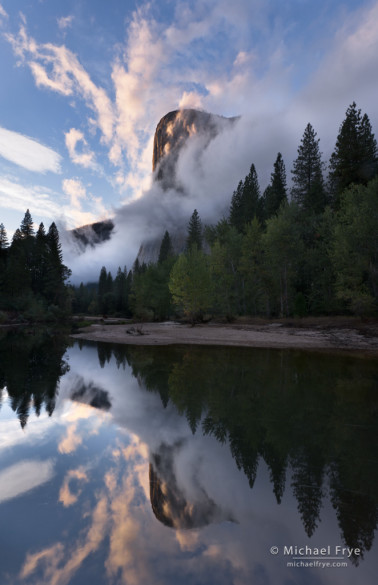
Cloud formations, El Capitan and the Merced River, Yosemite NP, CA, USA
Telephoto Lenses
Telephoto lenses compress space, making objects appear larger and closer together than normal. You can use this spacial compression to flatten images and create abstract patterns.
In this photograph from the Temblor Range, the two ridges cutting across the bottom part of the frame are actually separated from the top half of the picture by a deep canyon at least a quarter-mile wide. But you’d never know it, because the long focal length (120mm) brought in the distant hillsides, making them appear bigger and closer to the foreground ridges. This perspective helped create a unified, rhythmic pattern of zigzags and diagonals from elements that were physically distant from each other:
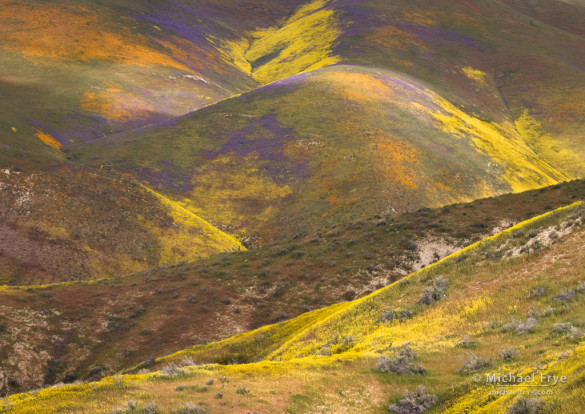
Painted hills in the Temblor Range, CA, USA
There was also a lot of physical distance between the foreground and background aspens in the next image, but it’s hard to tell. A long lens (165mm) again compressed the space and created a pattern out of trunks that were far apart:
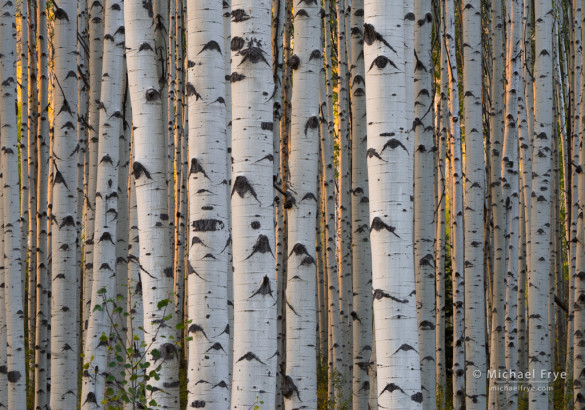
Late-afternoon sunlight in an aspen forest, Gunnison NF, CO, USA
The Long and the Short of It
Of course there are other ways of creating depth without using the near-far, wide-angle perspective; I wrote about that in this post. But the ability to stretch and squeeze space by using different lenses should be an essential part of every photographer’s visual toolbox. Don’t just zoom for convenience; think about what you want to say, and whether your message would be stronger with a sense of depth, or by flattening the perspective and creating patterns.
— Michael Frye
Related Posts: Creating Depth: Beyond the Wide-Angle Formula; The Third Dimension in Photography; When Should You Include a Foreground in a Landscape Photograph?
Did you like this article? Click here to subscribe to this blog and get every new post delivered right to your inbox!
Michael Frye is a professional photographer specializing in landscapes and nature. He is the author or principal photographer of The Photographer’s Guide to Yosemite, Yosemite Meditations, Yosemite Meditations for Women, Yosemite Meditations for Adventurers, and Digital Landscape Photography: In the Footsteps of Ansel Adams and the Great Masters. He has also written three eBooks: Light & Land: Landscapes in the Digital Darkroom, Exposure for Outdoor Photography, and Landscapes in Lightroom 5: The Essential Step-by-Step Guide. Michael has written numerous magazine articles on the art and technique of photography, and his images have been published in over thirty countries around the world. Michael has lived either in or near Yosemite National Park since 1983, currently residing just outside the park in Mariposa, California.


Thanks for a great post, I’ve been thinking about this a lot lately. I was tasked with taking a group/team photo (150 kids of all ages). I scouted out and found a suitable and appropriate location, an overlook with scenic views in the distance. I thought about how I would place myself in relation to the group and decided that I should be close and utilized a very wide lens 14-24. The sky was overcast, perfect for the situation, but I’ve now wondered if I shouldn’t have tried standing quite a ways back and using a longer lens for a more compressed view. I was able to shoot the image handheld from a ladder with a flash attachment, so not sure I would have pulled it off on a tripod from a distance…I would have likely needed a slower shutter speed and higher ISO….wiggly kids! Wished I had tried now!
Susan, photographing 150 kids is a tough assignment – I don’t envy you. 🙂 It’s hard to say whether a longer lens would have worked in that situation, but the ultra-wide would certainly give the image an unusual perspective that could be fun.
Great examples and post on choosing between tele and UWA for an image. Along with this, I am trying more to recognize what compositions are strengthened by shooting a different aspect ratio like 5:4 instead of normal 3:2. My D800E has nice frame lines for 5:4, 4:3, etc. so you can see while composing.
Hope new 5dsr from Canon has it.
Thanks Wayne. I always use different aspect ratios, but not constrained to any of those “standard” proportions. Whatever fits the image.
If you have a D800E, I’m not sure why you’re interested in the 5DS R. A little more resolution, but probably a lot more noise.
Yes, we will see how good the 5DS R will be IQ wise but I still have a lot of Canon mount lenses including 500L and 17 TS-E which I still use on my 1ds3 and 7d for wildlife and 17 for architecture shooting. Have not gone the Sony A7R route yet but we will see how there next large MP camera turns out. I also have quite a few manual focus Zeiss and Leica lenses which I can shoot on both Nikon and Canon cameras. The 5DS R won’t have the DR of the D800E which helps when lifting shadows so I will have to see if I like it. We sure have a large choice of great cameras now.
Indeed there are a lot of great cameras available, and no doubt more to come.
Hi Michael.
Another set of great shots – I especially like the Aspen trunks. The pedant in me was a little caught by the title of this essay, which may suggest to the novice that lenses (i.e. focal lengths) can alter perspective directly. Of course, the only way to change perspective is to change the camera position. Which lens you choose can help to decide this, but does not actually affect the perspective. Sorry for being pernickety!
Best wishes, Geoff
Thanks Geoff. I’m not going to argue the definition of perspective with you.
Thanks for the great article. I’m planning a 10 day trip to Yosemite in February. I switched to a full frame camera last year and don’t have many full-frame lenses. I’m looking to pick up some lenses to fill out my gear before my trip. I currently own Canon 6D and Sony a7r bodies. My lenses are a Canon 24-105 L and a Sigma 150 F2.8 Macro. I shoot mostly landscapes and cityscapes using a tripod. Some of the lenses on my short list are:
Canon 17-40 F4 L
Canon 16-35 F4 L
Canon 70-200 F4 L
Canon 70-300 F4-5.6 L
Tamron 150-600
Rokinon 24 F1.4
I’m definitely planning to buy the Rokinon for Astrophotography. But I’m having a difficult decision separating the other lenses. I have never used a Super-Wide angle zoom in Yosemite. I really don’t know much I would have used one. I am not a big fan of creating a sense of depth by using a very wide angle lens and getting close to a foreground subject. I definitely do like shooting landscapes with telephoto lenses for the ability to isolate details and compress depth of field.
Do you find that you use the super-wide range 15-24 or long telephoto range 200+ more when photographing Yosemite? I know that you have experience with the a7R as well as a number of the lenses on my short-list. I would appreciate any advice you could give.
You’re welcome Bob. In Yosemite I use everything, from telephoto to very wide-angle lenses. I would cross the Canon 17-40 off your list; the new 16-35 f/4L is much sharper. A 70-200 is a staple, and Canon’s f/4 version is usually good (individual copies of lenses always vary), but you might prefer the extra reach from the 70-300. I haven’t tested that one.
That makes my decision easy. The 16-35 and the 70-200 should cover it. I can always add a longer lens later. Would love to take one of your workshops. They fill up so fast. Thanks again for your input. I really enjoy reading the blog.
Hello Michael,
Continue with my focus questions, do you mind explaining to me how the 1st image (shot with 24mm lens) and the last image (the tree trunks) were focused? Please excuse my ignorance.
Thank you very much,
BL
Please see my answer to your similar question in this post:
https://www.michaelfrye.com/2015/04/26/good-year-dogwoods/
You do realize that changing lenses does not actually change perspective. Moving forward or backward, on the other hand, does.
As an example, take a landscape shot with a wider lens, then take the same shot with a longer lens. Crop the wider shot to the same exact content as the uncropped longer shot. The perspective will be identical. It’s a pretty well-known fact that changing focal length does not change perspective, only changing your camera’s position can do that.
Well perhaps I didn’t use the word perspective correctly. But did you get the point of the article? Do you understand how changing lenses can change the sense of depth in a photograph?
Changing lenses only changes angle of view/magnification, not depth. Your camera position will change perspective/sense of depth. Telephotos do not compress anything any more than wide and ultrawides extend anything.
The test I suggested in my first comment will illustrate that clearly. The compression you see with a telephoto is actually present in the cropped section of an image taken with a wide lens – because it is a function of camera position, not focal length.
Naturally it would make no sense to go around with a 15mm lens and cropping out 95% of the image to get that illusion of compression, but it is just an illusion created by the reduced angle of view.
Changing lenses, say from a wide lens to a tele, helps avoid cropping and the reduction of image quality that results from extreme cropping, if you are looking for that sense of compression, or vice versa.
This is a widely misunderstood concept in photography.