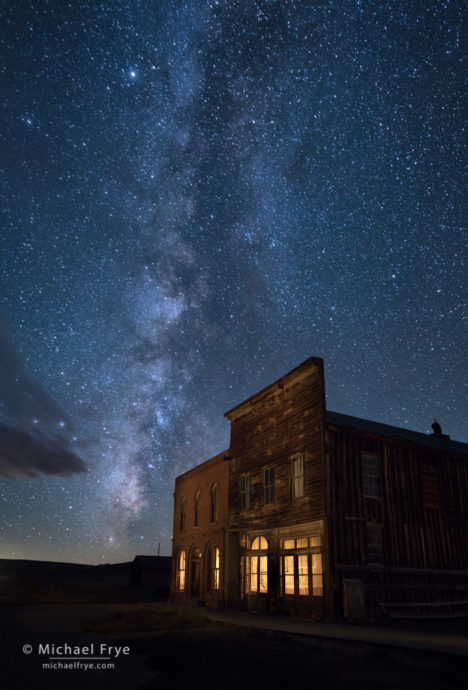
DeChambeau Hotel and I.O.O.F. Hall at night, Bodie State Historic Park, CA, USA
On the last night of our recent Starry Skies Adventure workshop we went to Bodie, which is always a great place for night photography. As the Milky Way moved into the southwest that evening it lined up well with these two buildings along Main Street, the DeChambeau Hotel and I.O.O.F. (Independent Order of Odd Fellows) Hall. I had never photographed this view of Bodie before so decided to try it, and was joined by several other people in the workshop.
I knew the lighting would be complicated, but that’s part of the fun of photographing Bodie at night. You can do relatively simple light-painting there, or, if you’re up for a challenge, try something complex. Here we wanted make it look as if the buildings were lit from the inside (even though the interiors were locked and inaccessible to us). That’s not really hard to do – just shine flashlights through the windows. The hard part was figuring out how to keep yourself out of the frame while doing so. The solution was to do each part of the lighting in a separate frame, and then mask off the unwanted areas of that frame (like a person holding a flashlight) in Photoshop.
We started by making an exposure for the sky, then added frames to light the exteriors. Next I lit the front, bottom-floor windows of the right-hand building (the I.O.O.F. Hall) by shining a flashlight through a window on the right side of that building.
Unfortunately there were no side windows in the left-hand building (the DeChambeau Hotel), so I had to stand in two different places at the front to light that interior. And one of the participants, Alan, had the idea of lighting the wooden sidewalk in front of the buildings, and used a flashlight with a snoot for that. I wished we could have lit the second-story windows too, but we would have needed a big ladder!
All those separate images were assembled and blended in Photoshop. That part is not terribly difficult if you’re reasonably proficient with Photoshop, but otherwise it can be hard to wrap your head around. Maybe I’ll do a tutorial someday, but just to help visualize how this works, here’s the background layer – the image of just the Milky Way:
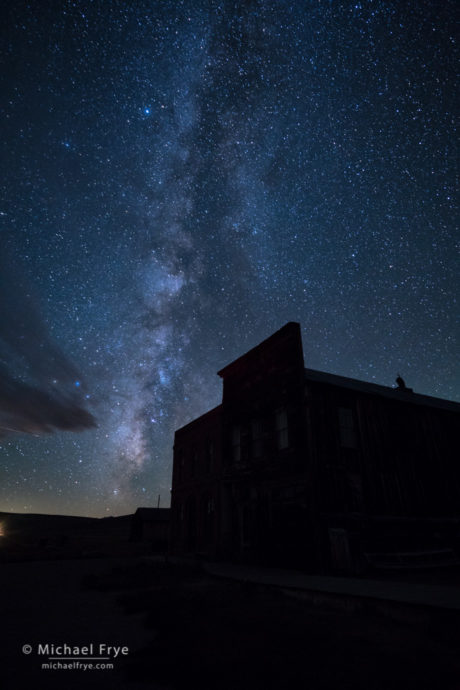
The background image of the Milky Way
And here’s one of the light-painting layers – the one where I put a flashlight against the right-hand window and lit the interior of the I.O.O.F building. If you look closely you can see part of my head and arm against that right-hand window, and a bright spot from the flashlight itself:
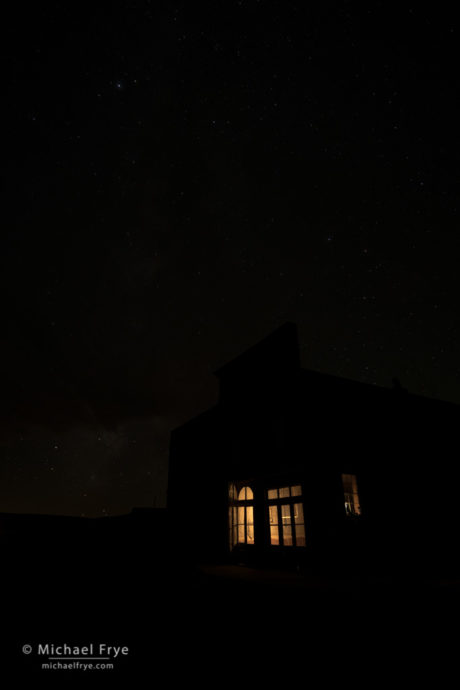
One of the light-painting layers, where I lit the interior of the right-hand building. You can see me outlined against the right-hand window.
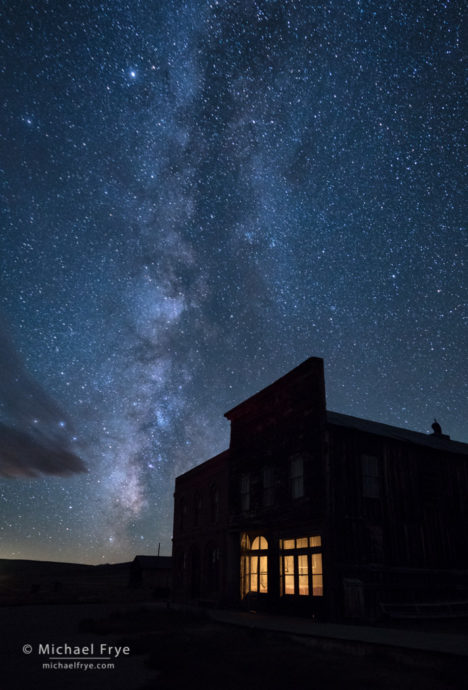
Here are those two layers stacked together in Photoshop, with the blending mode of the top light-painting layer changed to Lighten, but no layer mask. You can still see me outlined against that right-hand window:

The previous two images blended together using the Lighten blending mode in Photoshop. You can still see me outlined against the right-hand window.
And here again are those two layers, but I added a layer mask to reveal only a small part of the light-painting layer – the front windows – so you can’t see me or any of the light in that right-hand window:
Here I added a layer mask to reveal only the front windows in the light-painting layer, hiding that right-hand window and my outline.
I did something similar with all the other light-painting layers to reach the final image at the top of this post.
Doing light-painting in separate frames like this gives you tremendous control. As we’ve seen, you can refine which areas are lit by using the Lighten blending mode and a layer mask. You can also control the brightness of the lighting after the fact by adjusting the opacity of the layer, or clipping an adjustment layer to the light-painting layer. In the final image here, for example, I made the lighting for the building exteriors and wooden sidewalk quite subdued by reducing the opacity of those layers. And you can even change the color of the light-painting layer, which is like adding colored gels to the lights after the fact. (I didn’t do that here, but here’s an image where I did).
Photography is all about light, yet we usually have little control over that light. After dark, however, it’s easy to add light of your own, and by doing so you feel as if you’re creating the photograph, rather than just capturing it. So yes, this stuff can get rather complex – but that’s also part of the fun.
— Michael Frye
Related Posts: Jeffrey Pine Under the Stars; Star Trails Over Bodie
Michael Frye is a professional photographer specializing in landscapes and nature. He is the author or principal photographer of The Photographer’s Guide to Yosemite, Yosemite Meditations, Yosemite Meditations for Women, Yosemite Meditations for Adventurers, and Digital Landscape Photography: In the Footsteps of Ansel Adams and the Great Masters. He has also written three eBooks: Light & Land: Landscapes in the Digital Darkroom, Exposure for Outdoor Photography, and Landscapes in Lightroom: The Essential Step-by-Step Guide. Michael has written numerous magazine articles on the art and technique of photography, and his images have been published in over thirty countries around the world. Michael has lived either in or near Yosemite National Park since 1983, currently residing just outside the park in Mariposa, California.


Gorgeous night shots. I thoroughly enjoyed Bodie when I went last year. I have to say though the two roads into Bodie are outrageous in how treacherous they are. I’m surprised I made it without four wheel drive, and there was no four wheel drive warning. I made it in a low-riding Honda fit and I was amazed.
I can deal with a dirt road or gravel road but this was a literal rock road. I really wish there was some kind of funding to make that road a little safer for this important landmark.
Hmm… what roads did you take? The main road has only three miles of dirt, and though it’s rocky in spots, it’s not that bad (admittedly better this year than last). All kinds of cars make it up there without much difficulty. I heard that those last three miles haven’t been paved because of bureaucratic regulations; the current standards for paving a road would require that the road be widened and straightened, which is apparently too costly.
Lovely photos and so interesting to see how you layered them up. I LIKE the picture where you are seen and there is light in the side window. It’s almost as if there was a ghost peering in…
Thanks Anita!
Interested in a workshop.
Thanks Linda. Please make sure you’re signed up for my mailing list to get workshop notifications.
A beautiful image—Bodie never looked so good! Thanks, Michael, for that detailed procedure, fascinating and helpful.
I’m leaving for Scotland tomorrow for two weeks of photography—Outer Hebrides and Skye, along with Loch Lomond and the Trossachs National Park. I’ve written down many of your explanations for night photography and plan to put them to good use. All best!
Thanks Bob, and good luck in Scotland!
Michael,
Fantastic!
Alyn
Thanks Alyn!