
Lunar rainbow from Cook’s Meadow, Yosemite; from June, 2011, a very wet year
Lunar Rainbows and the Milky Way
There will be a full moon this Saturday, and I’m sure many photographers will be heading to Yosemite to photograph the lunar rainbow. Astronomer and “Celestial Sleuth” Don Olson has updated his website to include predictions for when the moonbow will appear on Upper Yosemite Fall from Cook’s Meadow, in addition to his previous predictions for Lower Yosemite Fall.
I think there should be enough spray to make the rainbow visible on Upper Yosemite Fall this month, but probably not in June, when there will be less spray. The Lower Yosemite Fall bridge might work in June, because you don’t need as much water to see a rainbow from that spot, but I expect the bridge will be rather wet this month, which will make it hard to keep spray off the front of your lens. Of course the weather always plays a role, and there are showers in the forecast for this Friday and Saturday nights, so the moonlight might get blocked by clouds. But if you want to try your hand at either location, here are some tips for photographing lunar rainbows.
This is also the beginning of Milky Way season here in the northern hemisphere. The brightest part of the Milky Way can now be seen rising just after 10:30 p.m. here in central California, and will be visible in the evening sky through September.
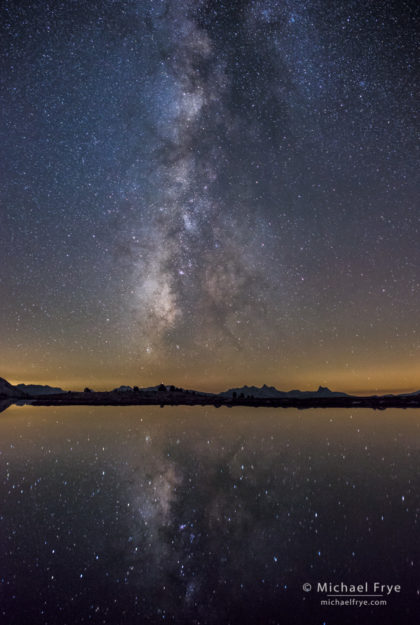
Milky Way reflected in an alpine lake, Yosemite
With all of these upcoming opportunities, I thought this might be a good time to address one of the most difficult aspects of night photography: focusing in the dark.
First, just turning the focusing ring to infinity doesn’t work. Most modern lenses are designed to focus past infinity, so you can’t just turn the ring all the way until it stops and hope for the best, or you’ll get fuzzy pictures. Also, with modern ED or fluorite glass, focus varies with the temperature, so you have to find the right focusing point anew every time you go out to photograph the night sky. And because you’re usually using wide apertures at night, the depth of field is quite shallow, and any slight focusing error will make the photographs look soft.
You could try autofocus, as most cameras should be able to autofocus on the moon, and some might be able to autofocus on a bright star. After you’ve acquired focus, make sure you turn autofocus off, otherwise the camera will refocus, or hunt for something to focus on, when you press the shutter (unless you’re using back-button focus). And if you’re using a zoom, you need to refocus every time you zoom in or out, because the focus may shift slightly. (That applies to any situation, day or night, when using a zoom lens.)
But many times you can’t find a star that’s bright enough to use autofocus on. And even if it works, your autofocus has to be perfectly calibrated, as, again, any slight focusing error will make the image soft. (This isn’t an issue with mirrorless cameras, but mis-calibrated autofocus is a common problem with SLRs. Most SLRs have an autofocus micro-adjustment option.)
Focusing in Live View
The most consistently accurate method of focusing at night – the one I’ve used for many years – has been to use manual focus, and zoom in on a star in live view. First, in order to see the brightest live-view image possible, set your lens to its widest aperture (lowest f-stop number), push the ISO way up (at least to 3200), and set a long exposure (at least 15 seconds). Also, make sure your lens is pre-focused somewhere near the infinity mark, otherwise everything will be so blurred you won’t be able to see any stars.
Then switch to live view, find a bright star, and magnify the view to zoom in on the star. It will help if you don’t zoom in too far at first. Zoom in a little bit, find the star, center it, zoom in more, and repeat. When the star gets big enough to see the focus clearly, adjust your focusing ring until the star looks sharp. Try to make the star look as small as possible – like a pinpoint, not a blob.
This technique works better with fast lenses (that is, lenses with wide maximum apertures); the more light the lens lets in, the brighter your view, and the easier it is to focus. It also works better on some cameras than others – typically very well on Canons and Sonys, and not as well with Nikons. Canons and Sonys can transmit a live view image at lower light levels than Nikons, which makes it considerably easier to focus and compose at night in live view. I’ve been able to use this technique with Nikons, but it’s challenging. You need a fast lens and a very bright star, and even when you find such a star it can be hard to tell when it’s in focus.
If you can’t find a bright enough star to focus on, look for another light source, like distant streetlights, lit buildings, or the moon. Or you can try shining a flashlight on a tree or rock. With the wide-angle lenses typically used for night photography, a tree that’s 50 feet away will be at infinity, so if the tree is in focus the stars will be too. You could even walk out 50 feet or more from the camera and set a flashlight down on a rock, pointed back at the camera, and then focus on the flashlight.
But even zoomed in with live view, many people have trouble telling exactly when the star (or tree) is in focus. I’ve had a lot of practice with this technique, yet I still sometimes miss the focus slightly.
SharpStar2
I recently learned about a product that attempts to solve this problem called SharpStar2, by Lonely Speck. I’ve had a chance to test SharpStar2 pretty thoroughly, and it works very well. It takes some practice to use it properly, and it doesn’t work under all conditions, but it works most of the time, and when it does it removes any doubt about whether the focus is accurate.
SharpStar2 slides into a filter holder (like a Cokin P-Series holder, or a Lee holder). SharpStar2 uses a Bahtinov Mask to create three fine spike lines around a star. The idea is to adjust the focus until the middle line is centered between the other two. Here’s what that looks like:
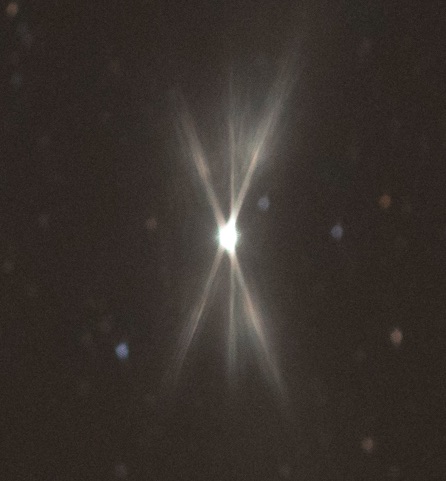
Focused too close with SharpStar2

Focused too far
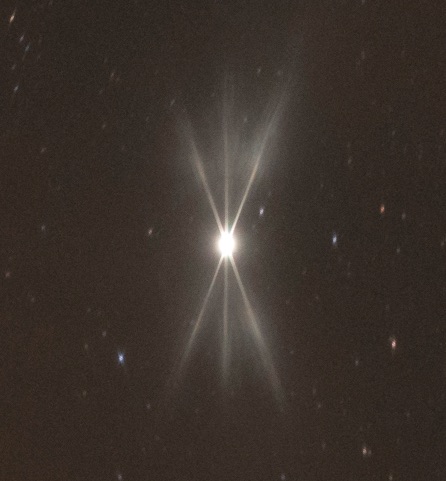
Correct focus with SharpStar2; the middle spike is centered between the outer ones
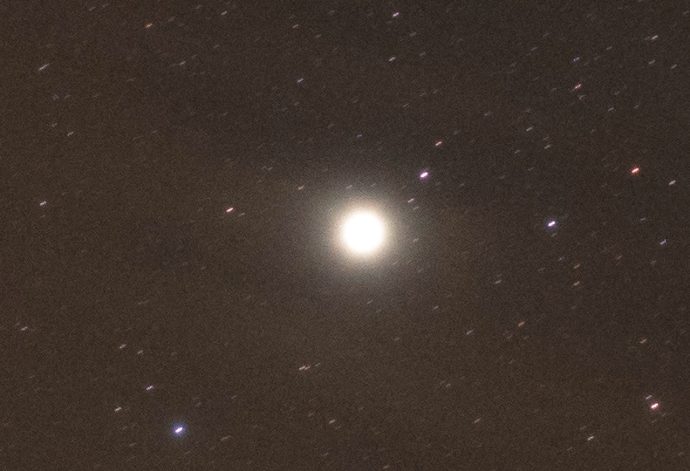
100% view without SharpStar2, showing that the stars are perfectly focused (it’s easier to tell with the smaller stars)
As I said, it takes a bit of practice, so here are some tips for using SharpStar2:
The more contrast between the star and the surrounding sky the better. That means SharpStar2 works best with a bright star and dark skies. It can work on moonlit nights, but usually only with the very brightest stars. On dark nights it can work with moderately-bright stars – at least with some cameras.
If you can’t see the spikes clearly in live view you can focus as best you can and take a photo with SharpStar on to confirm focus (this requires a filter holder). If you don’t get the focus right the first time it could take some trial and error to get it right, but eventually you should be able to nail the focus.
I also found that I could focus with SharpStar2 even when I couldn’t see the spikes. The star itself becomes a slightly-elongated oval when it’s in focus. But it takes some practice to focus this way!
You can also focus on off-center stars with SharpStar2, but this also requires some practice. With off-center stars, turn the focusing ring until you see a single, elongated spike, like this:

Off-center, in-focus stars become elongated single spikes with SharpStar2
Laser Focusing
Ian Norman, the developer of SharpStar, told me that any point light source will work – it doesn’t have to be a star. In fact he said that he used a laser pointer when doing his initial testing. That got me thinking. On moonlit nights, or times when there are no bright stars visible, what about using a laser?
Rick Whitacre recommended this green laser to me, so I ordered one. When it finally arrived I tested it with SharpStar, and it worked very well. You just point the laser at something more than 50 feet away (again, that should be far enough to get infinity focus with wide-angle lenses), put the laser dot in the center of the lens, and adjust the focusing ring until the middle spike is centered between the other two. Here’s what it looked like in my test (the spikes don’t look that crisp here because I couldn’t hold the laser perfectly still for 15 seconds when making this exposure, but the spikes were very clear in live view):
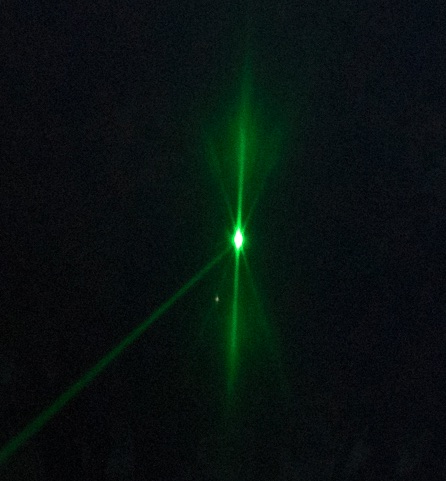
Focusing on a laser point with SharpStar2
The hardest part about using the laser is holding it steady while you adjust the focus. I just brace it against my tripod. But the laser makes it possible to focus accurately in any situation, even when there are no bright stars visible – or no stars at all. And you can do so without turning on a bright flashlight, which will ruin your night vision and annoy nearby photographers!
I don’t know if this laser-focusing technique will work with Nikon cameras. I hope so, because it might provide the best option for focusing at night with Nikons. If any of you Nikon users get a chance to try this, please let me know.
There are no simple, foolproof options for focusing in the dark. But SharpStar2 is the best tool I’ve found so far, and it’s earned a permanent place in my camera bag. And just to be clear, I didn’t get paid to say this, nor do I make any commissions on SharpStar2 sales. Lonely Speck did give me a free copy to try out, but with no obligation to say anything positive about it – or to say anything at all. I just think it might be helpful to those of you who do night photography. If any of you have tried SharpStar2 please post a comment and let us know how it worked for you.
— Michael Frye
Related Posts: The Mist Trail at Night; A Clearing Storm by Starlight; Tips for Photographing Lunar Rainbows
Michael Frye is a professional photographer specializing in landscapes and nature. He is the author or principal photographer of The Photographer’s Guide to Yosemite, Yosemite Meditations, Yosemite Meditations for Women, Yosemite Meditations for Adventurers, and Digital Landscape Photography: In the Footsteps of Ansel Adams and the Great Masters. He has also written three eBooks: Light & Land: Landscapes in the Digital Darkroom, Exposure for Outdoor Photography, and Landscapes in Lightroom: The Essential Step-by-Step Guide. Michael has written numerous magazine articles on the art and technique of photography, and his images have been published in over thirty countries around the world. Michael has lived either in or near Yosemite National Park since 1983, currently residing just outside the park in Mariposa, California.


Michael,
Very helpful information, thanks!
Cheers,
Alyn
You’re welcome Alyn!
Thank you Michael, for the information about the SharpStar. I just spent a very frustrating night at Burney falls trying to focus on the stars. This is the first time I have had such a problem. I am a Nikon shooter, but usually have good luck. This might be a solution for me. Usually if a 35 or 28 is wide enough I have no problems. I just slap on my old Leica R lenses, a 28/2.8 and a 35-70/4 and they have a hard infinity stop and I am set to go. The zoom does not shift focus as it is zoomed. But I often need wider, so I try to use my 16-35/4 Nikkor and usually have a fairly easy time once I find a star. But this time it never did focus well. Not sure why. I think I will try to find some older R lenses to do the job. I have a 24/2.8, but the mirror on the full frame Nikon will not clear the rear of the lens w/o doing some grinding on the mirror or the lens. Something I am not willing to do at this time. A lot to be said for those old lenses with hard infinity stops and zooms that do not shift focus. But I think I might try the SharpStar filter. It is a darn sight cheaper than a Leica 19mm R lens.
You’re welcome Aram, and thanks for your comments. The problem with those old lenses is that they’re just not as good as the new ones. Lens technology has evolved a lot, and the best of the latest generation of lenses are considerably better than the old ones – especially in the corners at wide apertures, which, of course, is the critical concern for night photography. The Nikon 14-24 f/2.8 is an excellent lens for night photography. The new 20mm f/1.8 is worth a look too. It’s quite sharp wide open, but there’s some coma. The coma gets better at f/2.8.
Thank you very much for this (as always) very interesting blog post. I am using a Canon Body and i used to focus on stars (infinity) by the technique you described at the beginning of the post. Is there a significant advantageof the SharpStar2 over the live-view technique?
Regards, Michael
You’re welcome Michael. As I said, magnifying the live view image generally works well, but there is always some uncertainty about whether you’ve really nailed the focus. SharpStar2 removes that uncertainty. For me, I’d much rather use SharpStar than focus without it. The only drawback is the time it takes to mount the filter holder and filter. But then you can always just hold the filter over the lens while you focus. It takes a bit of practice to learn to center the filter over the lens and focus at the same time, but it can work.
Great advice as always, Michael. The only thing I’d add would be to always magnify the image and check its sharpness each time you adjust focus or focal length. It’s so easy to get focus close enough to look sharp on the unmagnified LCD, only to be disappointed when you get home and look at it full size on a monitor. It’s particularly frustrating to find out that every image you thought was sharp is just a little soft.
Good advice Gary. I frequently remind my workshop students to magnify the images they’ve just taken to check sharpness – day or night. Doing that can prevent much woe and sorrow later.
Hey Michael, thanks for the tips. I used the sharp star last weekend and was able to achieve good focus but did not see the spikes, just focused until the dot was the cleanest. (Canon 6d, 16-35 f/2.8) Two caveats in my case, First I was focusing on Mars as that was the brightest object and second I was focusing before the moon set. As you pointed out there needs to be more contrast, so I am excited to get back out there for the upcoming new moon. Clear skies (for your night stuff) partly cloudy for the rest. Love your work. Cheers.
Thanks for sharing your experience Bill. The other factor that probably prevented you from seeing the spikes is that the f/2.8 maximum aperture of your lens. I usually use my Rokinon 24mm f/1.4 for night photography, and those two extra stops make a difference with SharpStar. But as you found out, it works even when you can’t see the spikes. It’s hard to describe exactly, but the star changes shape. When it’s out of focus it’s fuzzier, but also looks like an oval with a slight bulge on one side. (That bulge is actually the base of one of the spikes, if you could see the spike.) When it’s in focus the bulge disappears, and the star looks like a nice clean oval. It’s actually pretty easy to focus this way with a little practice.
Interesting tools you have there. One question: You point the laser pointer away from you and focus on the spot it illuminates, right? Or do you place the laser on the far end, pointing back to you, and focus on the light source (just like a star)? That would be a bit dangerous I guess.
That brings me to another idea: Could I use the laser alone and focus on its target with just live view and no special filter, instead of the torch? I have a few red lasers here and rarely use them anymore. They might be useful for that one day.
PS: Hyperlinks are hardly visible in the article. I didn’t see them at first.
Yves, yes, I point the laser away from me and focus on the spot it illuminates.
>That brings me to another idea: Could I use the laser alone and focus on its target with just live view and no special filter, instead of the torch?
I tried that, and it’s pretty difficult. Harder than focusing on a star in live view, because you can’t hold the laser perfectly still. I suppose you could use some kind of clamp or mount for the laser, but then it would still be just as difficult as focusing on a star. Using the laser with SharpStar works much better. And the brighter the laser the better, so I’m not sure if your red lasers will be bright enough.
Oh, I see, green is brighter, and that one’s got 5 mW which is just at the border of additional safety requirements.
Thanks for the tips on SharpStar2 and using a laser for focusing.
Rather than hand-holding the laser, I think I would try to clamp it to the tripod. If you go to Amazon and search for “tripod clamp” you can come up with cheap clamp-style ball heads for under $10. The ballhead would let you point the laser anywhere you want it. I had a small ballhead handy without a clamp, so I made a proof-of-concept mount with this head, some gaffers tape, and a small spring clamp to keep the on button depressed:
http://www.jeffstravels.net/Sharing/Laser-Tripod-Mount/n-GtWW4r/i-3LJgnN8/A
No doubt a clamp would be helpful Jeff. I’m just reluctant to add yet another gadget to my camera bag if I don’t need it! If you want to make an exposure with the laser and SharpStar on, a clamp would be almost essential. But for focusing in live view handholding the laser is sufficient.
One trick I’ve used when the scene has a long foreground has been to walk out a hundred yards or so away from the camera and then put a pen light on a rock or in the crook of a tree branch so it faces back toward the camera. Usually focus at a distance of a hundred yards is good enough unless you have to shoot with the lens wide open. Not all scenes have a long uncluttered foreground, so this doesn’t work all the time.
Thanks for the tip Kit. I’ve done something similar myself, though it’s a bit of trouble to walk out there to place the flashlight and retrieve it. That’s one reason why I like the idea of using a laser and SharpStar – you can do everything from the camera position. Of course part of that is just laziness, but speed is sometimes important when light and clouds are changing.
If you can’t see your spikes, consider a longer exposure…they’ll show up. I agree that sometimes liveview adjustments are challenging. You may have to do longer exposure/adjust/retake/adjust etc…
Thank you for this article. I am considering buying the SharpStar filter but was advised by an email from the filter’s creator that my Sigma 10-20 f3.5 lens would need to be used with a lower f/number. This is something to consider if you are thinking of buying this filter with a similar lens.
Thanks for this information Jeremy. It does help to have a lens with a wide maximum aperture when using Sharpstar, as the more light the lens lets in the better, but I’ve used Sharpstar successfully with my Sony 16-35mm f/4 lens. It’s a little challenging, but doable. Another factor is that it’s harder to use Sharpstar with really wide lenses. With my Sony lens at 16mm, for instance, even a large, bright star becomes pretty small, even when I magnify it as much as possible in live view. That makes the Sharpstar spikes small and hard to see. The combination of the f/4 maximum aperture and wide field of view makes using Sharpstar challenging with this lens at 16mm, but I’ve done it successfully.