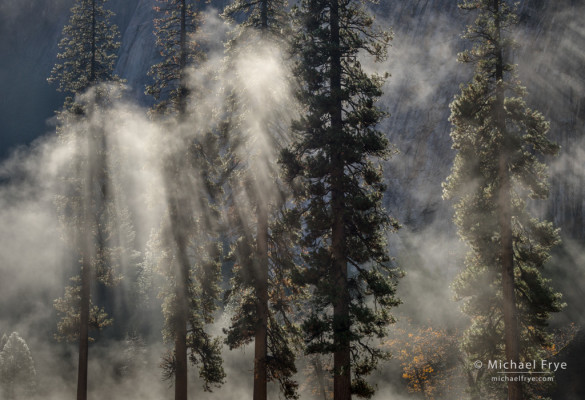
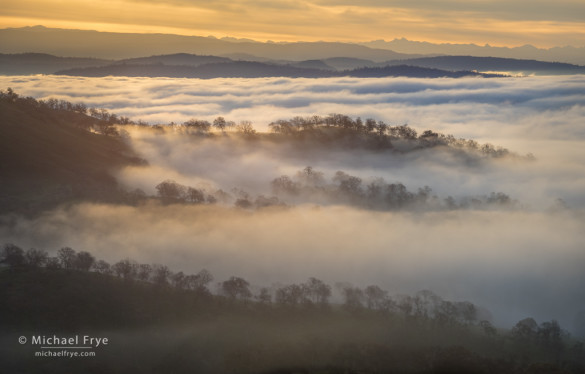
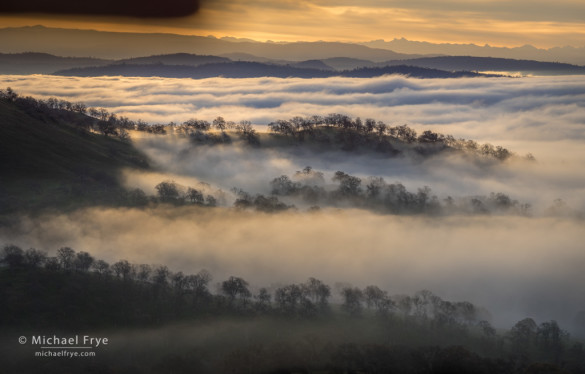
Ponderosa pines in mist, El Capitan Meadow, Yosemite
Natural light comes in an infinite variety of beautiful flavors. I love them all, but if I had to pick a favorite, it would probably be backlight, because it consistently delivers some of the most interesting images. All of the photographs from my last two posts, the ones from above the fog layer, were made with the camera pointing toward the sun. The photograph above, one I haven’t posted here before, captures a moment when backlit mist rose into the pines in Yosemite’s El Capitan Meadow. This next image, voted my top photograph of 2014, was also lit from behind, with the sun just above the frame:
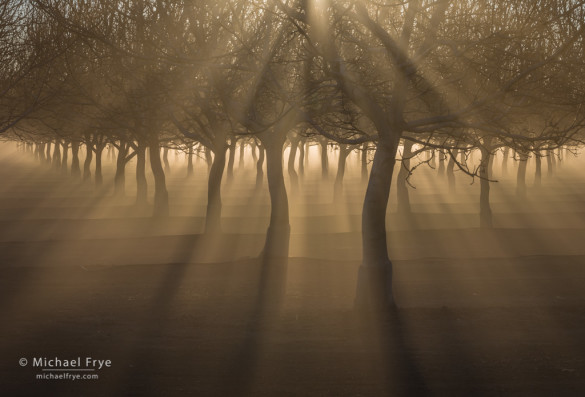
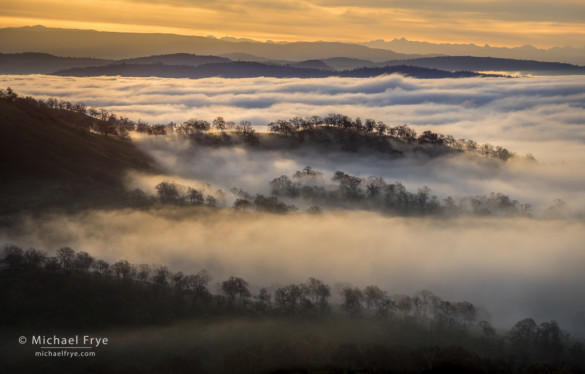
Sunbeams and fog in a Sacramento Valley orchard, California
The sun was also just above the picture here, in my second-most popular photograph of 2013:
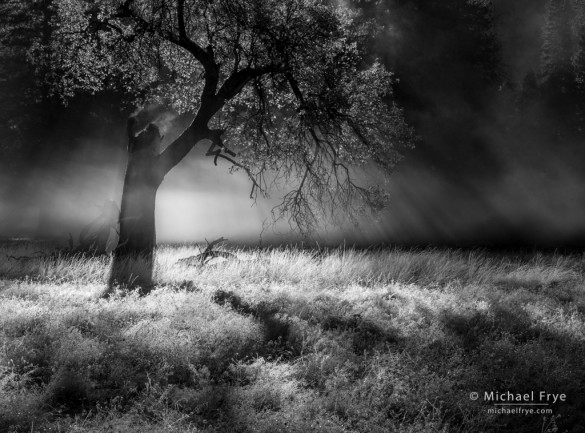
Mist, sunlight, and a California black oak, Yosemite
But while backlight can be beautiful, it’s difficult to work with. For one thing, looking into the sun is hard on the eyes. Backlight also creates a lot of contrast, so exposures can be challenging.
But perhaps the most difficult aspect of dealing with backlight is lens flare. Any time sunlight hits the front of your lens you risk getting flare in the form of bright spots, streaks, or an overall washed-out look to the photograph.
There are basically two ways to avoid flare while shooting into the sun: either hide the sun behind a tree, mountain, or some other object, or shade the lens with your hand or a hat. Putting the sun behind tree branches and creating a starburst effect can be very effective; I talked about that in this post. And it is sometimes possible to include the sun and avoid flare even without hiding the sun behind something. But today I’m going to discuss the art of shading the lens when the sun is just out of the frame.
First, forget about your lens hood: it’s almost useless for shading the lens. That doesn’t mean you should throw it away, because it still might protect your lens if your drop it, and it’s helpful for keeping the front glass dry when you’re photographing in the rain. But if the sun is just out of the frame, sunlight is still going to hit the front of your lens and create flare even with the hood on. So you’ll have to shade the lens with your hand, or a hat. I recommend using your hand, since it’s always available, but a hat will work too.
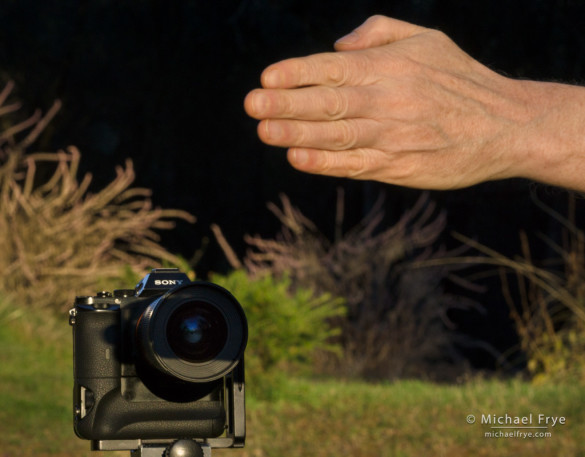
When the sun is just out of the frame, you need to get your hand (or hat) as far away from the lens as possible. If you reach out from the behind the camera your hand will probably be only a few inches in front of the lens, which makes it impossible to bring your hand down far enough to shade the lens without also getting your hand in the picture.
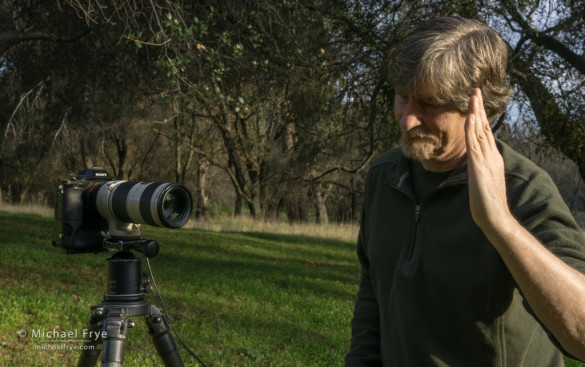
Instead, put the camera on a tripod, and step around in front of the camera, so you can get your hand about two feet away from the lens. Use the flat edge of the bottom of your hand, then watch the shadow your hand is casting, and bring that shadow down so it barely covers the front glass of the lens. Then use your other hand to trip the shutter with a cable release or remote (you can also use a two-second self-timer if you can reach the shutter button). Here’s a photo to show the basic position:
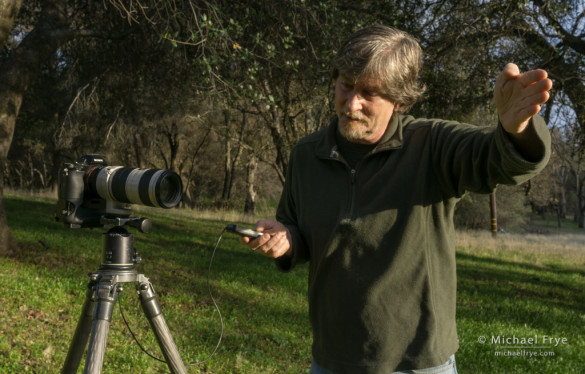
To shade the lens without getting your hand in the picture, step around in front of the camera and get your hand about two feet away
And here’s a closeup showing how the shadow of my hand just barely covers the glass, and no more (it’s a different lens, but you get the idea):
Bring the shadow of your hand down until it just barely covers the front glass
If the sun is off to the side, rather than above the frame, orient your hand vertically, and bring the shadow of your hand in from the side of the lens, rather than from above, like this:
If the sun is to the left or right of the frame, turn your hand vertically and shade the lens from the side
After you trip the shutter, look at the photo you just took and see if your hand is in it. If it is, try again, and this time move your hand until the shadow only covers the two-thirds of the glass, or even half. Half is often enough to eliminate most of the flare. Or if your hand appears in just a corner of the frame, that means your hand was slanted. Try again, and make sure the bottom of your hand is straight, parallel to the ground (or vertical if you’re bringing it in from the side). If your sleeve appears in the photo, roll up your sleeve!
Here are three versions of one of the images from my last post. The sun was just above the top of the frame on the left side, which made shading the lens challenging. The first image was unshaded, and while there are no bright spots or streaks, flare made the photograph look more washed out than the other versions below (check the shadows, especially on the left side). I stepped around in front of the camera to shade the lens, but as you can see from the second version below, part of my hand got in the frame. So I tried again, this time bringing my hand down so it only covered the top two-thirds of the glass. That worked: the third image is the one I posted Monday, where I successfully shaded the lens, and eliminated most of the flare, without getting my hand in the picture.
With the lens unshaded there are no obvious spots of flare, but the photograph looks washed out compared to the versions below
On my first attempt to shade the lens I got my hand in the frame
Raising my hand so that the shadow only covered two-thirds of the front glass eliminated most of the flare
Learning how to do this takes practice, but it’s worth it. If you can shade your lens even when the sun is just barely out of the frame, you can photograph some of nature’s most beautiful light.
— Michael Frye
Related Posts: Photographing Sunbursts; When a Scene Composes Itself; Oceans of Fog: Part One; Oceans of Fog: Part Two
Did you like this article? Click here to subscribe to this blog and get every new post delivered right to your inbox!
Michael Frye is a professional photographer specializing in landscapes and nature. He is the author or principal photographer of The Photographer’s Guide to Yosemite, Yosemite Meditations, Yosemite Meditations for Women, Yosemite Meditations for Adventurers, and Digital Landscape Photography: In the Footsteps of Ansel Adams and the Great Masters. He has also written three eBooks: Light & Land: Landscapes in the Digital Darkroom, Exposure for Outdoor Photography, and Landscapes in Lightroom 5: The Essential Step-by-Step Guide. Michael has written numerous magazine articles on the art and technique of photography, and his images have been published in over thirty countries around the world. Michael has lived either in or near Yosemite National Park since 1983, currently residing just outside the park in Mariposa, California.


Great learning experience, really like the actual shots of you shading, makes it really clear on how to do it exactly. Thank you very much for a great lesson.
You’re welcome Patsy – thanks!
Michael,
I agree, the pictures of you with proper positioning of your hand and your body in front of the camera really helps.
I tend to use a hat more than my hand. I always have one with me as I have a nice bald spot on the vertex of my head. It seems that you do not have that problem…
Jim
Thanks James. As you say, a hat works well if you have it with you. With a large enough hat and a stiff brim you could actually shade the lens from behind the camera if you’re careful, by extending it out beyond the lens parallel to the ground. This has the advantage of allowing you to see when the hat gets in the picture, but it’s tricky to get it right.
Thank you so much for this way of handling lens flare. I will definitely try your method of observing the shadow on the lens, in addition to using my hat or a 12″ reflector.
I appreciate that you provide a concrete way to act methodically here. Meadow mists do change quickly and in exciting ways, so in an effort to choose each exposure moment, I have been reluctant to step away from my viewfinder. But in these sunlight conditions, I will now simply fire more FPS just like I would for action shots, and cull my images later. Like all great ideas, yours seems so obvious now. Thanks again.
Gery, you bring up a good point, because stepping around in front of the camera does take an extra moment, a moment you might not want to lose if the light is changing quickly. But the procedure gets pretty quick with a little practice, and I actually find it quicker to “do it right” the first time.
Love this clear explanation! take care. And ps: i can’t get enough of the nut orchard picture. i love that one.
Thank you Adair!
Michael-
Thanks for the tip about shielding the lens. Your photos made it very clear. Beats hauling around a stand and black card when you’re hiking through the woods and you don’t want to carry a bunch of gear.
You’re welcome Bill, and thanks for your comments. I’ve never used a stand, but have used an articulating arm that you can attach to the tripod (made by Bogen, I think) and a black card. But I’ve only used that for night photos, where I can’t shade the lens with my hand for a four-minute exposure. (Yes, the moon can create flare too.) But aside from adding extra weight and another thing to carry, using a stand or arm is slow.
Excellent !!! Thank you ! I’m throwing out my lens hood, which is usually in a drawer somewhere taking up space. *-)
Don’t throw out that hood Dotty! As I said, it’s great for keeping raindrops off the front of the lens. I know you don’t PLAN to photograph in the rain, but sometimes great opportunities come your way during a light rain, like this one:
https://www.michaelfrye.com/2014/03/31/rainbow-weather/
Nice post, Michael.
The absolutely worst situation is shooting into the light (which I also love to do!) from the shoreline of a lake, especially in the morning/evening, which usually happens to be the best light time. Now you get two suns to deal with — the actual sun and the reflection of the sun in the water. It is possible to shield the lens and operate the camera, but one must be a bit of a gymnast!
I have one other technique for dealing with flare. I think I’ll write something up about it and share the link with you once I do.
Flare. Another reason that fog is great!
Dan
Yes, that’s a very difficult problem! I look forward to hearing about your other technique.
what an awesome tip Michael
Thanks Aps!
Beautiful images, Michael, and a great technical post. The pictures make it very clear how to get it just right.
Once or twice in the past I have used a Wimberley Plamp to hold my hat for this purpose, but the set up is fiddly and probably took longer than your method would have.
Thanks Geoff! You hit on the reason why I don’t normally use a clamp or something like that – too slow, especially when things are changing quickly. With a little practice, stepping around in front of the camera and using your hand or hat gets pretty quick, especially if the sun isn’t JUST out of the frame, and you don’t have to be as precise.
Sony Michael ? Is the Canon era over?
Well for me, yes, the Canon era has been over since last spring, when I wrote about buying the Sony A7r. We keep hearing rumors about higher-resolution Canon sensors, but just rumors so far. Meanwhile I’ve been getting great results with the Sony.
i’m sure somebody somewhere is using a selfie-stick while they shoot into the sun and not only shading their lens with their iphone but posting to facebook at the same moment…
http://www.walmart.com/ip/Minisuit-Selfie-Stick-Pro-with-Built-In-Remote-on-Handle-for-GoPro-Apple-Android-Phones/40506535
i haven’t ever stepped around the camera to watch the shadow on the lens, only peered around with my feet still behind the tripod. i can see that the distance would be helpful. typically i reach out my long arm holding my hat (what bald …spot? try dome) and bring it into view, then lift up till it just disappears.i guess my feet are still behind the tripod because i usually keep the camera strap over my neck as added insurance in case the tripod tips over (big feet), and so i don’t take the camera off and forget it’s not tethered to something. (okay, so maybe the dome isn’t just bald, but empty as well…). you know what they say: long arm, big feet=dumb photographer!
Marke,
I’m glad I’m not the only one who keeps the camera strap over his neck – I learned that the hard way.
James, as I said to Marke, that’s a good camera-safely procedure. For me, I don’t even put straps on my cameras. 🙂
No doubt Marke! Keeping the strap on is a good safety measure, but does encumber you. I don’t even have straps on my cameras.
It seems so easy how to avoid lens flares if somebody explains it the way you do. Thanks Michael.
Guess I would like the idea of a fmb-club(fog-mist-backlight-loving photographers club) …
Ha – I think that’s a great idea for a club. 🙂
Wonderful teaching point, Michael. It is my understanding that unless you are in manual exposure mode, when you make an exposure with the viewfinder eyepiece exposed to ambient light at the time of shutter release, i.e., without your face up against the eyepiece, you should either shade the eyepiece with some device (your hand, hat, etc.) or you should close the eyepiece shutter in order to prevent stray light from entering the viewfinder and altering the exposure. Your technique shown in the illustrations would seem to be relevant to this issue, but perhaps with backlighting it is not as important. Could you comment on this?
Thanks Gary. You bring up an interesting point. Since I always use manual mode, this isn’t an issue for me, but can be with any automatic exposure mode. However, it’s really only a concern if the sun is coming into the viewfinder from behind the camera, so shouldn’t be a problem with backlight.
Michael,
In addition to learning about your great technique for avoiding lens flair, I noticed the vertical battery grip and the “L” bracket on your alpha 7r. I know that both of these have been suggested as helpful to reduce the shutter vibration problem in the 7r. I was just wondering if indeed you use the vertical grip and the “L” bracket to increase the mass to reduce the effects of the shutter vibration problem, and what other techniques you use to address this problem. For instance, do you also avoid shutter speeds between 1/30 and 1/200 second? I am sure that whatever technique you use to get your fantastic shots will be more than adequate for my purposes. Thanks for sharing your tips, techniques, and passion with us!
Milton McNatt
Fredericksburg, VA
Milton, yes, my primary reason for using the vertical battery grip is to dampen the shutter shake. And I also try to avoid shutter speeds between 1/30th and 1/200th of a second, though with the battery grip the difference is barely noticeable. I talk about this and show examples in this post:
https://www.michaelfrye.com/2014/04/18/sony-a7r/
Great tip, Michael! I am definitely going to have to practice this, as I love shooting into the sun. I have used my hand and Lee filter case to try to shield for flare, but I haven’t stepped out that far.
Specs on the Canon 5DS have been leaked…will be interesting to see the official press release!
Thanks Vivienne! Hope this helps.
What a great article, Michael. How simple, I just ran into this the other day doing some shots in a rare Oregon bright sunny winter day 🙂 Thanks so much for the tips you provide.
Thanks Bill! Glad you liked this.
Great article – will put it to the test as soon as possible. Lovely photos too! One question though – will this work with wide angle lenses, as they capture a much closer sphere and trying to shade without being captured in the shot seems much harder (I’ve tried and failed!). The photos in your example all look as if they’re taken with telephoto lenses, not wide angles.
Thanks Sophie. Yes, this technique will work with wide-angle lenses, although not if the sun is really close to the edge of the frame. But wide-angles lend themselves better to the thumb technique than telephotos:
https://www.michaelfrye.com/2014/06/20/composing-itself/
Thanks Michael, I have used the finger technique and have had some okay results. Will definitely try it with longer lenses though.
Thank you for excellent advice. I agree that the lens shade not shall be thrown away. I well designed, it prevents from glare when you have strong light sources at less extreme angles.
In addition, I have a tip:
I mount my A7R and adapter (Commlite) with two screws on an Acra compatible mount. The camera/adapter is secured in two points, a very steady mount allowing me sliding the camera/lens combination to obtain best balance (or best position above my ball head that is used as a vibration damper).
It is nescessary to put a distance between the plate and adapter and a little longer screw.